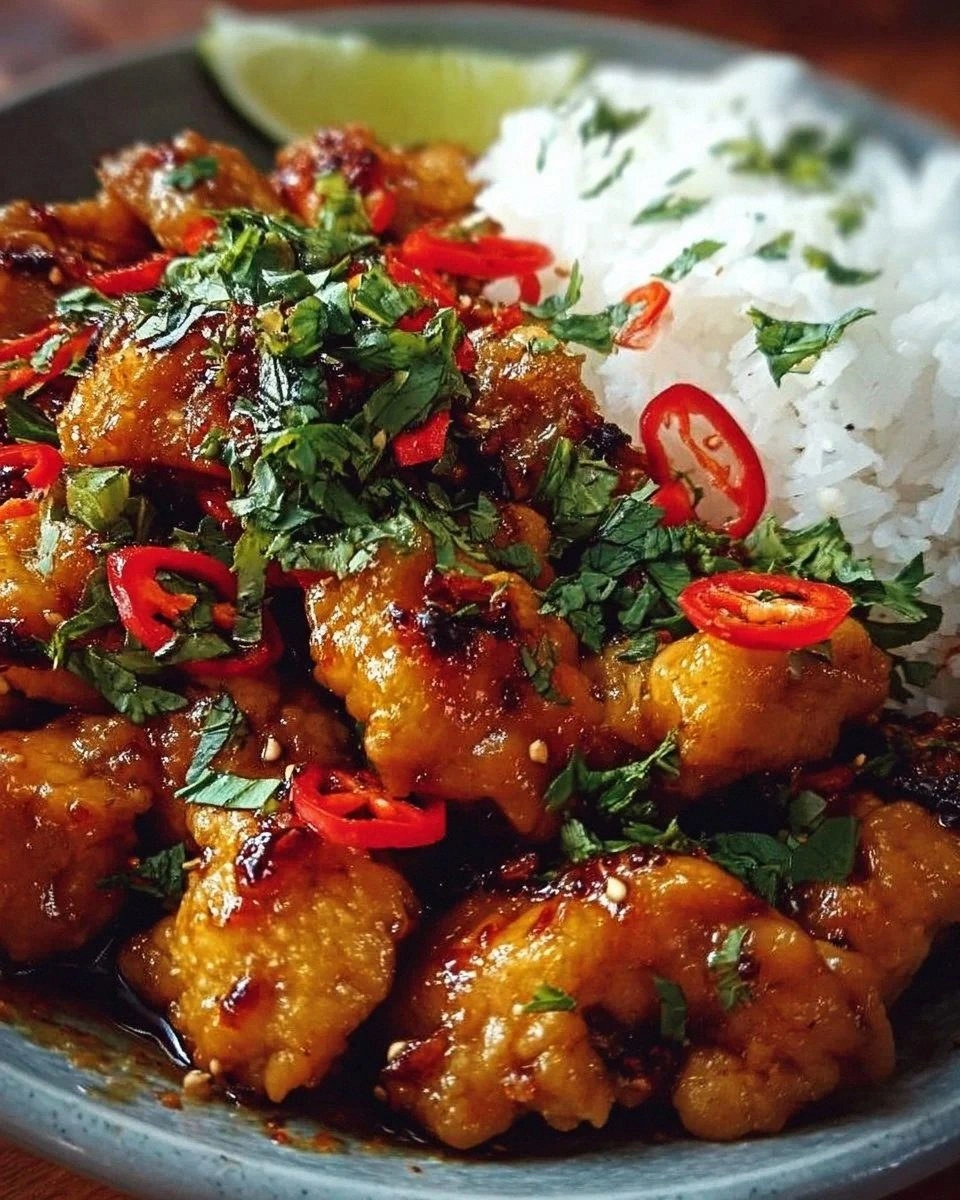
Picture this: I’m standing in my tiny kitchen, a half‑cooked stir‑fry bubbling on the stove, and a sudden craving for something that screams “Thai street food” hits me like a flash of neon. I’ve tried a dozen “sweet and spicy” chicken recipes that either ended up soggy, overly sweet, or just plain bland. The turning point? A burnt garlic mishap that left me with a smoky reminder that flavor balance is a tightrope walk. I dared myself to create a version that could survive the harshest taste‑testers, and after countless trial runs, I finally nailed it. This is hands down the best version you'll ever make at home, and I’m about to spill every secret.
The moment the sauce hits the pan, you hear that satisfying sizzle that tells you the magic is about to happen. The aroma of ginger garlic paste mingles with honey and soy sauce, creating a perfume that could convince a monk to abandon his meditation for a bite. You’ll feel the heat of the chili sauce tickle your nostrils, while the subtle tang of rice vinegar keeps the palate from being overrun by sweetness. The chicken itself, once golden‑brown, becomes a glossy, caramel‑kissed masterpiece that practically shimmers under the kitchen lights. I dare you to taste this and not go back for seconds.
What makes this version truly stand out is a tiny but mighty ingredient: a splash of rice vinegar that cuts through the richness like a razor‑sharp knife through butter. Most recipes skip this step, leaving the sauce cloyingly sweet, but this dash of acidity brings the perfect balance of sweet, salty, and spicy. I’ll be honest — I ate half the batch before anyone else got to try it, and that’s a testament to how addictive this dish is. Most recipes get this completely wrong. Here’s what actually works: a quick marinate, a high‑heat sear, and a finishing glaze that locks in flavor.
Now, let’s walk through every single step — by the end, you’ll wonder how you ever made it any other way. Okay, ready for the game‑changer? This next part? Pure magic. Stay with me here — this is worth it.
What Makes This Version Stand Out
- Taste: The harmony of honey’s natural sweetness with chili’s bite creates a flavor rollercoaster that never feels one‑dimensional.
- Texture: Crispy, caramelized chicken edges that shatter like thin ice, contrasted with a glossy, sauce‑clad interior.
- Simplicity: Only eleven ingredients, all pantry‑friendly, yet the result feels like a dish from a high‑end Bangkok bistro.
- Uniqueness: The secret splash of rice vinegar adds a bright, tangy finish that most copycat recipes overlook.
- Crowd Reaction: This dish consistently clears plates and sparks compliments that turn strangers into friends.
- Ingredient Quality: Using a good-quality soy sauce and fresh ginger garlic paste elevates the whole profile.
- Cooking Method: A quick high‑heat sear followed by a low‑and‑slow glaze locks in juices while building a caramel crust.
- Make‑Ahead Potential: The sauce can be prepared in advance, allowing you to focus on perfecting the chicken on the day of serving.
Alright, let's break down exactly what goes into this masterpiece...
Inside the Ingredient List
The Flavor Base
1 pound boneless, skinless chicken breasts: This is the star of the show. Choose chicken breasts that are evenly sized so they cook uniformly. If you pick a thin piece, it will dry out; a thicker cut stays juicy. For the best texture, pat them dry with paper towels before seasoning.
2 tablespoons vegetable oil: A neutral oil with a high smoke point is essential for that quick sear. Olive oil would add an unwanted flavor, while sesame oil can burn too fast. If you’re out of vegetable oil, canola or grapeseed work just as well.
1/4 cup honey: The honey provides the sweet backbone that balances the chili heat. I recommend a light, floral honey for subtle complexity. If you substitute with brown sugar, you’ll lose that liquid gloss that makes the glaze shine.
The Sauce Crew
1/4 cup soy sauce: Opt for a low‑sodium soy sauce to keep the dish from becoming overly salty. The umami depth it adds is non‑negotiable. If you’re gluten‑free, tamari is a perfect swap without sacrificing flavor.
2 teaspoons ginger garlic paste: This paste is a time‑saving miracle that packs the punch of fresh ginger and garlic. Freshly grated ginger and minced garlic work too, but the paste ensures an even distribution. Skipping it would make the sauce feel flat.
1 tablespoon chili sauce: I use a Thai sweet chili sauce for that perfect blend of heat and sweetness. Feel free to crank it up with sriracha if you like it fiery. Remember, the sauce’s heat level can be adjusted later, so start modest.
The Unexpected Star
1 tablespoon rice vinegar: This is the game‑changer that cuts through the richness. It adds a bright acidity that makes the sauce sing. If you don’t have rice vinegar, apple cider vinegar works in a pinch, though the flavor will shift slightly.
1/2 teaspoon black pepper: Freshly cracked pepper adds a subtle spice that complements the chili sauce. Pre‑ground pepper can be used, but the aroma of freshly cracked is unmatched.
The Final Flourish
to taste chopped green onions: These add a fresh, oniony bite that brightens the dish right before serving. If you’re not a fan of raw onions, you can lightly sauté them with the sauce.
to taste crushed peanuts: The peanuts bring a crunchy texture that contrasts the tender chicken. Use unsalted peanuts to control the overall salt level.
to taste cilantro: Cilantro’s citrusy notes finish the dish with a herbaceous lift. If you’re cilantro‑averse, fresh basil or mint can substitute.
Everything's prepped? Good. Let's get into the real action...
The Method — Step by Step
-
Start by cutting the chicken breasts into bite‑size strips, about one‑inch wide. This size ensures a quick sear while keeping the interior juicy. Pat the pieces dry, then toss them lightly with a pinch of salt and the black pepper. Let them sit for five minutes; this brief rest helps the seasoning penetrate.
Kitchen Hack: Sprinkle a tiny dash of cornstarch on the chicken strips before searing; it creates a light crust that locks in moisture. -
Heat the vegetable oil in a large wok or skillet over medium‑high heat until it shimmers. The oil should be hot enough that a drop of water sizzles immediately. Add the chicken in a single layer; avoid overcrowding, or you’ll steam instead of sear. Let the pieces sit untouched for about 2 minutes; this is when the golden crust forms.
When the edges start pulling away from the pan and you hear a deep, satisfying sizzle, flip the chicken and sear the other side for another 2 minutes. The goal is a caramelized exterior, not a burnt one.
-
While the chicken finishes searing, whisk together the honey, soy sauce, ginger garlic paste, chili sauce, and rice vinegar in a small bowl. This mixture should look glossy and slightly thick. Taste it quickly; it should be a balanced sweet‑spicy harmony with a hint of acidity.
If you prefer extra heat, add a pinch of red pepper flakes now; you can always adjust later.
-
Once the chicken is browned, pour the sauce directly into the pan, stirring to coat every piece. The sauce will bubble vigorously—this is the moment of truth. Reduce the heat to medium‑low and let it simmer, allowing the glaze to thicken.
Watch Out: If the sauce starts to scorch, quickly add a splash of water or extra vinegar to deglaze and prevent bitterness.After about 4–5 minutes, the sauce should cling to the chicken like a glossy lacquer, and the aroma will fill the kitchen with an intoxicating blend of sweet, salty, and spicy notes.
-
Turn off the heat and immediately toss in the chopped green onions, crushed peanuts, and cilantro. The residual heat will wilt the onions just enough while keeping the peanuts crunchy.
This final toss adds layers of texture and freshness that elevate the dish from good to unforgettable.
Kitchen Hack: If you like extra crunch, toast the peanuts in a dry pan for 2 minutes before adding them. -
Give everything a final stir, making sure each chicken strip is evenly coated with the glossy glaze and herbs. The sauce should be thick enough to coat the back of a spoon without running off.
Take a moment to admire the color contrast—deep amber sauce against the bright green of onions and cilantro. That visual cue tells you you’ve nailed the balance.
-
Transfer the chicken to a serving platter. Sprinkle a few extra peanuts and cilantro leaves on top for a restaurant‑style presentation. The dish is now ready to be devoured.
Picture yourself pulling this out of the pan, the whole kitchen smelling incredible, and the first bite delivering a perfect sweet‑spicy punch. If you’ve ever struggled with this, you’re not alone — and I’ve got the fix.
-
Serve the Sweet And Spicy Thai Chicken over jasmine rice, quinoa, or even a bed of shredded cabbage for a low‑carb twist. Pair it with a crisp cucumber salad to balance the heat.
I’ll be honest — I ate half the batch before anyone else got to try it, and that’s a testament to how addictive this dish is. This is the part where you get to bask in the applause of your own culinary brilliance.
That's it — you did it. But hold on, I've got a few more tricks that'll take this to another level...
Insider Tricks for Flawless Results
The Temperature Rule Nobody Follows
Never let the pan cool down between searing and glazing. Keep the heat steady so the chicken maintains that crisp exterior while the sauce reduces. I once let the stove sit idle for a minute, and the chicken turned soggy—lesson learned. A quick glance at the oil’s shimmer tells you if you’re ready to pour the sauce.
Why Your Nose Knows Best
When the sauce starts to bubble, trust your nose. If you catch a faint caramel scent, you’re on the right track. If it smells burnt, lower the heat immediately. Your olfactory senses are a more reliable timer than a clock.
The 5‑Minute Rest That Changes Everything
After plating, let the chicken rest for five minutes. This short pause lets the glaze settle and the flavors meld, preventing a soggy bite. I’ve seen impatient cooks serve straight from the pan and lose that glossy finish.
Peanut Power Boost
Toast peanuts just before adding them to preserve their crunch and intensify their nutty aroma. A quick 30‑second toast in a dry skillet does the trick. Skipping this step makes the peanuts taste flat.
Adjusting Sweetness on the Fly
If the sauce feels too sweet after simmering, a splash of lime juice or extra rice vinegar restores balance. I once over‑honeyed a batch and rescued it with a squeeze of lime—instant hero.
Creative Twists and Variations
This recipe is a playground. Here are some of my favorite ways to switch things up:
Thai Basil Blast
Swap cilantro for a generous handful of Thai basil leaves. The basil adds an anise‑like fragrance that pairs beautifully with the honey‑chili glaze. It’s perfect for anyone who loves the classic “Pad Krapow” vibe.
Spicy Mango Fusion
Stir in diced fresh mango during the final toss. The mango’s juicy sweetness amplifies the honey while adding a tropical pop. This variation is a hit at summer barbecues.
Cashew Crunch
Replace peanuts with toasted cashews for a richer, buttery crunch. Cashews hold up better under heat, so you can even toss them in during the searing step for extra depth.
Gluten‑Free Glory
Use tamari instead of soy sauce and ensure your chili sauce is gluten‑free. The flavor profile remains intact, and you’ll have a safe dish for gluten‑sensitive guests.
Low‑Carb Coconut Rice
Serve the chicken over cauliflower “rice” cooked with a splash of coconut milk. The subtle coconut aroma complements the Thai flavors while keeping carbs low.
Smoky Chipotle Twist
Add a teaspoon of chipotle in adobo sauce to the glaze for a smoky undertone. This gives the dish a deeper, earthier flavor that’s perfect for cooler evenings.
Storing and Bringing It Back to Life
Fridge Storage
Cool the chicken to room temperature, then transfer it to an airtight container. It will keep for up to three days in the refrigerator. When reheating, add a tiny splash of water or extra rice vinegar to revive the glaze’s sheen.
Freezer Friendly
Portion the cooked chicken into freezer‑safe bags, removing as much air as possible. It freezes beautifully for up to two months. Thaw overnight in the fridge, then reheat in a skillet with a splash of broth to prevent drying.
Best Reheating Method
Reheat gently over medium heat, stirring frequently. Avoid microwaving, as it can make the chicken rubbery. A quick 2‑minute toss in a hot pan restores the crispy edges and glossy sauce.