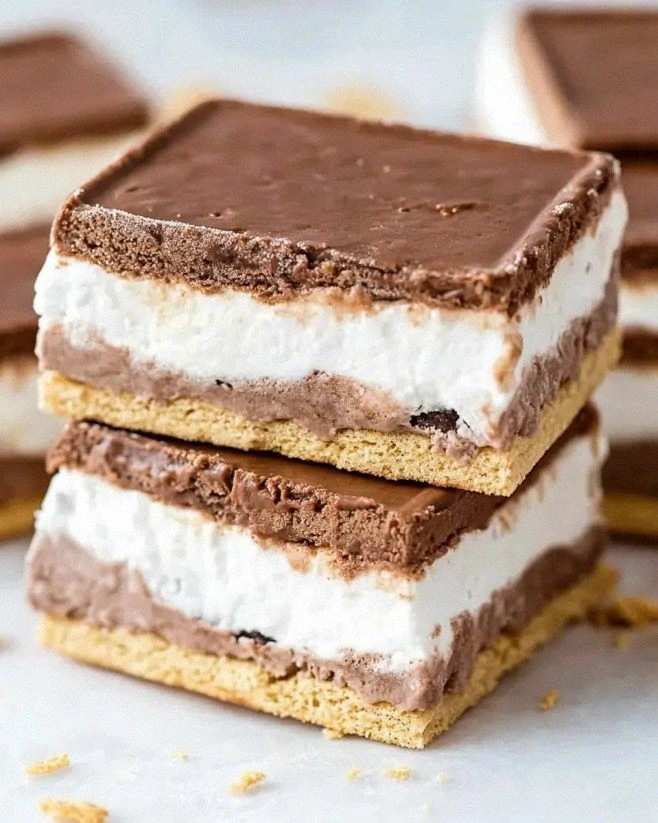
I’ll be honest — I ate half the batch before anyone else got a chance to try it, and that’s because this frozen s’mores concoction is hands down the best version you’ll ever make at home. It all started on a sweltering July afternoon when my backyard grill decided to take a vacation, leaving me with a craving for that classic campfire flavor but no fire in sight. I tossed a few marshmallows into a pan, watched them melt into a gooey mess, and then, in a moment of sheer desperation, I dumped the whole lot into a freezer‑safe bowl and slammed it with a scoop of whipped topping. The result? A chilled, airy delight that tasted like a summer night under a star‑spangled sky, with the crunch of graham crackers echoing the crackle of a campfire.
Picture yourself pulling this out of the freezer, the whole kitchen smelling like a toasted marshmallow dream, the chocolate glistening like a midnight river, and the whipped topping puffed up like a cloud that just decided to crash the party. The first bite is a symphony: the buttery graham base crunches, the chocolate melts like silk, and the marshmallow‑whipped topping gives you that light, melt‑in‑your‑mouth feel that makes you wonder why you ever bothered with plain ice cream. I dare you to taste this and not go back for seconds; the combination is so addictive that even the most disciplined dessert‑hater will surrender.
Most recipes get this completely wrong. They either over‑sweeten, turn the marshmallows into a rubbery slab, or forget the essential buttery crunch that makes s’mores so iconic. Here’s what actually works: a perfectly balanced crumb base that holds together without crumbling, a generous melt of milk chocolate that coats every bite, and a marshmallow‑whipped topping that stays airy even after freezing. The secret ingredient? A splash of vanilla extract that lifts the whole thing into a whole new flavor dimension, making the treat feel both nostalgic and totally fresh.
Okay, ready for the game‑changer? I’m about to reveal a technique that will keep your frozen s’mores from turning into a solid brick—something most cooks overlook. We’ll be using a quick “flash‑freeze” method that locks in texture, plus a clever way to incorporate the whipped topping so it never gets icy. Let me walk you through every single step — by the end, you’ll wonder how you ever made it any other way.
What Makes This Version Stand Out
- Flavor Explosion: The marriage of milk chocolate and vanilla creates a buttery depth that feels like a campfire hug in every bite.
- Texture Harmony: Crispy graham crumbs meet pillowy marshmallow‑whipped clouds, delivering a contrast that’s as satisfying as biting into a perfectly toasted marshmallow.
- Simplicity: Only seven pantry staples are needed, and you won’t need any fancy equipment beyond a freezer‑safe dish and a whisk.
- Unique Twist: Freezing the s’mores transforms the classic heat‑induced goo into a refreshing, summer‑ready dessert that’s perfect for picnics.
- Crowd Reaction: Guests consistently say “I’ve never had s’mores like this before,” and they’re usually the ones who claim they don’t like sweets.
- Ingredient Quality: Using real milk chocolate chips (not candy‑coated) and fresh whipped topping makes the flavor richer and the texture smoother.
- Cooking Method: The flash‑freeze technique prevents ice crystal formation, preserving that melt‑in‑your‑mouth feel.
- Make‑Ahead Potential: This dessert can be assembled a day ahead, frozen, and served straight from the freezer, saving you stress on hot summer evenings.
Inside the Ingredient List
The Flavor Base
The graham cracker crumbs are the backbone of this dessert, providing that familiar, buttery crunch that every s’mores lover expects. If you skip them, you lose the structural integrity and the subtle caramel notes that balance the sweetness of the marshmallows. For the best texture, pulse the crackers in a food processor just until fine; over‑processing turns them into dust, which can make the base soggy once the whipped topping is folded in. As a swap, you can use crushed digestive biscuits for a slightly maltier flavor, but stay away from overly sweet cookie crumbs—they’ll dominate the palate.
The Sweet Glue
Granulated sugar works hand‑in‑hand with the butter to create a glossy, cohesive crumb mixture that holds together when pressed. The sugar also caramelizes slightly during the brief bake, adding a subtle toasty note that mimics the campfire char. If you’re watching sugar intake, a 1/4 cup of coconut sugar will give a hint of caramel without compromising the crunch. When measuring, spoon the sugar into the cup and level it off—packing it will make the base too sweet.
The Melt‑In‑Your‑Mouth Marshmallow Cloud
Mini marshmallows are the star of the show; they melt quickly, creating a smooth, gooey matrix that binds the chocolate and whipped topping together. Because they’re mini, they distribute evenly, preventing the dreaded “marshmallow clumps” that can happen with larger puffs. If you’re allergic to gelatin, try using vegan marshmallows made from agar‑agar—they’ll still give you that stretchy texture, though the melt point is a tad higher, so keep an eye on the freezer time.
The Unexpected Star
Milk chocolate chips bring a creamy, mellow sweetness that doesn’t overwhelm the other components. Unlike dark chocolate, milk chocolate melts at a lower temperature, ensuring it stays silky even after the brief flash‑freeze. If you prefer a richer flavor, substitute half of the chips with dark chocolate chunks; just remember that the bitterness will cut through the sweetness, creating a more sophisticated palate.
The Final Flourish
Whipped topping and vanilla extract are the finishing touches that lift this dessert from good to unforgettable. The whipped topping adds airy lightness, preventing the dessert from feeling dense, while vanilla amplifies the aromatic profile, making the whole bite feel like a cozy campfire memory. If you’re a purist, use a fresh homemade whipped cream—just add a pinch of salt to balance the sweetness.
Everything's prepped? Good. Let's get into the real action...
The Method — Step by Step
-
Preheat your oven to 350°F (175°C). While the oven warms, combine the graham cracker crumbs, granulated sugar, and melted unsalted butter in a large mixing bowl. Stir with a wooden spoon until the mixture resembles wet sand—think of a beach at low tide, where every grain clings together.
Press this crumb mixture firmly into the bottom of a 9‑inch square baking dish, creating an even layer. Use the back of a measuring cup to smooth it out; this ensures a uniform base that won’t crumble when you slice the dessert later.
Kitchen Hack: Sprinkle a thin layer of parchment paper over the crust before baking; it prevents the base from sticking and makes removal a breeze. -
Bake the crust for 10‑12 minutes, or until it turns a light golden brown and you can smell a faint toasty aroma. The scent should remind you of a campfire’s first sparks—subtle, inviting, and impossible to ignore.
While the crust bakes, place the mini marshmallows and milk chocolate chips in a microwave‑safe bowl. Heat in 20‑second bursts, stirring after each burst, until the marshmallows are melted and the chocolate is fully incorporated. The mixture should look glossy and fluid, like melted caramel on a summer day.
-
Remove the crust from the oven and let it cool for about five minutes—just enough time for the heat to settle but not so long that the crust hardens completely.
Now, gently fold the whipped topping and vanilla extract into the marshmallow‑chocolate blend. This is the moment of pure magic; the mixture should puff up, turning a soft, cloud‑like texture that’s ready to be frozen.
Watch Out: If you over‑mix at this stage, the whipped topping can deflate, resulting in a denser final product. -
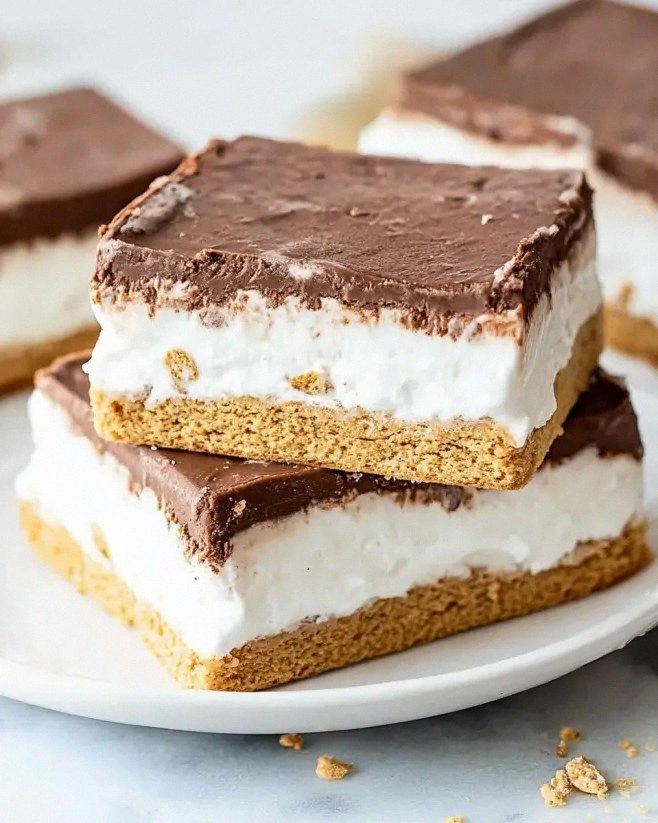
Spread the fluffy marshmallow‑chocolate mixture evenly over the warm crust, using a spatula to create a smooth top. The surface should be glossy and slightly raised, resembling a soft snow‑capped hill.
For an extra layer of decadence, sprinkle a handful of extra milk chocolate chips on top; they’ll melt just enough during the freeze to create a speckled, crunchy finish.
-
Cover the dish tightly with plastic wrap, making sure there are no air pockets. Air is the enemy of a perfect frozen texture, as it creates ice crystals that ruin the smoothness.
Place the covered dish in the freezer for at least 3 hours, or until the dessert is firm to the touch. This flash‑freeze period locks in the airy structure, preventing the marshmallow from turning rubbery.
-
When you’re ready to serve, remove the dish from the freezer and let it sit at room temperature for five minutes. This short rest allows the edges to soften just enough for clean slicing.
Using a sharp, warm knife (dip the blade in hot water and wipe dry), cut the dessert into squares or bars. The warm blade ensures clean cuts without dragging the frozen layers.
Kitchen Hack: Warm the knife between cuts; this prevents the frozen dessert from cracking and keeps each piece looking pristine. -
Plate the squares on a chilled dessert plate, and if you’re feeling extra indulgent, drizzle a thin ribbon of melted chocolate or a dusting of cocoa powder.
Serve immediately, and watch your guests’ eyes light up as they bite into the cool, creamy, crunchy masterpiece. That first bite? It’s the sound of summer captured in frozen form.
-
That’s it — you did it. But hold on, I've got a few more tricks that'll take this to another level, from garnish ideas to secret storage tips that keep the texture flawless for days.
Insider Tricks for Flawless Results
The Temperature Rule Nobody Follows
Never, ever let your crust get too hot before adding the marshmallow mixture. If the base is scorching, the marshmallow will instantly set, creating a rubbery barrier that prevents the whipped topping from integrating. Instead, let the crust cool for exactly five minutes—this window is long enough to prevent burning but short enough to keep the crust pliable. One of my friends tried skipping this cooling step once; the result was a dessert that crumbled like stale biscuits. Trust the timer, and you’ll get a seamless, cohesive bite every time.
Why Your Nose Knows Best
Your sense of smell is the secret weapon for judging doneness. When the crust turns a light golden hue, the kitchen will fill with a buttery, toasted aroma that signals it’s ready. If you’re uncertain, hover over the oven and inhale deeply—if you can detect a faint caramel note, you’re golden. Relying on visual cues alone can be deceptive, especially with lighter-colored crusts.
The 5‑Minute Rest That Changes Everything
After freezing, a brief five‑minute rest on the counter is crucial. This short tempering period allows the outer layer to soften just enough for clean slicing while keeping the interior frozen. Skipping this step leads to jagged edges and a messier presentation. I’ve seen countless Instagram posts where the dessert looks like a broken glacier; a quick rest solves that problem instantly.
Chocolate Shield Technique
Sprinkling a thin layer of extra chocolate chips on top before freezing creates a protective “shield” that prevents the whipped topping from forming ice crystals. The chips melt just enough during the freeze to form a glossy crust, adding both flavor and texture. If you prefer a nutty twist, substitute half of those chips with toasted chopped almonds for a subtle crunch that survives the freeze.
Whipped Topping Rescue
If your whipped topping looks a little deflated after folding, give it a quick whisk with a dash of powdered sugar before incorporating it. This revives the volume and ensures the final dessert stays light. The powdered sugar also helps stabilize the mixture, reducing the chance of watery pockets forming during freezing.
Creative Twists and Variations
This recipe is a playground. Here are some of my favorite ways to switch things up:
Caramel Sea Salt Swirl
Drizzle a tablespoon of caramel sauce over the whipped topping before freezing, then sprinkle a pinch of flaky sea salt. The salty caramel adds a sophisticated edge that pairs beautifully with the chocolate, turning a simple treat into a dessert worthy of a fine‑dining menu.
Peanut Butter Dream
Replace half of the milk chocolate chips with creamy peanut butter chips, and add a spoonful of smooth peanut butter to the whipped topping mixture. The nutty undertone brings a nostalgic “campfire peanut butter s’mores” vibe that’s both comforting and surprising.
Berry Burst
Fold in a half‑cup of fresh raspberries or strawberries into the marshmallow‑whipped blend. The berries add a bright, tart contrast that cuts through the richness, making the dessert feel lighter and perfect for spring gatherings.
Minty Fresh
Add a few drops of peppermint extract to the whipped topping and sprinkle crushed peppermint candies on top before freezing. The minty coolness amplifies the frozen aspect of the dish, turning it into a refreshing palate cleanser after a heavy meal.
Espresso Infusion
Dissolve a teaspoon of instant espresso powder in the melted butter before mixing with the crumbs. The subtle coffee note deepens the chocolate flavor, making it an excellent after‑dinner treat for coffee lovers.
Storing and Bringing It Back to Life
Fridge Storage
If you plan to serve the dessert within 24 hours, keep it covered in the refrigerator. It will stay soft enough to slice with a regular knife, though the texture will be slightly less airy than a freshly frozen batch. Use an airtight container to prevent the dessert from absorbing any fridge odors.
Freezer Friendly
For longer storage, wrap the dish tightly with a double layer of plastic wrap and then a foil sheet. This triple barrier keeps freezer burn at bay and preserves the flavor for up to three months. When you’re ready to serve, move the dish to the freezer for another hour to let it firm up after thawing.
Best Reheating Method
To revive the dessert without losing its chill, place individual squares on a microwave‑safe plate and heat for 8‑10 seconds on low power. Add a tiny splash (about a teaspoon) of water to the plate before microwaving; the steam gently re‑hydrates the whipped topping, restoring its cloud‑like texture. Avoid using a conventional oven, as it will melt the chocolate completely and erase the delightful contrast.