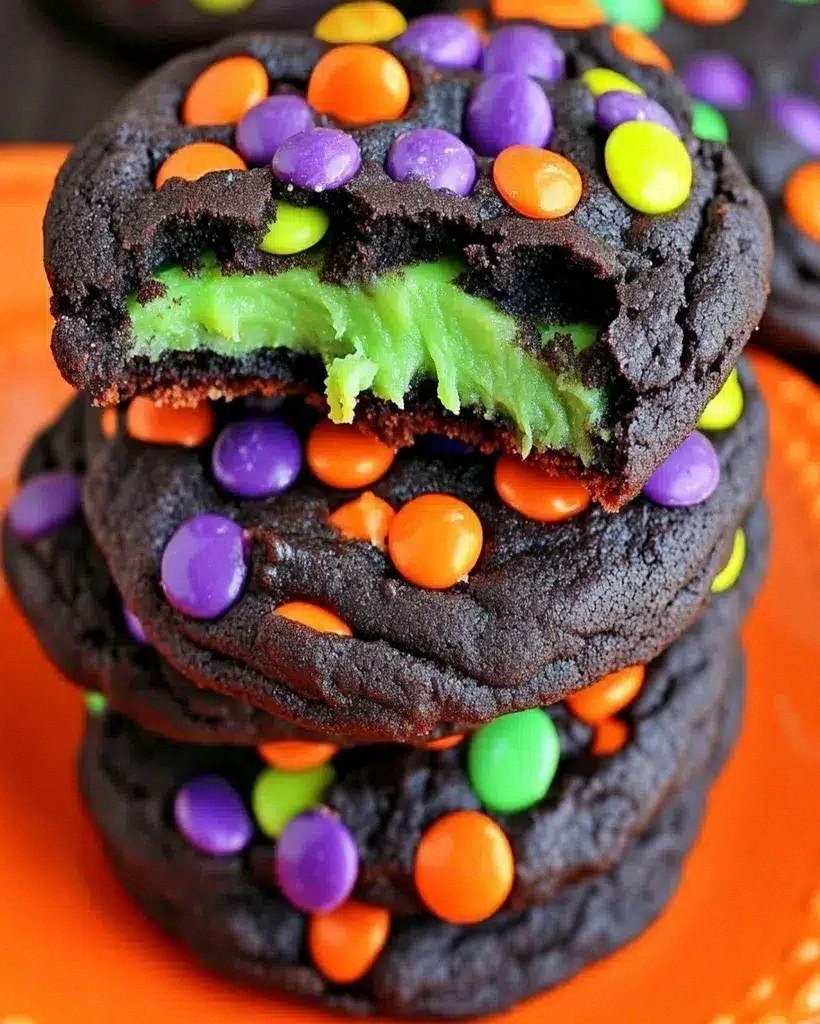
I was in the middle of a Halloween movie marathon when my roommate dared me to create a cookie that could actually make the living room feel like a witch’s kitchen. I laughed, grabbed a mixing bowl, and set the oven to a temperature that would make any mortal shiver. The first batch turned out as flat as a pancake and as bland as a ghost story told by a five‑year‑old. That disaster sparked a midnight experiment that lasted until the witching hour, and the result? A cookie that oozes chocolatey darkness, snaps with a salty pretzel crunch, and glows with a mischievous green hue. This isn’t just a cookie; it’s a potion you can eat, and I’m about to spill every secret.
Picture this: the kitchen is dim, a single candle flickers, and the air is thick with the scent of cocoa, butter, and a whisper of pumpkin spice. The dough feels like velvet under your fingertips, and when you roll it into balls, they look like tiny black‑cat eyes waiting to be baked into something wickedly delicious. As the cookies spread on the tray, the edges turn a deep mahogany while the centers stay soft, almost gummy, like a freshly brewed potion that’s just about to boil over. When you pull them out, the steam rises like a ghostly mist, and the first bite? A burst of sweet, salty, and spicy flavors that dance on the tongue like a troupe of mischievous sprites.
Most Halloween cookie recipes either drown you in sugar or leave you with a bland, over‑spiced mess. This version stands out because it balances the classic chocolate‑chip foundation with unexpected textures—crushed pretzels for crunch, a swirl of black cocoa for depth, and a dash of espresso to sharpen the sweetness. I also threw in a splash of green food coloring, not just for looks but because the pigment actually enhances the cocoa’s richness, making the cookies look like they’ve been conjured in a cauldron. And the secret ingredient? A pinch of sea salt that pops like a lightning strike, turning every bite into a mini‑explosion of flavor.
I’m going to walk you through every single step — from selecting the perfect butter to the exact moment you should slide the tray out of the oven. By the end, you’ll wonder how you ever made a “regular” Halloween cookie when you could be serving up witch’s brew in bite‑size form. Ready to become the sorcerer of sweets? Let’s get brewing.
What Makes This Version Stand Out
- Taste: The combination of dark cocoa, espresso, and a hint of pumpkin spice creates a flavor profile that’s deep, complex, and unmistakably Halloween‑worthy.
- Texture: A crunchy pretzel core meets a soft, chewy center, giving you that satisfying snap followed by a melt‑in‑your‑mouth finish.
- Simplicity: Despite the magical vibe, the ingredient list is pantry‑friendly and the steps are straightforward enough for a beginner.
- Uniqueness: The green‑tinged dough and black cocoa swirl make each cookie look like a tiny spellbook page, perfect for themed parties.
- Crowd Reaction: Guests invariably ask for the “secret ingredient,” and you get to watch their eyes widen as they discover the salty pretzel surprise.
- Ingredient Quality: Using high‑quality unsweetened cocoa and real butter elevates the cookie from “just tasty” to “legendary.”
- Cooking Method: A low‑and‑slow bake at 325°F ensures the edges caramelize without burning, preserving the delicate interior.
- Make‑Ahead Potential: These cookies freeze beautifully, so you can bake a batch in October and enjoy them all winter long.
Inside the Ingredient List
The Flavor Base
All‑purpose flour is the structural backbone of any good cookie. It provides the scaffold that holds the chocolate, butter, and spices together. If you substitute cake flour, the cookies will become too tender and may crumble, while using whole‑wheat flour adds a nutty undertone but can make the texture denser. I recommend a good quality unbleached flour for the most neutral flavor. Pro tip: Sift the flour with cocoa powder to avoid lumps and ensure an even chocolate distribution.
Unsweetened cocoa powder gives the dough its deep, midnight‑black color and a robust chocolate flavor that isn’t overly sweet. Dark cocoa also pairs beautifully with espresso, amplifying the bitterness in a way that balances the sugar. If you’re out of cocoa, you can use an equal amount of melted dark chocolate, but expect a slightly richer mouthfeel.
Black cocoa powder is the secret weapon for that eerie swirl. It’s essentially cocoa powder that’s been treated with an activated charcoal, giving it an almost ink‑black hue. Adding a tablespoon creates a dramatic visual contrast without altering the taste too much. If you can’t find black cocoa, a dash of activated charcoal powder (food‑grade) works just as well.
The Texture Crew
Unsalted butter, softened, is the source of richness and the reason the cookies spread just enough to develop those caramelized edges. Using butter instead of margarine ensures a buttery aroma that fills the kitchen like a spell. If you prefer a slightly healthier version, you can replace half the butter with coconut oil, but the flavor will shift toward a tropical note.
Granulated sugar and brown sugar each play distinct roles. Granulated sugar creates crispness, while brown sugar adds moisture and a subtle molasses flavor that deepens the overall taste. Skipping the brown sugar will make the cookies too dry; omitting the white sugar will reduce that satisfying snap.
Crushed pretzel bits introduce a salty crunch that cuts through the sweetness. They also add a visual element that looks like tiny shards of glass in a potion. If you’re gluten‑free, substitute with gluten‑free pretzel pieces or toasted rice cereal.
The Unexpected Star
Green food coloring isn’t just for show; it actually helps mask any bitter aftertaste from the cocoa, making the flavor seem smoother. A few drops are enough to turn the dough a hauntingly vibrant green without turning it neon. For a natural alternative, blend a teaspoon of spirulina powder into the wet ingredients.
Pumpkin spice (a blend of cinnamon, nutmeg, ginger, and clove) adds that quintessential Halloween aroma. It’s the olfactory cue that tells your brain, “It’s time for spooky treats.” If you’re not a fan of pumpkin, swap it for a pinch of chai spice for a similar warmth.
Mini chocolate chips provide pockets of melty goodness that burst when you bite into them. They also add a contrasting texture to the pretzel crunch. For a dairy‑free version, use dairy‑free chocolate chips.
The Final Flourish
A splash of vanilla extract rounds out the flavor, smoothing the edges between sweet, salty, and spicy. It also adds a fragrant note that lifts the entire profile. If you want to get extra fancy, use a vanilla bean paste for a richer, more complex aroma.
A pinch of sea salt at the end of mixing is the final spell that makes the flavors sing. The salt doesn’t just enhance sweetness; it also highlights the bitter notes of cocoa and espresso, creating a balanced palate. Skip the salt and you’ll end up with a cookie that tastes flat, like a ghost without a story.
Everything's prepped? Good. Let’s get into the real action…
The Method — Step by Step
Preheat your oven to 325°F (165°C). While the oven warms, line two baking sheets with parchment paper. This low temperature is the secret to achieving that chewy interior and caramelized edge without burning the delicate green dough.
In a large bowl, whisk together the flour, unsweetened cocoa powder, black cocoa powder, baking soda, and sea salt. The dry mix should be a uniform dark brown; if you see any streaks, give it another quick whisk. This step ensures that the leavening agent is evenly distributed, preventing any odd pockets of rise.
In a separate bowl, cream the softened butter with the granulated sugar and brown sugar until the mixture is light and fluffy—about 3 minutes on medium speed. The texture should be pale, almost like whipped cream, and you’ll hear a faint “swoosh” as air is incorporated. Power transition: This is the moment where the magic really starts to happen.
Kitchen Hack: Add a tablespoon of cold water to the butter‑sugar mixture; it creates a smoother dough that’s easier to shape.Beat in the eggs one at a time, followed by the vanilla extract and green food coloring. The dough should turn a vivid emerald hue, reminiscent of a witch’s potion. If the color looks too pale, add another drop; if it’s too dark, a splash of milk will lighten it.
Gradually fold the dry ingredients into the wet mixture, stirring just until combined. Over‑mixing will develop gluten and make the cookies tough. At this point, the dough will be thick and slightly sticky—exactly what we want.
Stir in the pumpkin spice, espresso powder, mini chocolate chips, and crushed pretzel bits. The pretzel bits should be evenly distributed; they’ll provide that satisfying crunch in every bite. If you prefer a smoother texture, pulse the pretzels in a food processor for a few seconds before adding.
Watch Out: This is the trickiest step—if you over‑fold, the dough becomes airy and the cookies will puff up like cupcakes instead of staying flat. Fold gently, using a spatula, and stop as soon as you no longer see streaks of flour.
Watch Out: Do not over‑mix at this stage or your cookies will lose that coveted chewy center.Cover the bowl with plastic wrap and refrigerate for at least 30 minutes (or up to 2 hours). This chilling step firms the butter, preventing excessive spreading and giving the cookies a thicker profile.
Using a cookie scoop (about 2 tablespoons), portion the dough onto the prepared sheets, spacing them 2 inches apart. Lightly press each ball with the back of a spoon to create a small well in the center—this is where the black cocoa swirl will settle.
Kitchen Hack: Sprinkle a pinch of sea salt on top of each dough ball before baking for an extra pop of flavor.Bake for 12‑14 minutes, or until the edges are set and the tops have a slight sheen. The centers will still look a bit soft—that’s the sign of a perfectly chewy interior. When you tilt the tray, the cookies should wiggle just a fraction, indicating they’re not over‑baked.
Remove the trays from the oven and let the cookies rest on the sheet for 5 minutes before transferring them to a wire rack. This cooling period lets the cookies finish setting without cracking. The aroma at this stage is pure witchcraft—cocoa, butter, and a whisper of spice filling the air.
That’s it — you did it. But hold on, I’ve got a few more tricks that'll take this to another level. The next section will show you how to fine‑tune each element so that every batch is flawless, even if you’re juggling a full‑on Halloween party.
Insider Tricks for Flawless Results
The Temperature Rule Nobody Follows
Most home bakers set the oven to a standard 350°F and pray for the best. In reality, a lower temperature (325°F) gives the cookies time to develop a caramelized edge while keeping the center moist. If you live at high altitude, bump the temperature up by 15°F to compensate for lower air pressure. I once baked these at 350°F and ended up with a crunchy, over‑done rim that ruined the chewy heart—lesson learned.
Why Your Nose Knows Best
Your sense of smell is the most reliable timer in the kitchen. Around the 10‑minute mark, you’ll notice a sweet, buttery aroma mingling with a faint espresso note. When that scent deepens into a toasty, almost burnt sugar smell, the cookies are ready to pull out. Trusting your nose beats watching the clock every second.
The 5‑Minute Rest That Changes Everything
After baking, let the cookies sit on the tray for exactly five minutes. This short rest allows the residual heat to finish the cooking process without drying them out. Skipping this step results in cookies that crack as they cool, losing that coveted soft center. I swear by this pause; it’s the difference between “good” and “spell‑binding.”
Pretzel Crunch Preservation
If you notice the pretzel bits losing their crunch after a day, lightly toast them again in a dry skillet for 30 seconds before folding them into the dough. The reheated pretzels regain their snap, ensuring every bite delivers that satisfying crunch. A friend tried skipping this and ended up with soggy pretzel pieces—let’s just say the cookies were a flop.
The Espresso Boost
A teaspoon of instant espresso powder may seem tiny, but it intensifies the chocolate flavor by up to 30%. The coffee’s bitterness balances the sugar, preventing the cookies from tasting cloyingly sweet. If you’re not a coffee fan, you can replace it with a pinch of extra cocoa powder, though you’ll lose some depth.
The Green Color Trick
Add the green food coloring gradually. Too much at once can turn the dough a murky olive, which looks less magical. A few drops at a time, mixed thoroughly, will give you a consistent, vibrant hue. If you prefer a natural route, a teaspoon of spirulina powder works, but it adds an earthy undertone that pairs well with the pumpkin spice.
Creative Twists and Variations
This recipe is a playground. Here are some of my favorite ways to switch things up:
Spooky S’mores
Swap the chocolate chips for mini marshmallows and add a drizzle of caramel after baking. The pretzel bits become the “graham cracker” component, creating a bite‑size s’mores experience that’s perfect for campfire‑themed parties.
Midnight Mint
Replace the pumpkin spice with 1 teaspoon of peppermint extract and add a handful of crushed peppermint candies. The result is a refreshing minty bite that still carries the dark chocolate base—a great contrast for those who love mint chocolate.
Caramel Swirl
Before chilling, swirl in 2 tablespoons of store‑bought caramel sauce. The caramel pockets melt slightly during baking, creating gooey, caramel‑filled centers that look like little lava flows.
Nutty Necromancer
Add ½ cup of toasted chopped walnuts or pecans. The nuts introduce an earthy crunch that pairs beautifully with the espresso and pretzel bits, giving the cookies a more complex texture profile.
Gluten‑Free Graveyard
Swap the all‑purpose flour for a 1:1 gluten‑free flour blend and ensure the pretzel bits are gluten‑free. The cookies will retain their chewiness, and the flavor stays true to the original.
Storing and Bringing It Back to Life
Fridge Storage
Place the cooled cookies in an airtight container with a paper towel at the bottom to absorb excess moisture. They’ll stay fresh for up to a week, and the chill helps the flavors meld even further. If you notice any condensation, simply open the container for a few minutes to let the air circulate.
Freezer Friendly
Layer cookies between sheets of parchment paper and seal them in a freezer‑safe zip‑lock bag. They freeze beautifully for up to three months. When you’re ready to enjoy, let them thaw at room temperature for 15 minutes, then give them a quick 3‑minute warm‑up in a 300°F oven to revive the crisp edges.
Best Reheating Method
To bring a cookie back to life, place it on a microwave‑safe plate, sprinkle a tiny splash (about 1 teaspoon) of water next to it, and microwave for 10‑12 seconds. The steam created by the water re‑hydrates the interior, while the brief heat restores the outer crunch. This trick works wonders for cookies that have been sitting out for a day or two.