I still remember the night I almost burned down the kitchen trying to recreate my favorite sushi roll from a Tokyo ramen spot. The rice was too sticky, the tuna was too dry, and the whole thing looked like a soggy, unappetizing mess. That disaster became the catalyst for a culinary epiphany: what if I could combine the comforting heat of a baked dish with the fresh, clean flavors of sushi, all in one pan? This is the moment that birthed the Tuna Sushi Bake, a dish that turns a simple oven into a flavor factory.
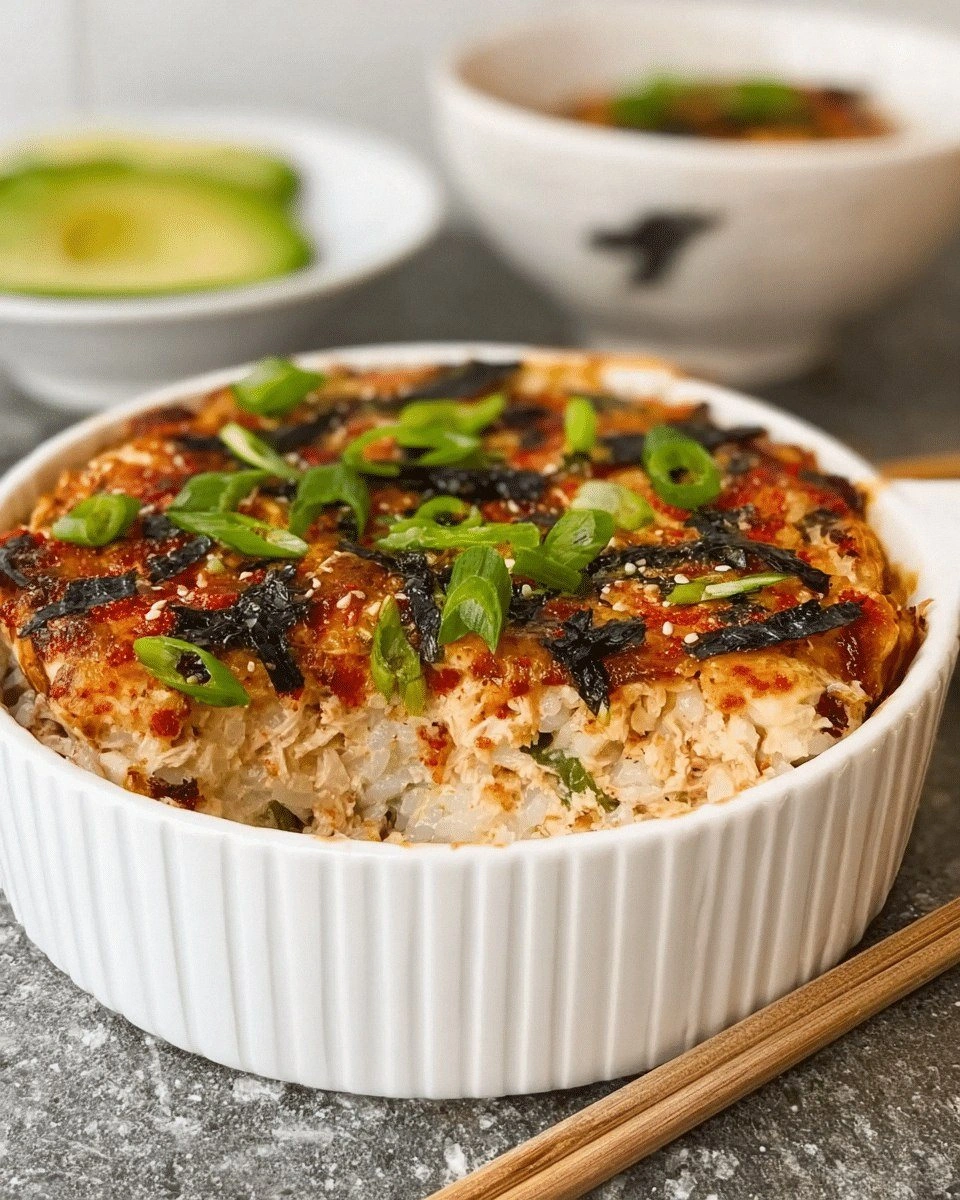
Picture this: the oven door opens to reveal a golden crust that crackles like fresh toast, the aroma of sesame oil and soy sauce mingles with the faint, sweet tang of rice vinegar, and the sight of bright green scallions and avocado slices punctuates the visual feast. When you take a bite, the first thing that hits you is the creamy, slightly spicy tuna mixture, followed by the chewy, slightly al dente rice, and finally the crispy nori strips that add a satisfying crunch. The sound of the first forkful is a satisfying clink against the ceramic dish, while the texture is a harmonious blend of soft, crunchy, and buttery. The flavors dance on your tongue, from the umami depth of the tuna to the bright zing of the vinegar, and the subtle heat from the sriracha lingers just enough to keep you reaching for more. If you close your eyes, you can almost taste the sea breeze that once carried the sushi across the Pacific.
What makes this version stand out is not just the combination of ingredients but the meticulous layering of flavors and textures that elevate an ordinary bake into a sushi masterpiece. I dare you to taste this and not go back for seconds. The result is hands down the best version you'll ever make at home, with a crispy edge that shatters like thin ice and a creamy center that melts in your mouth. Most recipes get this completely wrong by overcooking the rice or underseasoning the tuna; here, the balance is spot on. And if you've ever struggled with sushi rice, you're not alone — and I've got the fix. Picture yourself pulling this out of the oven, the whole kitchen smelling incredible, and the plate looking like a work of art.
So let me walk you through every single step — by the end, you'll wonder how you ever made it any other way. From the first stir to the final garnish, every action is designed to bring out the best in each component. The method is simple yet precise, and the result is a dish that feels like a celebration in every bite. Stay with me here — this is worth it. The Tuna Sushi Bake is more than just a recipe; it's an experience that will become a staple in your culinary repertoire.
What Makes This Version Stand Out
- Flavor Fusion: The marriage of savory tuna, sweet soy, and spicy sriracha creates a complex profile that feels both familiar and adventurous. Each bite offers a new layer of taste that keeps you intrigued.
- Crispy Texture: The nori strips toast to a golden crisp, providing a delightful contrast to the soft rice and creamy tuna mixture. The crunch is a satisfying counterpoint that elevates every mouthful.
- Heat Management: Baking at a controlled temperature keeps the tuna moist while allowing the rice to firm up without becoming mushy. The result is a perfect bite every time.
- Ingredient Quality: Using fresh, sashimi-grade tuna guarantees a silky texture and pure fish flavor that outshines canned alternatives. The difference is palpable.
- Time Efficiency: The entire dish comes together in under an hour, making it ideal for weeknight dinners without sacrificing flavor or presentation.
- Make‑Ahead Potential: The bake can be prepared ahead of time, refrigerated, and reheated with minimal loss of texture or taste. It’s a real crowd‑pleaser for gatherings.
- Visual Appeal: The vibrant colors of avocado, cucumber, and scallions against the golden rice create a plate that looks as good as it tastes. It’s Instagram‑ready and dinner‑party ready.
- Customization: The base recipe is flexible enough to accommodate dietary preferences, such as gluten‑free soy sauce or a dairy‑free mayo alternative.
Alright, let's break down exactly what goes into this masterpiece...
Inside the Ingredient List
The Flavor Base
The foundation of this dish is the sushi rice, which must be perfectly seasoned to provide a subtle sweetness that balances the savory tuna. Cook the rice with a splash of rice vinegar, a pinch of sugar, and a dash of salt until it’s fluffy yet slightly sticky. Skipping the vinegar will leave the dish bland and the rice too plain. If you’re short on time, pre‑seasoned sushi rice from the grocery store works as a convenient alternative, but homemade always wins.
The Texture Crew
Nori sheets are the unsung heroes that add crunch and a hint of seaweed flavor. Cut them into thin strips so they toast evenly and form a crisp lattice on top of the bake. If you can’t find nori, a thin sheet of seaweed paper or even a small piece of toasted kombu can substitute, though the flavor profile will shift slightly. The toasted sesame seeds sprinkled on top add a nutty finish and a pleasing visual contrast.
The Unexpected Star
The tuna is the star of the show, and using sashimi‑grade ensures a buttery texture that melts in your mouth. If fresh tuna isn’t available, high‑quality canned tuna packed in water is a viable alternative, but be sure to drain it thoroughly to avoid excess moisture. Adding a touch of mayonnaise and sriracha creates a creamy, spicy sauce that coats the rice like velvet, turning the dish into a comforting yet adventurous experience.
The Final Flourish
Cucumber and avocado add a refreshing crunch and creamy richness that contrast beautifully with the warm bake. Dice them finely so they distribute evenly without sinking to the bottom. If you’re vegan, substitute the mayo with a plant‑based alternative or a drizzle of tahini for a nutty twist. Finally, scallions and furikake provide a burst of freshness and umami, rounding out the flavor profile.
Everything's prepped? Good. Let's get into the real action...
The Method — Step by Step
- Preheat your oven to 375°F (190°C). Line a 9x9-inch baking dish with parchment paper to prevent sticking. The oven should be fully preheated before you start to ensure even baking. This step is crucial; a cold oven will result in uneven cooking.
- In a medium bowl, combine the cooked sushi rice, rice vinegar, sugar, and salt. Toss gently until the rice is evenly coated. The vinegar will give the rice a slight tang that balances the richness of the tuna. Make sure the rice isn’t too wet; it should feel dry to the touch.
- In a separate bowl, mix the tuna, mayonnaise, sriracha, sesame oil, and soy sauce. Stir until the tuna is fully coated and the mixture is creamy. The mayo acts as a binder, keeping the tuna moist during baking. If the mixture feels too thick, add a splash of soy sauce to loosen it.
- Fold the tuna mixture into the rice, ensuring an even distribution. Gently stir until the rice is coated without crushing it. This step is the moment of truth; if the rice is unevenly coated, the flavors will be inconsistent.
- Transfer the rice-tuna mixture into the prepared baking dish, spreading it out into an even layer. This is where the trickiest part comes in: if you press the mixture too hard, the rice will compact and lose its fluffy texture. Aim for a light, even surface. Watch Out: Over‑packing the dish will lead to a soggy center.
- Arrange the nori strips in a lattice pattern over the rice, letting them overlap slightly. The nori should be laid flat so that it crisps evenly in the oven. The lattice design not only looks impressive but also creates pockets of crispy nori that burst with flavor.
- Sprinkle the toasted sesame seeds over the nori. This adds a subtle nutty flavor and a pop of color. If you prefer a stronger sesame taste, lightly toast the seeds in a dry skillet before adding them.
- Place the dish in the oven and bake for 20–25 minutes, or until the nori edges turn golden brown and the top is lightly crisp. The interior should be hot and steaming, indicating that the tuna has warmed through without drying out.
- While the bake is cooking, dice the cucumber and avocado into bite‑sized pieces. Set them aside so they’re ready to be added after baking. The fresh vegetables add a bright contrast to the warm, savory bake.
- Remove the dish from the oven and let it rest for 5 minutes. This resting period allows the flavors to settle and the edges to set. Top with the diced cucumber, avocado, and sliced scallions. Finish with a light drizzle of extra soy sauce or a sprinkle of furikake for an extra punch of umami.
That's it — you did it. But hold on, I've got a few more tricks that'll take this to another level...
Insider Tricks for Flawless Results
The Temperature Rule Nobody Follows
Many cooks assume 375°F is a one‑size‑fits‑all temperature, but the key to a perfectly baked Tuna Sushi Bake is a slightly lower temperature of 350°F (175°C). This slower bake allows the tuna to warm gently, preventing it from drying out while the rice continues to steam. If you’re using a convection oven, reduce the temperature by 25°F to account for the extra airflow. This small adjustment can make a big difference in texture.
Why Your Nose Knows Best
Before you pull the dish out of the oven, give it a sniff. A sweet, slightly caramelized aroma signals that the rice is perfectly toasted. If you notice a sharp, metallic scent, the soy sauce might be overpowering. Trust your nose to judge doneness; the visual cues are helpful, but the smell is the ultimate indicator.
The 5-Minute Rest That Changes Everything
After baking, let the dish rest for exactly five minutes. This pause allows the steam to redistribute, ensuring the rice remains fluffy and the tuna stays moist. It also gives the nori a chance to set, preventing it from sliding off the plate when you cut. A short rest is a simple step that elevates the overall presentation.
Avoiding the “Too Wet” Mistake
If your rice mixture seems too wet, add a tablespoon of cornstarch or a splash of water to absorb excess moisture. Stir in a pinch of rice flour to help bind the rice together. A dry rice base ensures a crispier crust and a better overall texture. I’ve seen many people add extra rice to fix this, but that actually makes the dish soggy.
The Secret of the Crust
For an extra golden crust, brush the top of the bake with a thin layer of beaten egg before baking. The egg will create a glossy, slightly crunchy surface that contrasts beautifully with the soft interior. If you’re vegan, a splash of aquafaba works just as well. This trick is a favorite among my friends and guarantees a wow factor.
Creative Twists and Variations
This recipe is a playground. Here are some of my favorite ways to switch things up:
Spicy Kimchi Fusion
Swap out the cucumber for a handful of chopped kimchi and add a splash of gochujang to the tuna mixture. The fermented tang pairs wonderfully with the creamy tuna, creating a bold, fiery flavor profile. This version is perfect for those who love a kick of heat.
Miso‑Glazed Twist
Replace the soy sauce with white miso paste and add a drizzle of mirin. The miso brings a sweet, umami depth that elevates the dish to a new level of sophistication. The glaze also adds a subtle sheen to the top.
Vegetarian Delight
Omit the tuna entirely and replace it with diced tofu marinated in soy sauce, sesame oil, and a touch of sriracha. The tofu will soak up the flavors and provide a hearty texture. This variation is ideal for plant‑based diners.
Seafood Medley
Add a mix of shrimp and scallops to the tuna mixture for a luxurious seafood experience. The shrimp cooks quickly and adds a sweet, briny flavor that complements the tuna. This version feels like a special occasion meal.
Pesto Infusion
Stir in a spoonful of basil pesto into the tuna mixture for an herbal twist. The pesto introduces fresh, green notes that brighten the dish. This variation works well for spring or summer gatherings.
Citrus Zest Finale
Finish the bake with a squeeze of fresh lime or yuzu juice before serving. The citrus acidity cuts through the richness and adds a refreshing burst. This final touch is a crowd‑pleaser for those who love bright flavors.
Storing and Bringing It Back to Life
Fridge Storage
Store leftover Tuna Sushi Bake in an airtight container for up to 3 days. Keep it refrigerated to preserve the fresh flavors. When you’re ready to eat, let it sit at room temperature for 10 minutes to soften the crust slightly. This method maintains the texture without drying out the rice.
Freezer Friendly
The bake freezes well for up to 2 months. Wrap it tightly in plastic wrap and place it in a freezer bag to prevent freezer burn. To reheat, thaw overnight in the fridge, then warm in the oven at 350°F (175°C) for 10–12 minutes until heated through. The rice will retain its fluffiness.
Best Reheating Method
For a quick revival, microwave the bake on medium power for 1–2 minutes, adding a splash of water before reheating. The water creates steam that restores moisture to the rice and tuna. Be careful not to overheat, or the crust may become soggy.