Picture this: a Friday night, the house smells like burnt toast and the neighbor’s barbecue is blasting. I was craving something that felt like a hug, but the kitchen was a battlefield. I tossed a bag of chicken breasts into the air, only to have them land in a pile of disappointment. That moment sparked the idea for a dish that would turn any culinary disaster into a crowd‑pleasing triumph. And trust me, this is the kind of recipe that makes you feel like a kitchen wizard.
First, I thought of the Texas Roadhouse line‑up—steak, ribs, that iconic gravy. But instead of the usual, I imagined a creamy, cheesy smothering that would make even the most skeptical taste buds swoon. The aroma that hit my nose was a buttery blend of melted cheese and bacon, a scent that made my stomach rumble. The texture? Think tender chicken, a silky sauce that clings like a velvet blanket, and a crisp bacon crunch that pops with each bite. I promised myself this would be the ultimate comfort dish, and I couldn’t wait to share it.
Why does this version stand out? Because it balances bold flavor with a simple method that even a novice can master. The secret lies in layering cheeses that melt at different temperatures, creating a cascade of gooey richness. The ranch seasoning mix adds a subtle kick that cuts through the creaminess without overpowering it. The bacon isn’t just a garnish; it’s a flavor engine that brings smoky depth. And the green onions add a fresh, almost citrusy bite that lifts the whole dish.
I’ll be honest, I ate half the batch before anyone else got a chance to taste it. That’s the kind of confidence you get when the food is that good. The next step? I’m going to walk you through every single detail, from the first sear to the final garnish. By the end, you’ll wonder how you ever made it any other way. And trust me, you’ll want to keep this recipe in your pantry for all occasions.
What Makes This Version Stand Out
- Flavor: The combination of Monterey Jack and mozzarella creates a layered melt that feels like a cheese shower. The Jack gives a buttery sharpness while mozzarella adds a light, stretchy finish. Together they produce a sauce that clings to the chicken without being greasy.
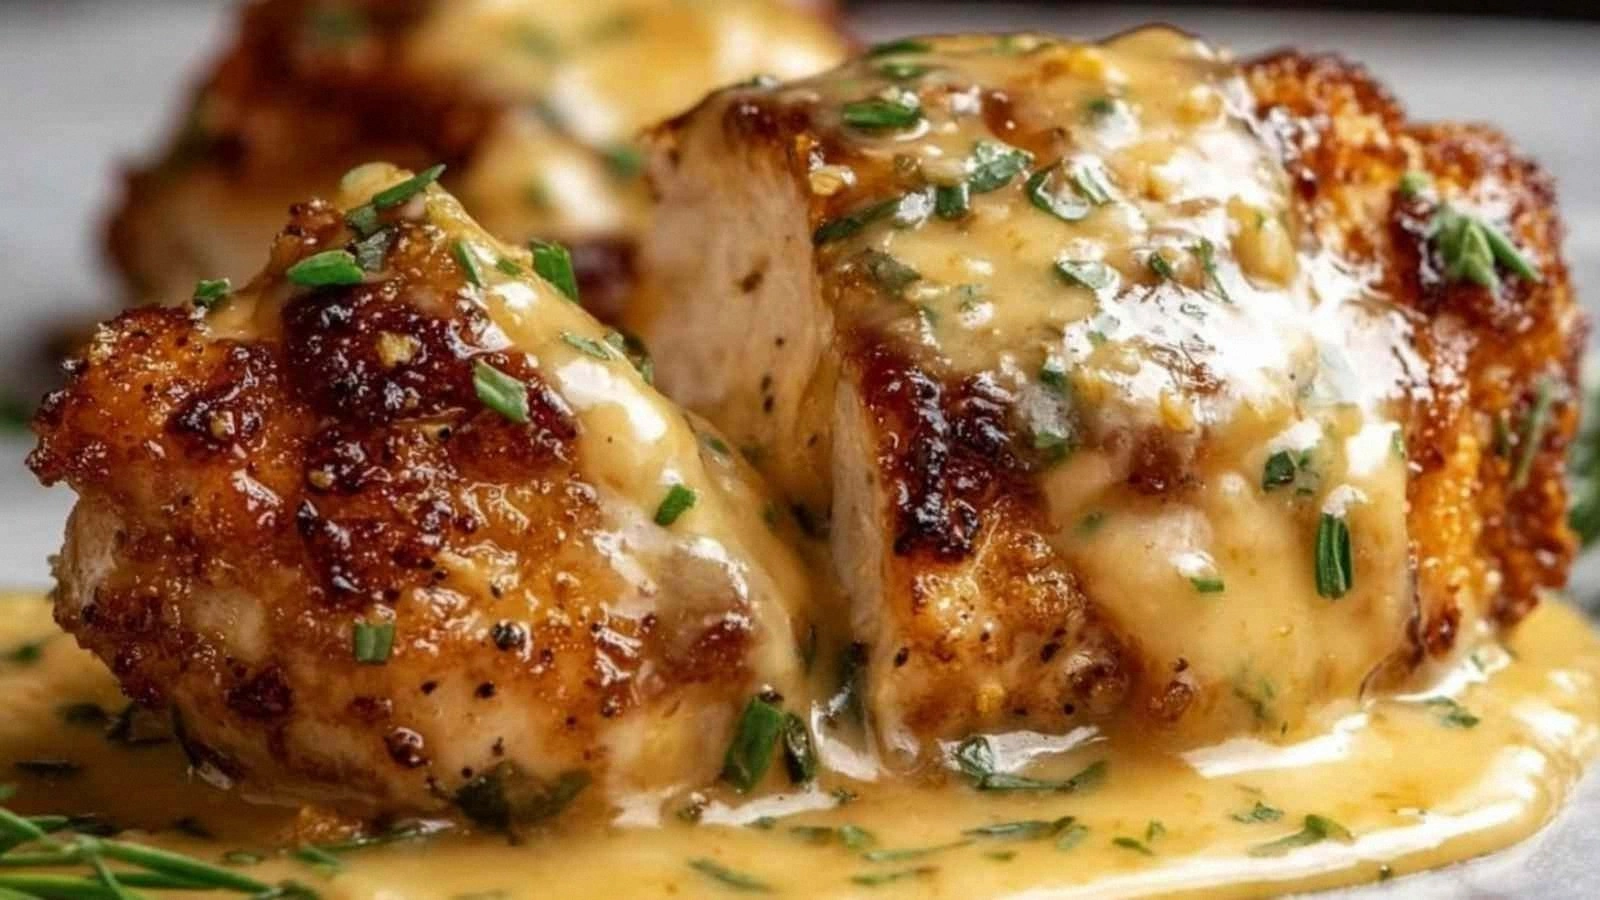
- Texture: The bacon is cooked until just crisp, then folded in, giving a crunchy contrast that shatters with each bite. The chicken breasts are seared to a golden crust before simmering, ensuring a juicy interior. The result is a dish that feels both comforting and indulgent.
- Simplicity: No fancy equipment needed—just a skillet, a saucepan, and a few pantry staples. The recipe is broken into clear steps that anyone can follow. Even a beginner can achieve restaurant‑style results with minimal fuss.
- Crowd‑Pleaser: Guests rave about the cheesy, savory sauce and the bacon crunch. It’s perfect for family dinners or a casual gathering. The dish’s visual appeal—golden chicken topped with bubbling cheese—makes it Instagram‑worthy.
- Ingredient Quality: Fresh chicken breasts, high‑quality cheeses, and real bacon make a difference. The ranch seasoning mix provides depth without the need for complex spice blends. Using a good broth ensures the sauce stays moist and flavorful.
- Make‑Ahead Friendly: The dish can be assembled ahead of time and baked later, saving dinner prep time. The sauce thickens as it cools, so reheating is quick and retains texture. This flexibility makes it a reliable go‑to for busy weeks.
- Nutritional Balance: The protein from chicken and bacon, coupled with calcium from cheese, gives a satisfying meal. The dish is moderate in calories yet rich in flavor. It satisfies cravings without compromising health goals.
Alright, let’s break down exactly what goes into this masterpiece...
Inside the Ingredient List
The Flavor Base
Chicken broth is the liquid that pulls all the flavors together, turning the dish into a silky sauce that coats every bite. It also keeps the chicken moist during the simmering phase, preventing dryness. If you skip broth, the sauce will be thin and the chicken may dry out. A good alternative is low‑sodium chicken stock, which adds depth without excess sodium.
Ranch seasoning mix gives the dish a savory kick that mimics the famous Texas Roadhouse seasoning. It’s a quick way to infuse herbs and spices without measuring out individual components. Skipping the ranch would leave the sauce bland; you could substitute with a homemade blend of dried oregano, garlic powder, and smoked paprika.
The Texture Crew
Monterey Jack cheese melts beautifully, creating a golden, buttery layer that clings to the chicken. Its mild flavor lets the other ingredients shine. If you omit it, the sauce will lack that silky richness; a good swap is cheddar, which offers a sharper bite.
Mozzarella cheese adds a light, stretchy texture that balances the heavier Jack. It also helps the sauce bind together, creating a cohesive coating. If you can’t find mozzarella, part of a shredded mozzarella and part of a mild provolone will work well.
Cooked bacon is the star of the texture contrast, offering a salty crunch that pops with each bite. It also contributes smoky undertones that echo a Texas grill. Without bacon, the dish would feel flat; a quick alternative is pancetta or smoked sausage, sliced thin.
The Unexpected Star
Chopped green onions add a bright, almost citrusy lift that cuts through the richness of the cheeses. Their mild bite keeps the dish from feeling heavy and adds a fresh pop of color. If you’re allergic or dislike green onions, finely minced shallots or scallions will provide a similar nuance.
Salt and pepper are essential for seasoning each component. They enhance flavor without overwhelming the dish. If you’re watching sodium, use a low‑sodium broth and reduce the amount of ranch seasoning, then taste as you go.
The Final Flourish
A handful of extra shredded cheese can be sprinkled on top before the final bake for an extra gooey finish. A drizzle of hot sauce or a sprinkle of crushed red pepper can add a subtle heat that contrasts the creamy base. The finishing touch is a light dusting of fresh parsley or cilantro, which adds a burst of herbal aroma.
Everything's prepped? Good. Let's get into the real action...
The Method — Step by Step
- Preheat your oven to 375°F (190°C). Pat each chicken breast dry with paper towels to ensure a crisp sear. Season both sides generously with salt and pepper. Heat a large oven‑proof skillet over medium‑high heat, then add a splash of oil. When the oil shimmers, lay the chicken breasts flat and let them cook for 4–5 minutes per side, or until golden brown. This step locks in flavor and creates a beautiful crust that will hold up during the simmer.
- Once seared, remove the chicken from the skillet and set it aside on a plate. This prevents the juices from evaporating and keeps the chicken moist. The skillet will now become the foundation for your sauce, so keep it clean to avoid burnt bits that could alter the flavor profile.
- In the same skillet, pour in the chicken broth and sprinkle the ranch seasoning mix. Bring to a gentle boil, stirring constantly to dissolve the seasoning and lift the browned bits from the bottom of the pan. Those fond bits are full of flavor, so make sure they’re incorporated. Kitchen Hack: Use a wooden spoon to scrape the bottom of the skillet; this releases caramelized flavors that enrich the sauce.
- Return the chicken breasts to the skillet, nestling them into the liquid. Reduce the heat to low, cover the skillet, and let the chicken simmer for 10 minutes. The sauce will thicken slightly while the chicken cooks through. Keep the lid on to trap steam, ensuring the chicken stays juicy. After 10 minutes, remove the lid to let any excess liquid evaporate.
- Sprinkle the shredded Monterey Jack and mozzarella cheeses evenly over the chicken. The cheeses will melt into a glossy, golden coating that clings to the meat. Cover the skillet again and slide the whole assembly into the preheated oven. Bake for 12–15 minutes, or until the cheeses are bubbly and the edges are slightly crisp. Watch Out: If you set the temperature too high, the cheese can burn before the chicken is fully cooked.
- While the cheese melts, chop the cooked bacon into bite‑size pieces and finely mince the green onions. Set them aside; they’ll be added in the final minutes of baking. Kitchen Hack: Reserve a few bacon bits for garnish; they’ll add a burst of flavor when sprinkled over the finished dish.
- About 3 minutes before the baking time is up, scatter the bacon and green onions over the top of the cheese. This timing ensures the bacon remains crisp while the onions soften just enough to release their aroma. The combination of sizzling bacon and fresh onions creates a sensory crescendo that elevates the dish.
- Remove the skillet from the oven and let the chicken rest for 5 minutes. Resting allows the juices to redistribute, ensuring each bite is moist and tender. During this time, the cheese will set slightly, making it easier to cut clean slices.
- Slice the chicken into thick strips, drizzle any remaining sauce from the pan, and serve immediately. The dish pairs wonderfully with mashed potatoes, rice, or a crisp green salad. Enjoy the harmony of creamy, cheesy, and smoky flavors that will have everyone asking for seconds.
That's it — you did it. But hold on, I've got a few more tricks that'll take this to another level...
Insider Tricks for Flawless Results
The Temperature Rule Nobody Follows
Many cooks keep the oven at 400°F, which can scorch the cheese before the chicken finishes. I’ve learned that 375°F is the sweet spot that allows the cheese to melt evenly while keeping the chicken juicy. If you’re using a convection oven, lower the temperature by 25°F to avoid over‑browning. This small tweak can mean the difference between a soggy mess and a golden masterpiece.
Why Your Nose Knows Best
As the chicken simmers, the scent of bacon and cheese will fill the kitchen. Trust that aroma as a cue that the sauce is thickening properly. If the smell feels too thin, give it another minute of simmering. My friend once skipped this step and ended up with a watery sauce that ruined the whole dish.
The 5‑Minute Rest That Changes Everything
Letting the chicken rest after baking might seem like a waste of time, but it’s essential. The juices settle, making the meat easier to cut and more flavorful. A quick 5‑minute rest also allows the cheese to set, preventing a gooey mess on the cutting board.
Don’t Skimp on the Broth
Using a high‑quality broth is key to a robust sauce. Low‑sodium stock will keep the dish from becoming overly salty, allowing the ranch seasoning to shine. If you’re short on time, a quick homemade broth made from simmering chicken bones for 30 minutes works wonders.
The Bacon Trick
Cook the bacon until it’s just crisp, then let it rest on a paper towel to drain. This removes excess fat and keeps the bacon from turning greasy. The leftover bacon fat can be used to sauté the onions, adding extra flavor to the sauce.
Use the Right Skillet
A heavy‑bottomed skillet, like cast iron, distributes heat evenly and prevents hot spots that could burn the sauce. If you don’t have a skillet that goes into the oven, transfer the chicken and sauce to a baking dish after searing. Just make sure the dish is oven‑safe and has a lid to trap moisture.
Creative Twists and Variations
This recipe is a playground. Here are some of my favorite ways to switch things up:
Smoky Chipotle Version
Add a teaspoon of chipotle powder to the broth for a smoky heat that complements the bacon. Swap the Monterey Jack for pepper jack to keep the heat balanced. Serve with a side of black beans for a Tex‑Mex twist.
Mushroom & Thyme Delight
Sauté sliced mushrooms with garlic before adding the broth. Stir in a teaspoon of fresh thyme for earthiness. The mushrooms absorb the cheesy sauce, creating a hearty, vegetarian‑friendly option.
Greek Yogurt Crunch
Replace half the mozzarella with crumbled feta for a tangy contrast. Add a dollop of Greek yogurt on top before baking for a creamy, tangy finish. This variation pairs well with a cucumber‑mint salad.
Pesto Fusion
Swirl in a couple of spoonfuls of basil pesto into the broth before simmering. The pesto adds a fresh herbaceous layer that brightens the dish. Top with chopped walnuts for added crunch.
Breakfast Brunch Edition
Use breakfast sausage instead of bacon for a savory twist. Serve the chicken over toasted English muffins and drizzle with a honey‑mustard sauce. This version is perfect for a weekend brunch with friends.
Low‑Carb Spin
Omit the broth and replace it with a splash of heavy cream to keep the sauce rich. Serve over cauliflower rice or zucchini noodles to cut carbs. This variation keeps the flavor profile intact while meeting dietary goals.
Storing and Bringing It Back to Life
Fridge Storage
Cool the dish completely before covering it tightly with plastic wrap or foil. Store in the refrigerator for up to 3 days. Reheat in the oven at 350°F for 10 minutes, or until heated through. The cheese will remain creamy, and the bacon will stay crisp.
Freezer Friendly
Wrap the cooled dish in parchment paper, then in foil, and place it in a freezer‑safe container. Freeze for up to 2 weeks. Thaw overnight in the refrigerator before reheating. The texture stays intact, and the flavor profile remains unchanged.
Best Reheating Method
Reheat in a preheated oven at 375°F for 12–15 minutes, adding a splash of water to the pan to create steam. This prevents the cheese from drying out and keeps the chicken moist. After reheating, sprinkle a few fresh green onions for a burst of freshness.