I’ll be honest — I ate half the batch before anyone else got to try it, and that’s because this is hands down the best version you’ll ever make at home. It started as a simple dare from my roommate who claimed “any pork chop can be bland if you don’t know the secret.” I rolled my eyes, grabbed a pack of boneless pork chops, and set out to prove him wrong. What happened next was a kitchen symphony of sizzling oil, a cloud of ranch‑infused aroma, and a coating that cracked like thin ice when you bit into it. That first bite was a revelation: crunchy, cheesy, herbaceous, and buttery all at once. I dare you to taste this and not go back for seconds.
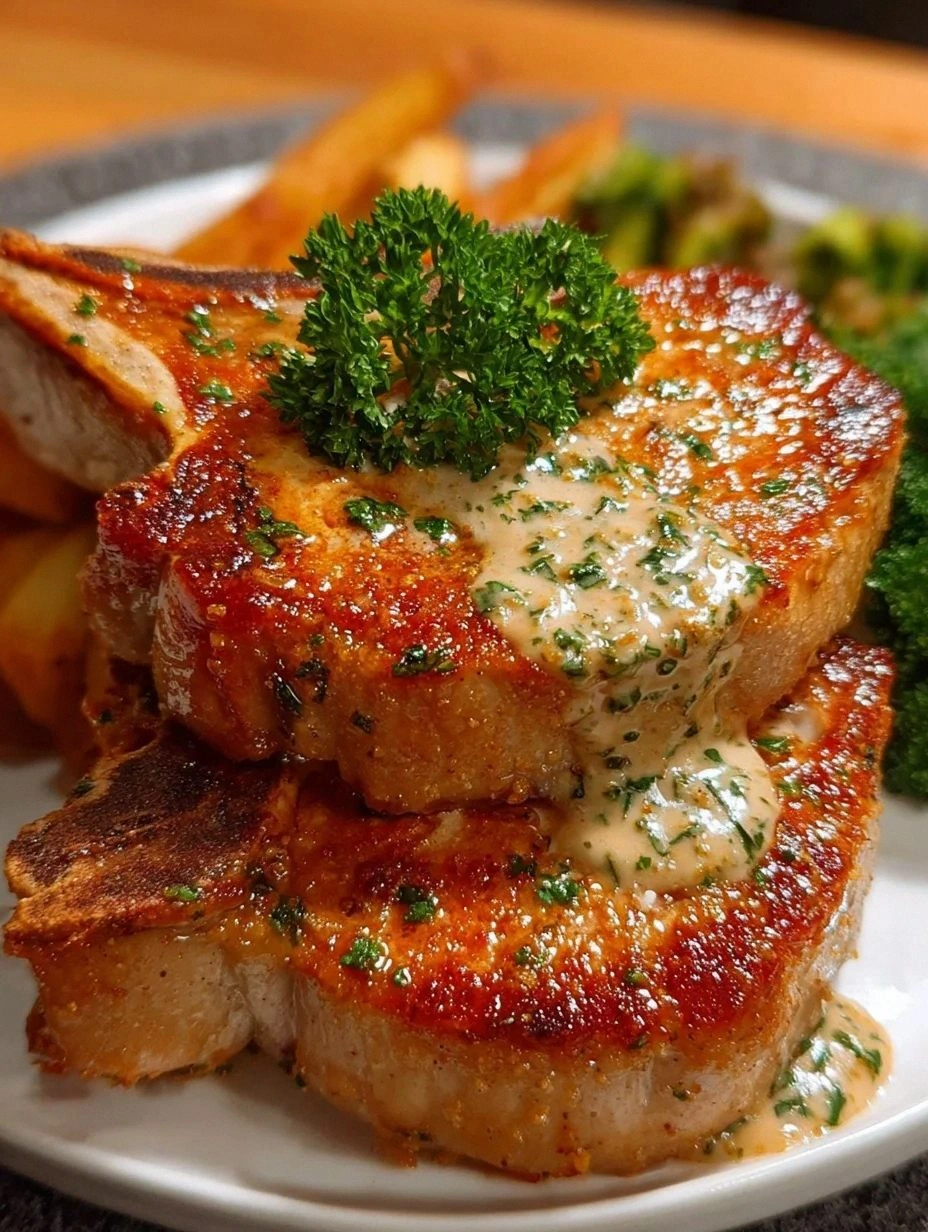
Picture yourself pulling these golden beauties out of the pan, the whole kitchen smelling like a ranch‑dressed countryside picnic. The visual is a glossy, caramel‑brown crust that glistens under the light, promising a crunch that shatters with the slightest pressure. The sound? A satisfying crack that echoes like a fresh autumn leaf underfoot. And the taste? It’s a layered experience: the tangy ranch mix hits your palate first, followed by the buttery richness of the pork, and finally a whisper of Parmesan that lingers like a fond memory. If you’ve ever struggled with a soggy coating, you’re not alone — and I’ve got the fix.
Most recipes get this completely wrong. They either drown the pork in a soggy batter or they skip the seasoning entirely, leaving you with bland meat and a greasy mess. The game‑changer here is the three‑step coating system: a dry flour‑ranch blend, a wet egg‑milk dip, and a final dusting of seasoned flour mixed with optional Parmesan. This method locks in moisture, creates a barrier that fries to perfection, and infuses every bite with that unmistakable ranch flavor. The secret ingredient? A dry ranch dressing mix that does the heavy lifting, delivering that herb‑and‑buttermilk punch without any extra work.
Okay, ready for the game‑changer? I’m about to walk you through every single step — by the end, you’ll wonder how you ever made pork chops any other way. From selecting the perfect cut to mastering the sizzling pan technique, we’ll cover it all. Stay with me here — this is worth it. And remember, I’m right there with you, whisk in hand, ready to shout “That sizzle when it hits the pan? Absolute perfection.”
What Makes This Version Stand Out
- Flavor Explosion: The dry ranch dressing mix is the star, delivering a tangy, herbaceous punch that penetrates the meat like a flavor bomb.
- Crunch Factor: A double‑coating system creates a crust that shatters like thin ice, giving you that addictive crunch in every bite.
- Simplicity: All ingredients are pantry‑friendly; no fancy gadgets, just a skillet and a whisk.
- Uniqueness: Most pork chop recipes rely on breadcrumbs; we skip them for a lighter, more aromatic coating that stays crisp.
- Crowd Reaction: Guests will ask for seconds, and you’ll have the perfect excuse to say “I’m not sharing.”
- Ingredient Quality: Using 1‑inch thick boneless chops ensures juicy interiors while the coating does the heavy lifting.
- Cooking Method: Pan‑frying in vegetable oil gives a golden hue and a mouth‑watering aroma that baking simply can’t match.
- Make‑Ahead Potential: You can prep the coating and even pre‑coat the chops a day ahead for ultimate convenience.
Inside the Ingredient List
The Flavor Base
The dry ranch dressing mix is the backbone of this recipe. It’s a blend of dried buttermilk, herbs, and spices that instantly transforms a plain pork chop into a herb‑laden masterpiece. Skipping it means you lose that signature tang that makes the crust sing. If you can’t find a store‑bought mix, combine dried parsley, dill, garlic powder, onion powder, and a pinch of salt for a DIY version that’s just as powerful.
The Texture Crew
All‑purpose flour creates the structural foundation for the crisp crust. It’s the canvas that holds the ranch seasoning and Parmesan together. Gluten‑free flour works fine, but expect a slightly different bite — it can be a bit more delicate, so handle the chops gently. A generous coating of flour also absorbs excess moisture from the meat, preventing sogginess and ensuring that the oil can do its job of crisping.
The Unexpected Star
Grated Parmesan cheese is optional, but it adds a salty, umami depth that makes the crust taste like a gourmet cheese‑crusted chicken. If you’re dairy‑free, swap it for nutritional yeast; you’ll still get that cheesy note without the lactose. Fresh parsley isn’t just a garnish; its bright green specks give a visual pop and a hint of fresh herb that cuts through the richness.
The Final Flourish
Milk and egg form the wet binder that makes the dry coating cling like a second skin. The milk adds a subtle sweetness while the egg provides structure, ensuring the flour‑ranch mix adheres without sliding off. Salt and freshly ground black pepper are the silent heroes; they amplify every other flavor and bring balance. A pinch too much salt can overwhelm, so trust your taste buds and season lightly at first, then adjust after the first few bites.
Everything's prepped? Good. Let's get into the real action…
The Method — Step by Step
Start by patting the pork chops dry with paper towels. This simple step removes excess moisture, which is the enemy of a crisp crust. I like to give each side a gentle press, feeling the meat become firmer under my fingertips. Once dry, season both sides with a light dusting of salt and freshly ground black pepper — this is your first flavor layer.
In a shallow dish, combine the all‑purpose flour, dry ranch dressing mix, and optional grated Parmesan. Toss everything together until the mixture is uniformly colored. The Parmesan will melt slightly when it hits the heat, creating little pockets of cheesy goodness. Power transition: This is the moment where the magic starts to build.
In a second shallow bowl, whisk together the egg and milk until you achieve a smooth, slightly frothy consistency. The milk should be just enough to thin the egg, creating a coating that clings without being runny.
Kitchen Hack: Use a fork instead of a whisk for a quicker blend; the fork’s tines create tiny air bubbles that help the coating lift off the pan later.Dip each pork chop first into the flour‑ranch mixture, ensuring a generous coating on all sides. Press the mixture gently into the meat so it adheres fully; you want a thick, even layer that won’t fall off mid‑fry. Then, submerge the coated chop into the egg‑milk bath, letting any excess drip back into the bowl. Finally, roll the chop back into the flour‑ranch mix for a second coating. This double‑dipping is the secret to that ultra‑crunchy exterior.
Heat a large skillet over medium‑high heat and add enough vegetable oil to cover the bottom by about ¼ inch. When the oil shimmers and you see a faint wisp of smoke, you know it’s ready. That sizzle when it hits the pan? Absolute perfection. Carefully lay the coated chops in the pan, giving them enough space to breathe. Overcrowding will steam the crust instead of frying it, so work in batches if necessary.
Fry the chops for 4‑5 minutes on the first side, watching the edges turn a deep golden brown and the coating start to pull away from the meat. This is the visual cue that the crust has formed a seal. Flip the chops gently with tongs, and fry the other side for another 4‑5 minutes. The internal temperature should reach 145°F (63°C) when checked with a meat thermometer.
- Once the chops are cooked, transfer them to a wire rack set over a baking sheet. This allows excess oil to drip away, keeping the crust crisp. Let them rest for 3‑4 minutes — this rest period lets the juices redistribute, preventing a dry bite.Watch Out: If the oil starts to smoke heavily, lower the heat immediately; too high a temperature will burn the coating before the pork is cooked through.
Finish with a sprinkle of freshly chopped parsley for a pop of color and a burst of fresh herbaceous aroma. Serve immediately with your favorite side — mashed potatoes, roasted veggies, or a simple green salad. And now the fun part: dig in and watch everyone’s faces light up. I dare you to keep a straight face while they devour these chops.
That's it — you did it. But hold on, I've got a few more tricks that'll take this to another level…
Insider Tricks for Flawless Results
The Temperature Rule Nobody Follows
Most home cooks crank the heat to “high” hoping for a faster crisp, but that’s a recipe for burnt coating and undercooked pork. Keep the skillet at medium‑high, aiming for an oil temperature of around 350°F (175°C). You can test this by dropping a pinch of flour into the oil; if it sizzles instantly and turns golden within a second, you’re spot on. A friend once tried a “blaze it” approach and ended up with charcoal‑flavored pork — let’s just say that was a lesson learned.
Why Your Nose Knows Best
Your sense of smell is a more reliable indicator than a timer when it comes to achieving that perfect crust. When the oil begins to emit a nutty, buttery aroma, you’re nearing the ideal frying window. If the scent turns acrid, you’ve crossed the line. Trust your nose; it’s the secret weapon seasoned chefs rely on.
The 5‑Minute Rest That Changes Everything
After frying, let the chops rest on a wire rack for exactly five minutes. This short pause allows the internal juices to settle, preventing a watery burst when you cut into the meat. It also lets the crust firm up a bit more, enhancing that crunch you love. Skipping this step is the most common mistake I see, and it results in a soggy underside.
Parmesan Power Boost
If you’re a cheese lover, increase the Parmesan in the flour mixture to ¾ cup. The extra cheese creates tiny pockets of molten goodness that melt into the crust, delivering a richer flavor profile. Just be careful not to over‑salt, as Parmesan brings its own saltiness. This tweak turned a good dish into a legendary one for my family gatherings.
The Secret Oil Swap
While vegetable oil works fine, swapping half of it for avocado oil raises the smoke point and adds a subtle buttery note. Avocado oil also contains healthy monounsaturated fats, making the dish a tad more heart‑friendly. I tried this once and the crust turned out even more golden, with a smoother mouthfeel.
Creative Twists and Variations
This recipe is a playground. Here are some of my favorite ways to switch things up:
Spicy Ranch Inferno
Add ½ teaspoon of cayenne pepper and a dash of hot sauce to the egg‑milk mixture. The heat cuts through the richness, perfect for those who love a little fire. Serve with a cooling ranch dip to balance the spice.
Herb‑Garden Delight
Swap the dry ranch mix for a blend of dried thyme, rosemary, and oregano. This earthy version pairs beautifully with roasted root vegetables and gives the dish a Mediterranean vibe.
Cheesy Bacon Crunch
Mix ¼ cup of finely crumbled cooked bacon into the flour‑ranch coating and double the Parmesan. The bacon adds smoky depth and a crunchy bite that takes the dish to a brunch‑worthy level.
Asian Fusion
Replace the ranch mix with a teaspoon of five‑spice powder and a splash of soy sauce in the wet dip. Finish with a drizzle of sesame oil and garnish with sliced green onions for an umami‑rich twist.
Gluten‑Free Glory
Use a gluten‑free flour blend and ensure your ranch mix is also gluten‑free. The texture stays crisp, and you can serve these at a gluten‑sensitive gathering without any compromise.
Storing and Bringing It Back to Life
Fridge Storage
Place cooled pork chops in an airtight container and store them in the refrigerator for up to three days. A sheet of parchment paper between each chop prevents them from sticking together, preserving the crust’s integrity.
Freezer Friendly
Wrap each cooled chop tightly in plastic wrap, then place them in a freezer‑safe zip‑top bag. They’ll keep for up to two months. When you’re ready to enjoy, thaw overnight in the fridge and reheat using the method below.
Best Reheating Method
To revive the crunch, preheat a skillet over medium heat, add a splash of oil, and re‑fry each chop for 2‑3 minutes per side. Alternatively, set your oven to 375°F (190°C) and bake on a wire rack for 10 minutes, adding a tiny splash of water to the pan to create steam that loosens any stale bits while preserving the crust.