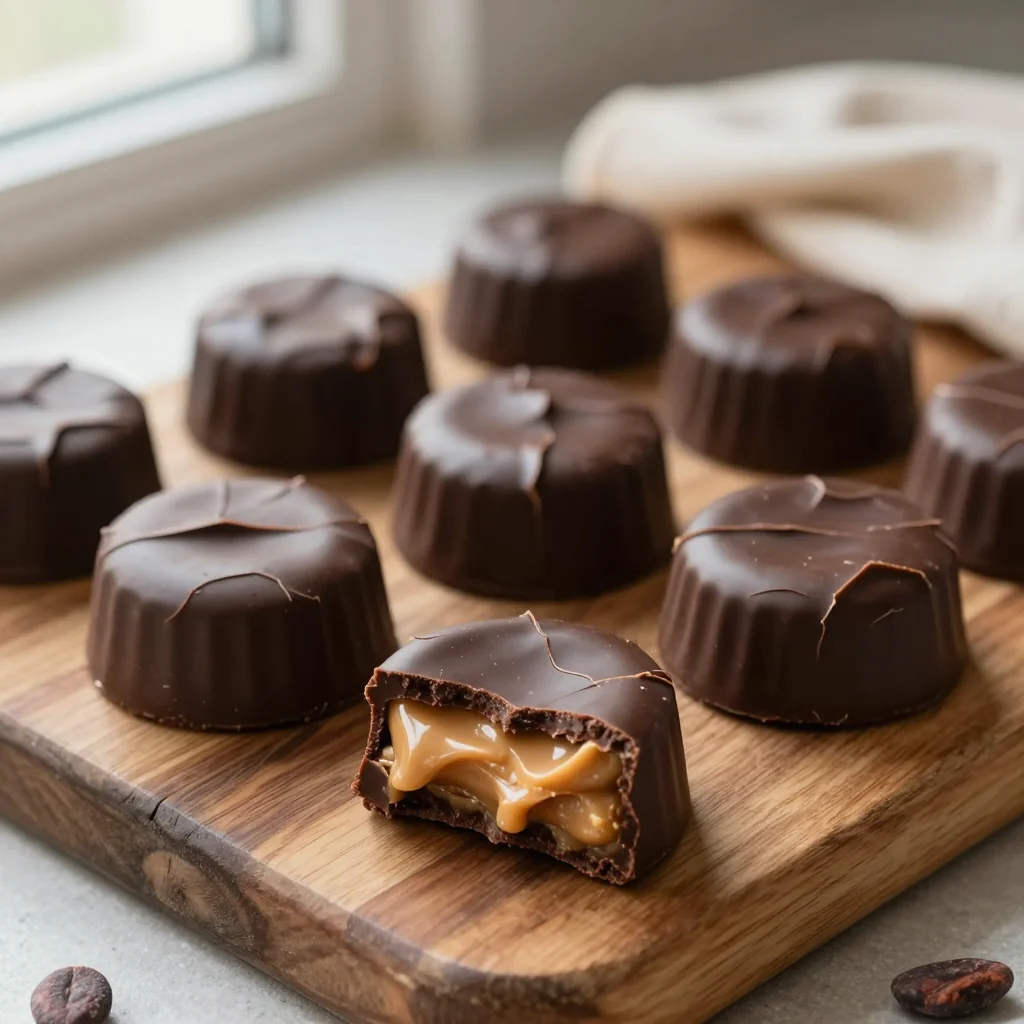
Indulge in a silky dark chocolate shell filled with creamy peanut butter—perfect for any celebration.

There’s something magical about the first bite of a homemade peanut butter cup: the snap of glossy dark chocolate, the smooth, salty‑sweet peanut butter that melts on your tongue, and the faint hint of sea salt that ties everything together. I first discovered this delight at a family reunion where my aunt revealed her secret recipe, and I was instantly hooked. The aroma of melting chocolate and roasted peanuts filled the kitchen, turning an ordinary afternoon into a festive celebration.
Peanut butter cups have roots in American confectionery, tracing back to the early 20th century when candy makers first combined peanuts with chocolate. Over time, they evolved from store‑bought treats to beloved homemade creations that allow you to control the quality of ingredients and experiment with flavors. This version uses rich 70% dark chocolate and a silky peanut butter filling, giving you a sophisticated yet comfort‑filled dessert.
In this article, you’ll learn how to temper chocolate for that perfect glossy finish, how to balance the sweet and salty notes in the filling, and how to assemble the cups with minimal fuss. I’ll also share storage tips, variations, and pro tricks that will make your homemade cups rival any commercial brand.
Ready to create a batch that will impress friends, family, and even the most discerning sweet tooth? Let’s dive in and start crafting these indulgent treats together.
🌟 Why This Recipe Will Win Your Heart
From the moment you melt the chocolate to the final garnish of sea salt, every step is designed to deliver maximum flavor and visual appeal.
- ✨ Perfect Balance of Sweet and Salty: The dark chocolate’s bitterness perfectly offsets the creamy, slightly salty peanut butter, creating a harmonious taste that’s addictive.
- ✨ No Special Equipment Needed: All you need are basic kitchen tools—a microwave or double boiler, silicone molds, and a spoon—making this recipe accessible to anyone.
- ✨ Customizable Sweetness: By adjusting the amount of powdered sugar or using a milder dark chocolate, you can tailor the sweetness to your personal preference.
- ✨ Ideal for Gifting: Wrapped in a decorative tin or a simple parchment-lined box, these cups make an elegant, homemade gift for birthdays, holidays, or thank‑you notes.
- ✨ Nutrient‑Smart Indulgence: Using dark chocolate and natural peanut butter provides antioxidants and healthy fats, offering a more wholesome treat than many store‑bought alternatives.
- ✨ Fun to Make with Kids: The hands‑on assembly process is safe and engaging, turning dessert time into a memorable family activity.
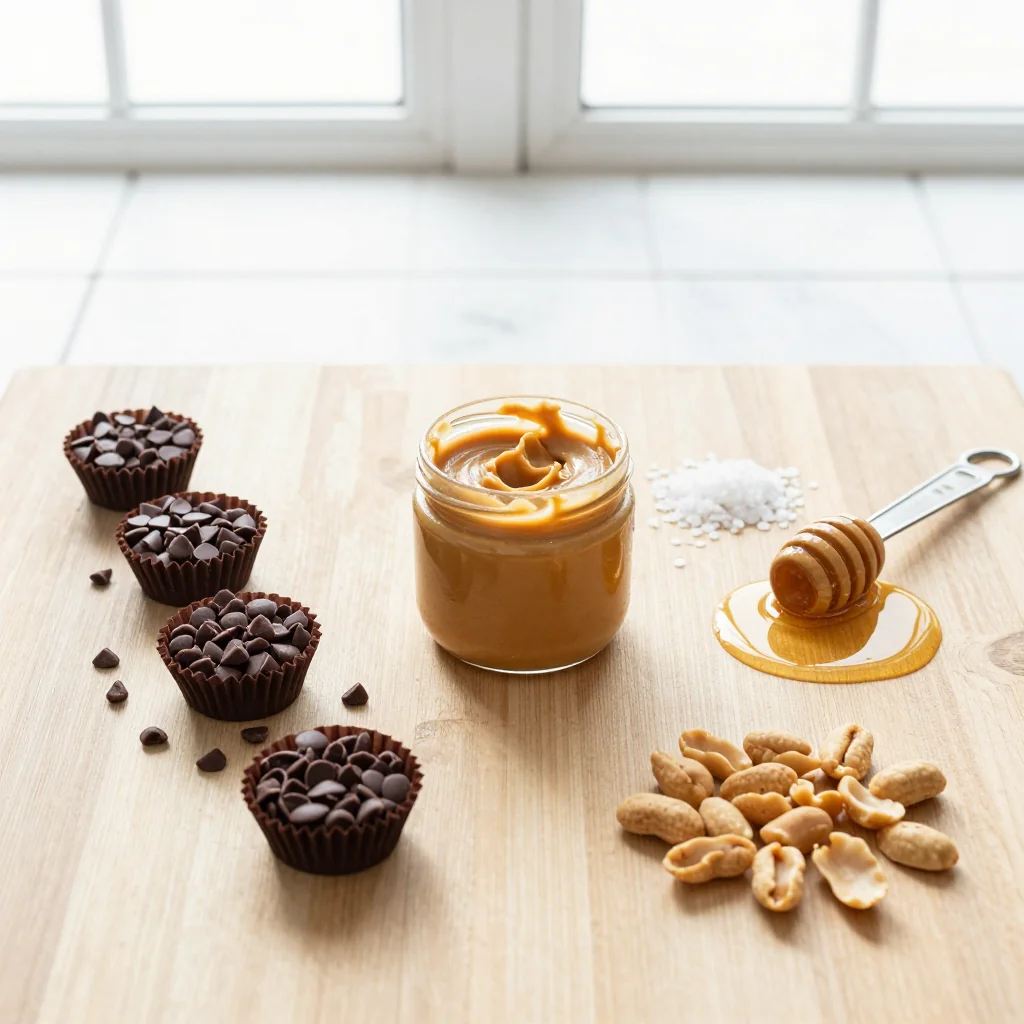
🥗 Ingredients
📝 Complete Ingredient List
For the Chocolate Coating:
- 200 g dark chocolate (70% cocoa)
- 2 tbsp coconut oil
For the Peanut Butter Filling:
- 150 g smooth peanut butter
- 50 g powdered sugar
- 1 tbsp unsalted butter, melted
- ¼ tsp sea salt
For Garnish (Optional):
- a pinch sea salt flakes
🔍 Focus on Key Ingredients
Dark Chocolate (70% Cocoa)
Dark chocolate provides a deep, slightly bitter flavor that balances the sweetness of the peanut butter. Look for chocolate with a cocoa butter content of at least 30% to ensure a smooth melt and a glossy finish. If you prefer a milder taste, you can use 60% chocolate, but the final product will be less intense.
Natural Peanut Butter
Choosing an unsweetened, natural peanut butter lets you control the sugar level and adds a rich, authentic peanut flavor. Stir the peanut butter before measuring to incorporate any settled oil, ensuring a consistent texture throughout the filling.
Coconut Oil
Coconut oil lowers the melting point of the chocolate, making it easier to coat the cups and giving them a beautiful sheen. It also adds a subtle tropical note that pairs wonderfully with the roasted peanuts.
🔄 Quick Substitutions
| If you don’t have... | Use instead... |
|---|---|
| Dark chocolate | Milk chocolate (but reduce sugar) |
| Coconut oil | Vegetable oil or melted butter |
| Powdered sugar | Granulated sugar (blend to fine powder) |
👨🍳 Step‑by‑Step Instructions
Follow these detailed steps to create perfectly glossy chocolate shells and a silky peanut butter center.
📋 Phase 1: Preparation and Mise en Place
Gather all tools and pre‑measure ingredients before you start melting chocolate.
Set Up a Double Boiler
Fill a medium saucepan with about an inch of water and bring it to a gentle simmer. Place a heat‑proof bowl on top, ensuring the bottom does not touch the water. This indirect heat prevents scorching the chocolate.
Measure and Combine Chocolate and Coconut Oil
Place the 200 g dark chocolate and 2 tbsp coconut oil into the bowl. Stir gently as they melt together, creating a smooth, glossy mixture. The oil helps the chocolate flow easily into the molds.
🔥 Phase 2: Coating and Filling
Create the chocolate shells first, then add the peanut butter filling.
Coat the Molds
Using a silicone cupcake mold or mini muffin tin, pour a thin layer of melted chocolate into each cavity, swirling to coat the sides. Tap the mold gently on the counter to remove air bubbles. Place the mold in the refrigerator for 5 minutes to set the first layer.
Prepare the Peanut Butter Filling
In a mixing bowl, combine 150 g smooth peanut butter, 50 g powdered sugar, 1 tbsp melted butter, and ¼ tsp sea salt. Stir until the mixture is light, airy, and glossy. The butter adds a silky texture while the sea salt intensifies the peanut flavor.
Fill the Chocolate Shells
Using a small spoon or a piping bag, add about a teaspoon of peanut butter filling to the center of each chilled chocolate shell. Ensure the filling does not touch the edges, leaving room for the final chocolate seal.
✨ Phase 3: Finishing and Presentation
Seal the cups and let them set before serving.
Seal with a Second Chocolate Layer
Re‑heat the remaining melted chocolate if it has thickened. Spoon or pipe a second layer over each filling, covering the peanut butter completely. Gently tap the mold again to smooth the surface.
Optional Sea Salt Sprinkle
While the chocolate is still soft, lightly sprinkle a pinch of sea salt flakes on each cup. This adds a delightful crunch and enhances the sweet‑salty contrast.
Cool and Unmold
Transfer the mold to the refrigerator for another 10 minutes, then to the freezer for 5 minutes to fully set. Gently pop each cup out of the silicone mold; they should release cleanly with a glossy finish.
💡 Expert Tips and Tricks
🛒 Choosing the Right Ingredients
When selecting dark chocolate, look for a label that lists cocoa solids and cocoa butter as the first ingredients. Avoid chocolates with added vegetable fats, which can result in a dull finish. For peanut butter, natural varieties without added sugars or hydrogenated oils give you the cleanest flavor and the healthiest fat profile. If you’re allergic to peanuts, try almond butter with a dash of maple syrup for a similar texture.
🔪 Preparation Techniques
Before melting, chop the chocolate into uniform pieces; this ensures even melting and reduces the risk of scorching. Use a silicone spatula to scrape the sides of the bowl, keeping the mixture smooth. When piping the filling, a small pastry bag fitted with a plain tip gives you precise control and a neat appearance.
🌡️ Mastering the Tempering Process
If you want a professional snap and shine, temper the chocolate using the seeding method: melt two‑thirds of the chocolate, remove from heat, and stir in the remaining third until the temperature drops to about 31 °C (88 °F). This creates stable cocoa butter crystals, resulting in a glossy surface that doesn’t melt at room temperature.
🍽️ Presentation and Service
Arrange the cups on a slate board or a rustic wooden platter for visual impact. Add a drizzle of melted white chocolate and a few extra sea salt flakes for contrast. Serve at room temperature for the best texture, or keep refrigerated until just before serving to maintain firmness.
🏆 Pro Tips
Elevate your homemade cups from delicious to extraordinary with these professional insights.
- 🎯 Use a Chocolate Tempering Machine: A tempering machine guarantees precise temperature control, producing a glossy finish and a satisfying snap that homemade methods can’t always achieve.
- 🎯 Add a Hint of Espresso Powder: Dissolve ½ tsp espresso powder in the melted chocolate to intensify the chocolate flavor without adding liquid.
- 🎯 Incorporate Crunchy Textures: Sprinkle finely chopped roasted peanuts on top of the filling before sealing; this adds a pleasant crunch that contrasts the creamy center.
- 🎯 Use a Silicone Brush for a Thin Seal: Lightly brush a thin layer of chocolate over the top after filling; this creates a seamless seal and prevents the filling from leaking.
- 🎯 Control Sweetness with Sugar Substitutes: Replace powdered sugar with erythritol for a lower‑calorie version that still maintains the smooth texture.
- 🎯 Finish with a Light Dusting of Cocoa Powder: After unmolding, dust the tops with a fine cocoa powder to add a sophisticated, matte contrast to the glossy chocolate.
"The best desserts are those that balance technique with love; a perfectly tempered chocolate cup shows both." — Dominique Ansel
🔄 Variations and Adaptations
This base recipe is a versatile canvas—experiment with flavors, dietary needs, and presentation styles to suit any occasion.
🥬 Vegan Version
Swap the dairy butter for 1 tbsp coconut oil and ensure the peanut butter is labeled vegan. Use a vegan dark chocolate (certified dairy‑free) for the coating. The result is a completely plant‑based treat that retains the classic texture.
- Vegan butter alternative: coconut oil or vegan margarine.
- Vegan dark chocolate: look for “dairy‑free” on the label.
🌶️ Flavor Variations
Play with spices, extracts, and mix‑ins to create unique flavor profiles that surprise the palate.
Spicy Chili Version:
Add ¼ tsp cayenne pepper to the chocolate coating and a dash of chipotle powder to the filling for a smoky heat that pairs beautifully with dark chocolate.
Mediterranean Olive Oil Version:
Replace coconut oil with extra‑virgin olive oil and sprinkle a pinch of smoked sea salt on top. The olive oil adds a fruity note that complements the peanuts.
Asian Matcha Version:
Mix 1 tsp matcha powder into the peanut butter filling and drizzle a thin line of white chocolate infused with a touch of yuzu on the finished cups for an elegant, earthy twist.
⚠️ Dietary Adaptations
Gluten‑Free:
All ingredients are naturally gluten‑free; just ensure the chocolate and peanut butter have no added wheat‑based stabilizers.
Lactose‑Free:
Use a dairy‑free dark chocolate and replace butter with coconut oil, as mentioned in the vegan variation.
Low‑Calorie:
Reduce the powdered sugar to 30 g, use a 85% dark chocolate (lower sugar content), and substitute half of the peanut butter with almond butter to cut calories while maintaining creaminess.
👶 Kid‑Friendly Version
For younger palates, use milk chocolate instead of dark, and omit the sea salt. Add a thin drizzle of caramel sauce after the cups have set for a sweet, kid‑approved finish.
📦 Storage and Reheating
🧊 Conservation
In the Refrigerator:
- Duration: 7 days
- Recommended container: airtight plastic container or zip‑lock bag.
- Tip: Place a parchment sheet between layers to prevent sticking.
In the Freezer:
- Duration: 3 months
- Method: Freeze in a single layer on a tray, then transfer to a freezer‑safe bag.
- Defrosting: Move to the refrigerator overnight before serving.
💡 For optimal texture, avoid repeated temperature fluctuations; they can cause the chocolate to develop a dull surface.
♨️ Reheating
🔥 Oven (Recommended):
- Preheat to 150 °C (300 °F).
- Place cups on a parchment‑lined baking sheet.
- Heat for 5 minutes, then check for softness.
- If needed, heat an additional 2 minutes.
⚡ Microwave (Quick):
- Cover each cup with a microwave‑safe lid.
- Heat on medium power for 15 seconds.
- Check and stir the filling if it feels too firm.
🍳 Stovetop (Optional):
Place cups in a skillet over low heat, cover, and warm for 2‑3 minutes, turning gently to avoid melting the chocolate too much.
🍷 Perfect Pairings
🥗 Accompaniments
- Fresh Berries: A handful of raspberries or strawberries adds acidity that cuts through the richness.
- Light Citrus Salad: Mixed greens with orange segments and a honey‑lime dressing refresh the palate.
- Salted Caramel Popcorn: The crunchy sweet‑salty combo mirrors the cup’s flavors.
🍷 Wine & Beverage Pairings
- Port Wine (Tawny): Its caramel notes echo the chocolate while its acidity balances the peanut butter.
- Stout Beer: The roasted malt flavors enhance the dark chocolate’s depth.
- Non‑Alcoholic: Sparkling water with a splash of grapefruit juice provides a bright, refreshing contrast.
🍰 To Complete the Meal
Start with a light citrus soup or a seasonal salad, follow with the peanut butter cups as a dessert, and finish with a coffee‑based digestif like an espresso martini for a complete gourmet experience.
❓ Frequently Asked Questions
Q: Can I use milk chocolate instead of dark chocolate?
A: Yes, you can substitute milk chocolate, but reduce the amount of added powdered sugar in the filling to prevent excess sweetness. Milk chocolate will give a softer flavor and a less intense snap.
Q: How do I prevent the chocolate from blooming?
A: Bloom occurs when chocolate is exposed to temperature fluctuations. Temper the chocolate properly, store the finished cups in a cool, dry place, and avoid refrigerating them for long periods unless you plan to serve them chilled.
Q: What if I don’t have a silicone mold?
A: You can use a mini muffin tin lined with parchment paper or even small paper cupcake liners. The chocolate will set well, though the shape may be slightly less defined.
Q: Can I add other nuts or nut butters?
A: Absolutely! Almond butter, cashew butter, or a mix of chopped toasted nuts can replace or supplement the peanut butter. Adjust the salt level accordingly, as some nut butters are already salted.
Q: How do I make these cups gluten‑free?
A: All ingredients are naturally gluten‑free. Just verify that the chocolate and peanut butter have no added wheat‑based stabilizers or flavorings.
Q: Can I prepare the cups a day ahead?
A: Yes, you can assemble and chill them up to 24 hours in advance. Keep them sealed in an airtight container to maintain freshness and prevent the chocolate from absorbing odors.
🎉 Let’s Get Cooking!
This homemade peanut butter cup recipe combines the elegance of tempered dark chocolate with the comforting familiarity of peanut butter. By mastering the simple steps—tempering, filling, and sealing—you’ll create a treat that looks as impressive as it tastes. Whether you’re serving it at a party, gifting it to a friend, or enjoying a quiet evening snack, these cups deliver a perfect balance of sweet, salty, and crunchy textures.
Feel free to experiment with the variations, share your personal twists, and let the community know how you made it your own. Your feedback helps us improve and inspires other food lovers.
Have you tried this recipe?
Leave a comment and rating below! Share your photos on Instagram with #HomemadePBcups for a chance to be featured.
Peanut Butter Cups Homemade with Dark Chocolate
Silky dark chocolate shells filled with creamy, salty‑sweet peanut butter.
📝 Ingredients
Chocolate Coating
Peanut Butter Filling
Optional Garnish
👨🍳 Instructions
- 1 Set up a double boiler and melt the chocolate with coconut oil, stirring until smooth.
- 2 Coat silicone molds with a thin layer of chocolate, tap out air bubbles, and chill for 5 minutes.
- 3 Mix peanut butter, powdered sugar, melted butter, and sea salt until light and creamy.
- 4 Spoon a teaspoon of filling into each chilled chocolate shell.
- 5 Cover the filling with a second layer of chocolate, smoothing the surface.
- 6 Sprinkle a pinch of sea salt flakes on top (optional).
- 7 Refrigerate for 10 minutes, then freeze for 5 minutes to fully set.
- 8 Unmold the cups and arrange on a serving platter.
- 9 Store in an airtight container in the fridge or freezer as needed.
- 10 Serve at room temperature, optionally accompanied by fresh berries or a glass of port.
🥗 Nutritional Information (per serving)
*Values are estimates based on standard ingredient data.
📚 You Might Also Like
Salted Caramel Chocolate Truffles
Almond Joy Energy Bites
Spicy Mexican Chocolate Bark


💬 Comments and Reviews
Leave a Comment
No comments yet. Be the first to share your thoughts!