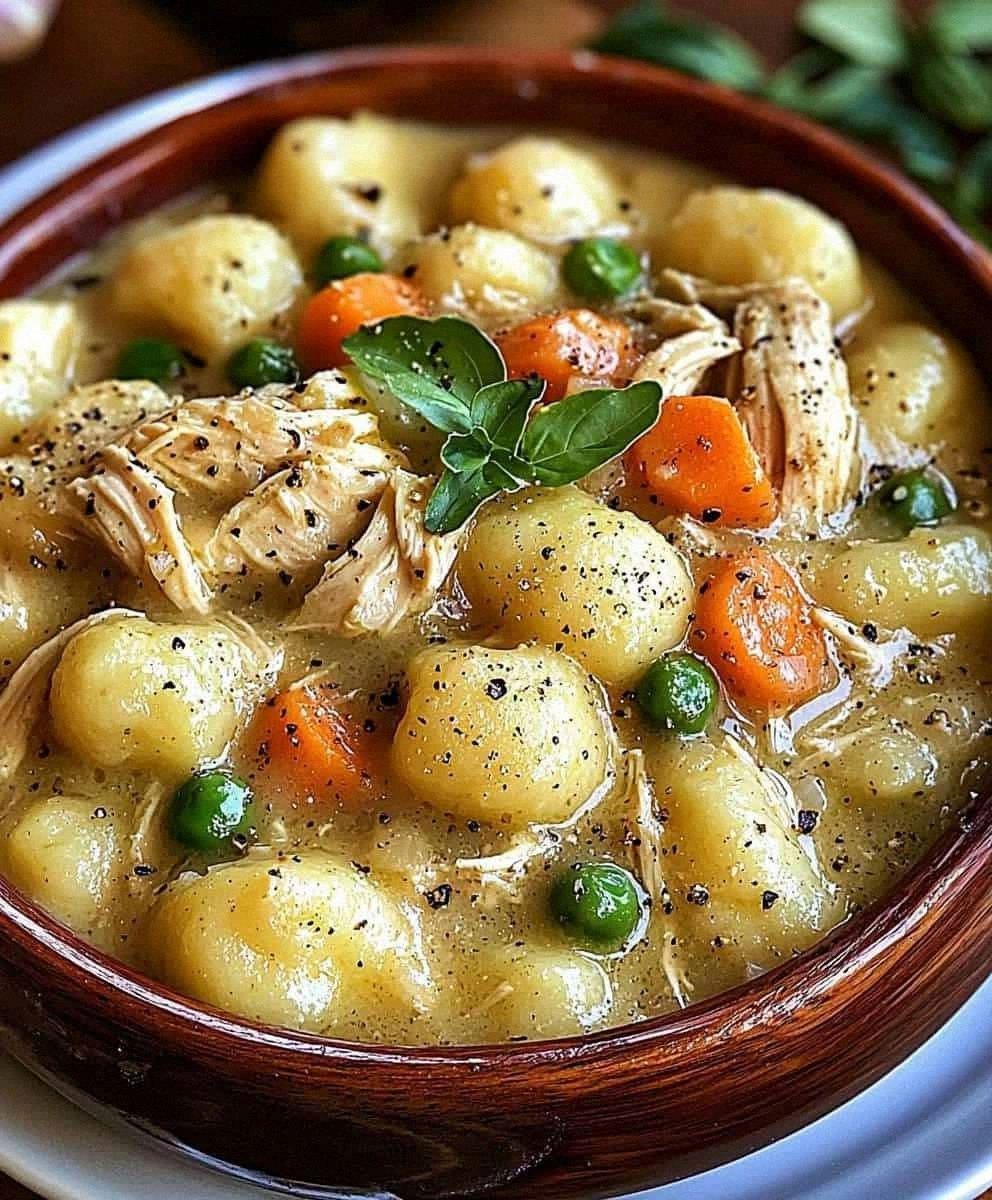
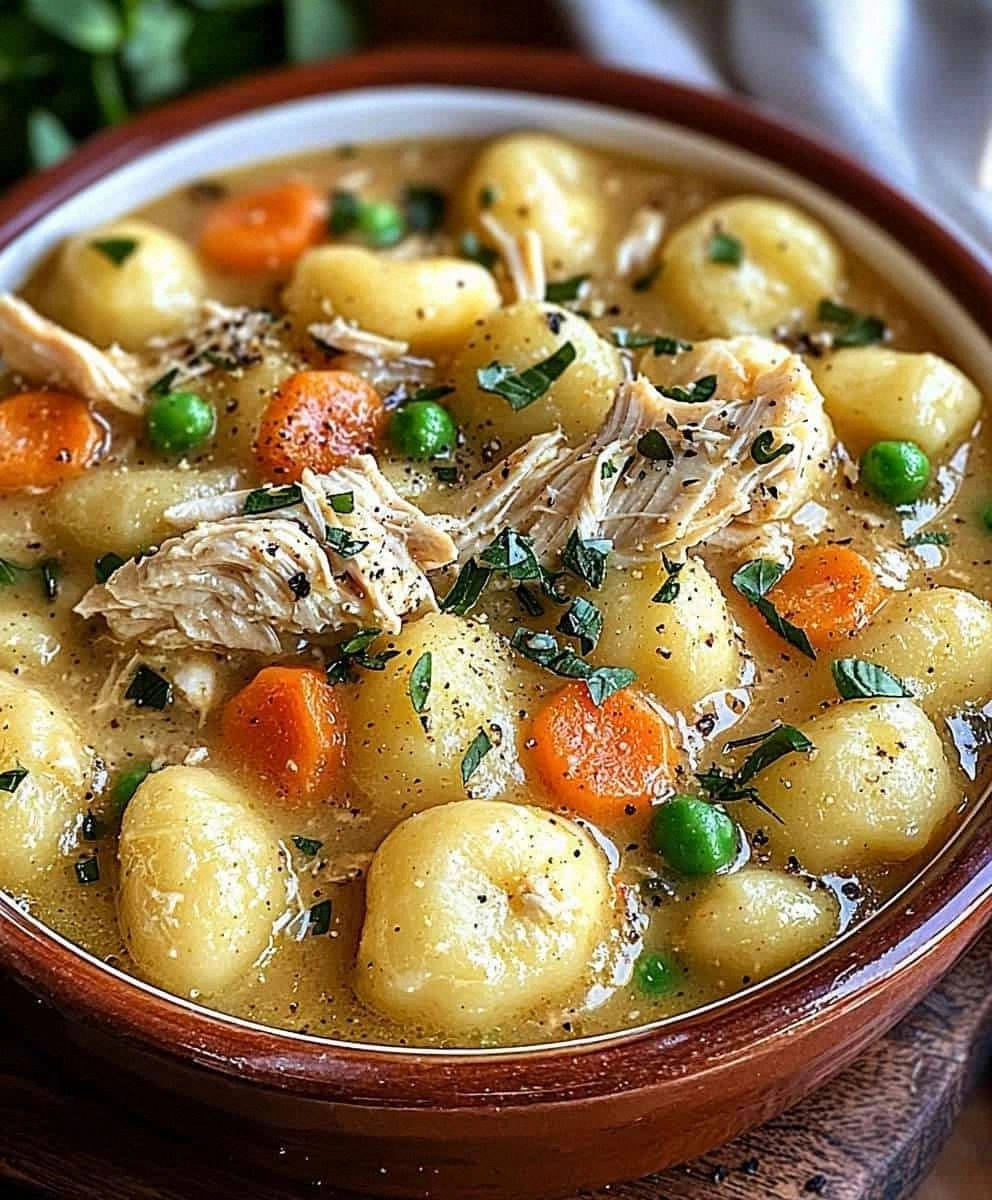
I still remember the night I almost set my kitchen on fire trying to make a traditional chicken pot pie. There I was, juggling a bubbling stovetop filling, a preheating oven, and a rolling pin that kept rolling off the counter. By the time I got everything assembled, my family had ordered pizza and I was left with a mountain of dishes and a bruised ego. Fast forward to last Tuesday when I discovered the holy grail of comfort food: One Pot Gnocchi Chicken Pot Pie that tastes like someone wrapped you in a warm blanket on a rainy day. I'm talking about pillowy gnocchi swimming in a velvety chicken gravy studded with tender vegetables, all coming together in a single pot that practically cleans itself. The first time I made this, my teenage son — who typically communicates only in grunts — actually said, and I quote, "Mom, this is ridiculous good." That's basically a five-star Michelin review in teenager speak.
Here's the thing that'll make you fall head over heels: this isn't just another dump-and-stir recipe. We're building layers of flavor like we're constructing the world's most delicious building. Picture yourself standing over the stove, wooden spoon in hand, as the aroma of butter and onions fills your kitchen like the world's best scented candle. That moment when the gnocchi hit the pot and start soaking up all that chickeny goodness? Pure magic. And when you lift that first spoonful to your mouth, the way the sauce coats each gnocchi like liquid velvet, you'll understand why I'm practically shouting about this recipe from the rooftops. I've made this dish seventeen times in the past month (yes, I counted), and each time it disappears faster than free samples at Costco.
What makes this version the stuff of legend is how it takes everything you love about chicken pot pie — the creamy filling, the tender chicken, those perfect vegetables — and marries it with the Italian soul of gnocchi. Most recipes get this completely wrong by treating gnocchi like regular pasta, but here's what actually works: we're going to toast those little potato dumplings right in the pot until they develop these gorgeous golden edges that shatter like thin ice when you bite into them. The sauce thickens into this luxurious blanket that hugs every curve and crevice of the gnocchi, while the vegetables maintain just enough bite to keep things interesting. Trust me, once you taste this, you'll never look at chicken pot pie the same way again.
Let me walk you through every single step — by the end, you'll wonder how you ever made it any other way. We're talking about a recipe so foolproof that even my friend Sarah (who once burned water) nailed it on her first try. Okay, ready for the game-changer?
What Makes This Version Stand Out
One Pot Wonder: Everything cooks in a single Dutch oven, which means you're not playing dishwasher Jenga with multiple pots and pans. The gnocchi release just enough starch to naturally thicken the sauce, eliminating the need for a separate roux. This is hands down the best version you'll ever make at home because it respects your time and your sanity.
Texture Revolution: Most chicken pot pies suffer from soggy-bottom syndrome, but we're flipping the script by pan-searing the gnocchi first. Those crispy edges create textural contrast that'll make you weak in the knees, while the inside stays cloud-soft. It's like getting the best parts of fried chicken and creamy pasta in one bite.
Speed Demon: From fridge to table in 35 minutes flat, which is faster than delivery and infinitely more satisfying. The secret lies in using rotisserie chicken and store-bought gnocchi, but treating them with enough respect that they taste completely homemade. If you've ever struggled with weeknight dinner timing, you're not alone — and I've got the fix.
Flavor Bomb Base: We start by rendering bacon fat (yes, bacon fat) that becomes the foundation for everything else. Onions, carrots, and celery get caramelized in this liquid gold, creating a depth of flavor that tastes like it simmered for hours. The smoky undertones will have your neighbors knocking on your door asking what smells so incredible.
Crowd-Pleasing Power: I've served this to picky toddlers, skeptical food snobs, and everything in between. The combination of familiar flavors in an unexpected format makes it feel both nostalgic and exciting. Plus, it's naturally nut-free and can be made gluten-free with one simple swap, making it the ultimate dinner party chameleon.
Make-Ahead Magic: This dish actually improves overnight as the flavors meld together. I'll be honest — I ate half the batch before anyone else got to try it, and the next day's portion was even better. Picture yourself pulling leftovers out of the fridge, knowing you've got a gourmet meal that just needs a quick reheat.
Alright, let's break down exactly what goes into this masterpiece...
Inside the Ingredient List
The Flavor Foundation
Thick-cut bacon forms the backbone of this entire operation, rendering its fat to create a smoky, salty base that makes everything else taste like it came from a five-star restaurant. Don't you dare reach for that turkey bacon or those sad, thin strips — we need the good stuff that'll give us proper lardons with real texture. As the bacon sizzles and crisps, it creates these little flavor nuggets that get folded back into the final dish, giving you surprise bursts of smoky goodness in every other bite. If you're feeling particularly rebellious, try using pancetta for a more refined Italian twist that'll make your dinner guests think you studied abroad.
Butter might seem redundant after the bacon fat, but here's where we get technical: butter contains milk solids that brown and create nutty, complex flavors you simply can't achieve with oil alone. We're using European-style butter with higher fat content because it emulsifies better with the flour, creating a silkier sauce that coats each gnocchi like a custom-tailored suit. The combination of bacon fat and butter is what separates amateur hour from the big leagues — it's like having both a bass line and a melody in your favorite song.
The Texture Crew
Store-bought gnocchi gets a bad rap, but here's the truth: unless you're making fresh pasta daily, the vacuum-packed stuff from the refrigerated section is actually your best friend. Look for brands that list potatoes as the first ingredient and avoid anything with a laundry list of preservatives that reads like a chemistry textbook. The key is in the treatment — we're not just boiling these babies, we're giving them a proper sear that creates a crispy exterior while maintaining that cloud-like interior. When they hit the hot fat, they should sizzle like applause, developing golden spots that add incredible nuttiness to the final dish.
Rotisserie chicken is the weeknight warrior that makes this recipe possible on a Tuesday when you're already running on fumes. But don't just shred it willy-nilly — we're going for a mix of bigger chunks and smaller shreds, creating varied texture that keeps every bite interesting. The breast meat stays in larger pieces while the darker meat gets shredded fine, ensuring you get both substantial chicken bites and those little shreds that integrate into the sauce. Pro tip: grab your rotisserie chicken early in the day when they're freshest, or ask your grocery store when they put out the new batch.
The Vegetable All-Stars
Frozen peas might sound like a cop-out, but they're actually picked and flash-frozen at peak ripeness, meaning they're often fresher than the sad specimens sitting in your produce drawer. These little green gems add pops of sweetness that cut through the richness of the sauce, plus they cook in exactly the same time it takes for the gnocchi to finish. The key is adding them at the very end so they maintain their vibrant color and slight pop when you bite into them. If you're feeling fancy, try using fresh peas in spring when they're actually in season — the difference will make you weep happy tears.
Carrots and celery aren't just filler vegetables — they're the mirepoix backbone that gives this dish its soul. Dice them small enough that they cook quickly but large enough to maintain some texture, creating little pockets of sweetness and herbaceous crunch throughout the dish. The trick is cooking them until they're just starting to caramelize around the edges, developing those fond bits on the bottom of the pan that deglaze into the most incredible flavor. Don't rush this step — this is where the magic happens, where humble vegetables transform into something transcendent.
The Unexpected Star
Fresh thyme might seem like a small detail, but it's the herb that ties everything together with its subtle earthiness and lemony undertones. Dried thyme tastes like dusty regret in comparison — fresh thyme adds bright, woodsy notes that make the whole dish taste like it was cooked in a French countryside kitchen. Strip the leaves by running your fingers backwards down the stem, and don't be shy about using the tender upper parts of the stems too. The stems add even more flavor when they simmer in the sauce, releasing essential oils that perfume the entire dish.
White wine adds acidity that cuts through the richness like a beacon of light, but here's the secret: it has to be wine you'd actually drink. That six-month-old bottle sitting in your fridge door won't cut it — we need fresh, crisp wine with enough acidity to brighten the entire dish. Pour yourself a glass while you're at it, because cooking should be enjoyable, not a chore. The alcohol cooks off, leaving behind complex fruity notes that make the sauce taste like it simmered for hours instead of minutes.
Everything's prepped? Good. Let's get into the real action...
The Method — Step by Step
- Start by placing your Dutch oven over medium heat and adding the diced bacon. Listen for that gentle sizzle that tells you the pan is properly heated — not too hot or the bacon will burn before rendering its fat. As the bacon cooks, use a wooden spoon to move the pieces around occasionally, ensuring even browning. You're looking for golden-brown pieces with just a bit of chew, not bacon chips, which should take about 6-8 minutes. The rendered fat should pool like liquid gold in the bottom of the pan, and your kitchen should smell like the world's best breakfast joint.
- Remove the bacon with a slotted spoon and set aside, but leave every last drop of that precious fat in the pan. Now here's where patience pays off: add your gnocchi in a single layer and don't you dare touch them for the first 2 minutes. Let them develop those gorgeous golden crusts that'll add incredible depth to the final dish. When they release easily from the pan and have caramelized spots underneath, give them a gentle toss and continue cooking for another 3-4 minutes until they're golden all over. The sound should change from a wet sizzle to a drier, almost crackling sound when they're ready.
- Transfer the gnocchi to a plate and add your butter to the rendered bacon fat — this is where we're building the flavor base that'll make your taste buds sing. Add the diced onions, carrots, and celery, stirring to coat each piece in the glorious fat mixture. Cook these vegetables slowly, stirring occasionally, until the onions turn translucent and the carrots start to caramelize around the edges. This should take about 8-10 minutes, and you should see brown bits forming on the bottom of the pan — these are flavor gold that'll deglaze later.
- Clear a space in the center of the pan and add your minced garlic, letting it sizzle for just 30 seconds until fragrant. Sprinkle the flour over everything and stir constantly for 2 minutes to cook out the raw flour taste. The mixture should look like a chunky paste coating all the vegetables — this is your roux that'll thicken everything beautifully. Don't rush this step; properly cooked flour is the difference between a sauce that tastes like kindergarten paste and one that tastes like liquid silk.
- Pour in your wine and prepare for the dramatic sizzle and steam that signals all the good stuff happening. Use your wooden spoon to scrape up every last bit of those browned bits from the bottom of the pan — they're packed with concentrated flavor that'll make your sauce taste like it simmered for hours. Let the wine reduce by half, which should take about 3 minutes, and watch as the mixture transforms from lumpy and weird to smooth and luxurious. The alcohol will cook off, leaving behind complex fruity notes that brighten the entire dish.
- Gradually whisk in your chicken stock, adding it in a slow stream while stirring constantly to prevent lumps. The sauce should start to thicken immediately, coating the back of your spoon like heavy cream. Add your fresh thyme, bay leaf, and a generous amount of freshly ground black pepper. Bring everything to a gentle simmer and let it bubble away for 5 minutes, stirring occasionally, until the sauce reaches the consistency of a thick chowder. You want it thick enough to coat the gnocchi but not so thick that it becomes gloppy.
- Now comes the moment of truth: add your seared gnocchi back to the pot along with your shredded chicken and frozen peas. Gently fold everything together, being careful not to break up the gnocchi or turn your chicken into stringy bits. The sauce should coat every piece like a luxurious blanket, with the peas providing little pops of color throughout. Reduce the heat to low and let everything simmer together for 3-4 minutes, just until the chicken is heated through and the peas are bright green and tender.
- Remove the bay leaf and taste for seasoning — this is where you might need to add salt, but remember that the bacon already brought some saltiness to the party. The sauce should be thick enough to coat a spoon but still pourable, and everything should look glossy and appetizing. If it seems too thick, add a splash more stock; if too thin, let it simmer for another minute. Stir in half of your reserved bacon bits, saving the rest for garnish because we're fancy like that.
- Turn off the heat and let the pot sit for exactly 5 minutes — this brief rest allows the sauce to thicken slightly and the flavors to meld together into something greater than the sum of their parts. During this time, the gnocchi will continue to absorb flavors and the sauce will reach the perfect consistency. Resist the urge to dig in immediately; good things come to those who wait, and this short pause is what separates good cooks from great ones.
That's it — you did it. But hold on, I've got a few more tricks that'll take this to another level...
Insider Tricks for Flawless Results
The Temperature Rule Nobody Follows
Here's where most home cooks go wrong: they crank the heat too high, thinking it'll speed things up, but all they get is burnt bacon and broken sauce. Medium heat is your sweet spot — hot enough to create proper caramelization but gentle enough to prevent scorching. When you add the flour, if the pan is too hot, it'll seize up into impossible lumps faster than you can stir. The sauce should maintain a gentle bubble, not a rolling boil, which keeps everything silky smooth. A friend tried skipping this step once — let's just say it didn't end well, and she served something that resembled wallpaper paste with chicken bits.
Why Your Nose Knows Best
Your sense of smell is the most underrated tool in your kitchen arsenal, especially for this recipe. When the bacon is perfectly rendered, your kitchen should smell like a campfire breakfast, not acrid smoke. The vegetables are ready when they smell sweet and slightly nutty, never sharp or raw. As the wine reduces, the alcohol smell should fade, leaving behind something that reminds you of a cozy wine bar on a winter evening. And here's the real secret: when everything's perfectly balanced, the final dish should smell like comfort itself — warm, inviting, and impossible to resist.
The 5-Minute Rest That Changes Everything
I know you're hungry, and that pot of golden goodness is calling your name, but patience is what separates good from legendary. Those five minutes off heat allow the sauce to thicken naturally as it cools slightly, the gnocchi to absorb the perfect amount of sauce, and the flavors to meld into something harmonious. During this time, the starch from the gnocchi continues to work its thickening magic, transforming the sauce from pourable to perfectly coatable. Set a timer and walk away if you have to — your future self will thank you when you're eating something that tastes like it took hours instead of minutes.
The Salt Timing Secret
Here's what separates the pros from the amateurs: we season at every stage, not just at the end. The bacon brings salt, the stock might be salted, and the chicken was probably seasoned at the store, so we wait until the very end to add additional salt. Taste after everything comes together, then add salt if needed — you'll be amazed how often you don't need any extra. Over-salting is the fastest way to ruin an otherwise perfect dish, but under-seasoning makes everything taste flat and boring. The sweet spot is when you can taste all the individual flavors, but nothing screams "I need salt!"
Creative Twists and Variations
This recipe is a playground. Here are some of my favorite ways to switch things up:
The Mediterranean Escape
Swap the bacon for pancetta, use white wine and lemon juice for brightness, and add a handful of chopped sun-dried tomatoes along with some fresh basil at the end. The Italian flavors transform this into something that tastes like it came from a trattoria in Rome, with the salty pancetta playing beautifully against the sweet tomatoes and fragrant basil. Use Italian rotisserie chicken if you can find it — it's typically seasoned with herbs that complement this Mediterranean twist perfectly.
The Spicy Southwest Version
Replace the bacon with chorizo, swap the thyme for cilantro, and add a diced jalapeño with the vegetables. Use pepper jack cheese stirred in at the end for extra oomph, and garnish with fresh cilantro and a squeeze of lime. The smoky heat from the chorizo infuses everything with this incredible depth, while the cheese adds creaminess that tames the spice just enough. My spice-loving friend calls this "the dish that made me forget about mac and cheese."
The Spring Garden Variation
Skip the bacon entirely and use olive oil instead, then load up on fresh asparagus, peas, and baby spinach. Add fresh dill and chives instead of thyme, and finish with a splash of lemon juice for brightness. This lighter version tastes like spring in a bowl, with each vegetable maintaining its distinct personality while playing nicely together. The lemon juice at the end wakes everything up and makes the whole dish taste incredibly fresh and vibrant.
The Decadent Truffle Edition
Keep everything the same but finish with a drizzle of white truffle oil and some shaved fresh Parmesan. This turns your humble one-pot meal into something worthy of a special occasion, with the earthy truffle oil adding luxury that makes everyone feel pampered. Use the good Parmesan here — the kind that smells like nuts and aged milk — and grate it fresh right before serving. A little goes a long way, but what a way it goes.
The Veggie-Loaded Family Version
Add diced zucchini, bell peppers, and mushrooms along with the other vegetables, and use vegetable stock instead of chicken. Double the peas and add some white beans for extra protein. This version is how I sneak extra vegetables into my kids' diet — they get so focused on the gnocchi that they don't even notice they're eating a veritable garden of vegetables. The mushrooms add umami depth that makes up for the missing bacon.
The Creamy Dreamy Variation
Stir in a splash of heavy cream at the very end for an extra-luxurious version that tastes like the best chicken and dumplings you've ever had. The cream adds richness that makes this feel like restaurant food, but be careful not to add too much or it'll overpower the other flavors. This is my go-to when I need comfort food that hugs you from the inside out, perfect for those days when everything feels too hard and you need dinner to be easy and indulgent.
Storing and Bringing It Back to Life
Fridge Storage
This keeps beautifully in the refrigerator for up to 4 days, though I dare you to make it last that long. Store it in an airtight container — I prefer glass because it doesn't absorb odors and reheats more evenly. The sauce will thicken considerably as it cools, which is actually perfect because it means the flavors are concentrating into something even more incredible. When you're ready to reheat, add a splash of chicken stock or even just water to loosen it up, then warm it gently over medium-low heat. Whatever you do, don't microwave it on high or you'll end up with rubbery gnocchi and broken sauce that'll make you weep real tears.
Freezer Friendly
Here's where things get interesting: this dish actually freezes remarkably well, though the gnocchi will lose a bit of their tender texture. Freeze individual portions in freezer-safe containers, leaving about an inch of space at the top for expansion. It'll keep for up to 3 months, making it the ultimate emergency comfort food stash. Thaw overnight in the refrigerator, then reheat gently with a splash of liquid to bring everything back to life. The flavor actually improves after freezing, as if the ingredients decided to become better friends during their time in the cold.
Best Reheating Method
The stovetop is your friend here — add your portion to a pan with a splash of water or stock, cover it, and warm over medium-low heat. Stir occasionally and add more liquid as needed; you're looking for that original creamy consistency, not soup. If you're in a rush, the microwave works in 30-second bursts, stirring between each burst and adding liquid as needed. But here's the real pro tip: transform leftovers into something new by adding them to a baking dish, topping with buttered breadcrumbs, and baking until golden for a completely different take that tastes like a whole new meal. That sizzle when it hits the hot pan? Absolute perfection.