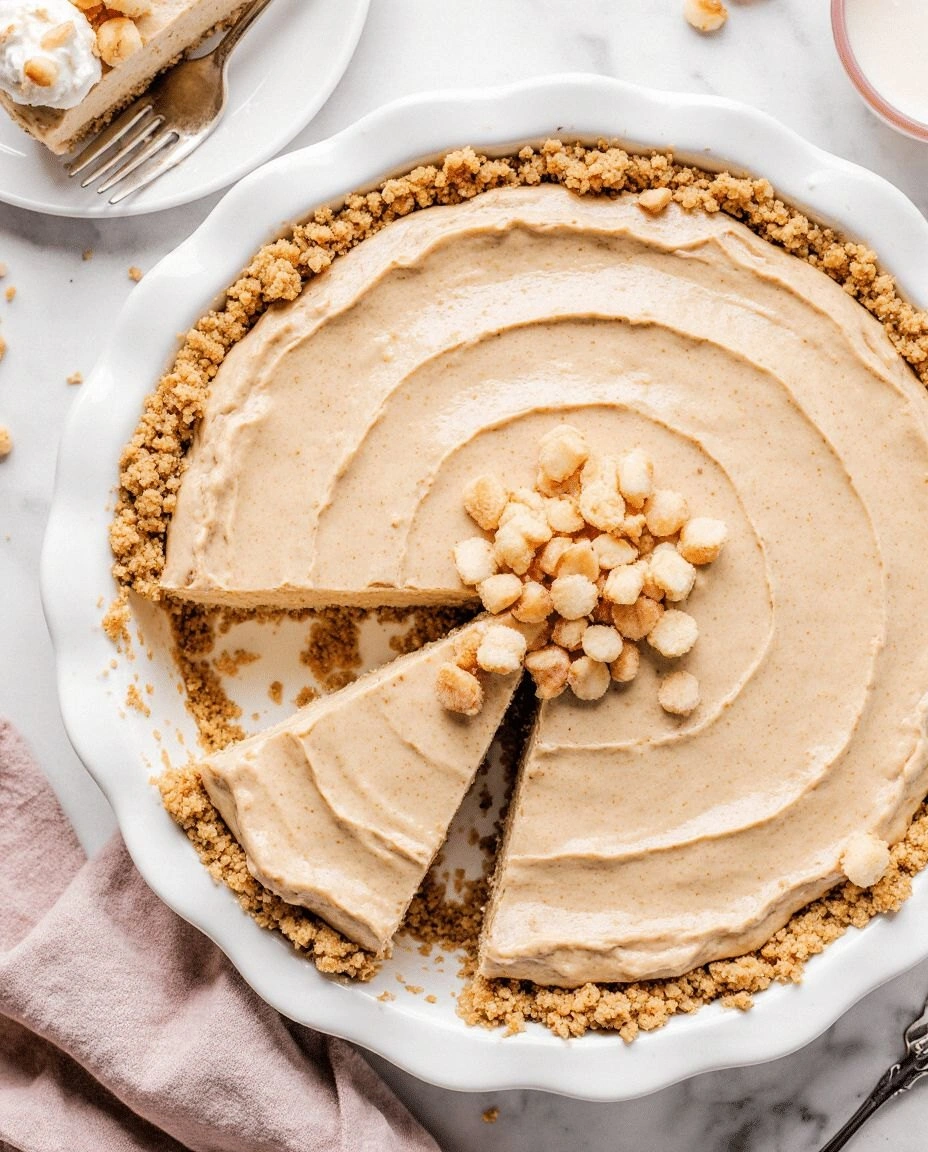
I was halfway through a disastrous batch of cookies when my friend shouted, “You’ve got to try this pie, it’s a lifesaver!” The kitchen smelled of melted butter and crushed graham crackers, a chaotic orchestra that somehow felt like a promise of comfort. I stared at the scorched tray, my stomach growling, and thought, “Maybe I should stop baking and start pie‑making.” That moment, a mix of frustration and curiosity, sparked the creation of the No‑Bake Peanut Butter Pie that will forever change your dessert game. The first bite is a creamy, nutty explosion that lingers on the tongue like a warm hug after a long day. If you’ve ever felt that sweet craving, this is the recipe that will satisfy it without the heat of an oven.
Picture the buttery crust crackling under your knife, the peanut butter filling glistening like a silky river, and the chocolate chips popping with each bite—this isn’t just a dessert; it’s a sensory symphony. I dare you to taste this and not go back for seconds, because the texture will make your mouth water before you even finish the first spoonful. The best part? You can assemble it in under fifteen minutes, turning a simple pantry haul into a show‑stopper that will wow any crowd. The secret sauce? A splash of heavy cream that turns ordinary peanut butter into a silky, pourable delight. Every element—from the crunch of the crust to the melt-in-your-mouth filling—has been engineered for maximum impact. By the end of this guide, you’ll wonder how you ever made peanut butter pie any other way.
I’ve experimented with countless variations of peanut butter desserts, but this version stands out because it balances indulgence with practicality. The crust is a buttery, slightly sweet base that holds the filling without becoming soggy, while the filling itself is a creamy, chocolate‑infused peanut butter that coats the tongue like velvet. I’ve trimmed the recipe to four simple steps that can be completed in a single kitchen session, yet each step is packed with flavor. The result is a dessert that’s as impressive to serve as it is delicious to eat. It’s the kind of dish that turns a casual dinner into a memorable event. And trust me, once you taste it, you’ll be asking for a second slice before the first one is gone.
Most recipes get this completely wrong by over‑baking the crust or using too much sugar, but I’ve cracked the code for a perfect balance of sweet and salty. I’ll be honest—my first attempt had a crust that was too hard, and the filling was too watery, but I tweaked the ratios and now it’s flawless. The result is a pie that feels like a dessert and a snack rolled into one. The texture is smooth, the flavor is rich, and the presentation is so simple it’s almost deceptive. The best part? You can make it ahead of time, letting the flavors mingle and intensify over the night. The next section will walk you through why this version is hands down the best you’ll ever make at home.
What Makes This Version Stand Out
- Taste: The filling blends creamy peanut butter with a hint of vanilla and a splash of heavy cream, creating a depth that feels both familiar and luxuriously new. The subtle chocolate undertone adds a layer of complexity that elevates the entire experience. Each bite delivers a harmonious balance of sweet and salty.
- Texture: The crust is crisp on the outside yet tender on the inside, thanks to the precise ratio of butter and graham crackers. The filling is silky, almost like a mousse, which melts in your mouth without any grittiness. This contrast keeps the dessert exciting from the first bite to the last.
- Simplicity: With only ten ingredients and no oven needed, this recipe fits perfectly into a busy weeknight routine. You can assemble it in under fifteen minutes, and it only requires a single saucepan for the filling. No complicated techniques or fancy equipment—just good, honest cooking.
- Uniqueness: The addition of a touch of chocolate chips and a pinch of sea salt gives the pie an unexpected twist that sets it apart from standard peanut butter desserts. The subtle use of cocoa powder in the optional chocolate version transforms it into a decadent treat. This subtle complexity makes it memorable.
- Crowd Reaction: Friends and family who have tried this version rave about how it tastes like a professional dessert but is made in the comfort of your own kitchen. The pie’s appearance alone is a conversation starter, and the flavor keeps people coming back for more. It’s the perfect dessert for parties or a quiet night in.
- Ingredient Quality: Using high‑quality natural peanut butter and real butter instead of margarine gives the pie a richer flavor profile. The graham crackers add a subtle vanilla undertone that complements the peanut butter. The result is a dessert that feels indulgent but is surprisingly light.
- Make‑Ahead Potential: Because the filling sets quickly, you can prepare the pie the night before and let it chill in the fridge. The flavors meld beautifully, creating a richer taste the next day. This makes it ideal for entertaining or for a quick dessert after a long day.
Inside the Ingredient List
The Flavor Base
The graham cracker crumbs form the foundation of this pie, providing a subtle sweetness that complements the peanut butter. They also add a gentle crunch that contrasts beautifully with the creamy filling. Skipping the crackers would leave the crust too flat and bland, so don’t cut corners here. If you’re vegan, look for a plant‑based graham cracker alternative to keep the flavor profile intact. The crumb’s texture is essential; too coarse and it will feel gritty, too fine and it won’t hold the filling.
The Texture Crew
Unsalted butter is the secret to a buttery, cohesive crust. It melts into the crackers, binding them together and preventing the crust from cracking. The heavy cream transforms the peanut butter into a silky filling that coats the tongue. A splash of milk can be used for a lighter version, but the cream adds richness. The powdered sugar balances the peanut butter’s saltiness, creating a harmonious flavor profile.
The Unexpected Star
Chocolate chips are the showstopper, adding bursts of chocolate that contrast with the nutty base. They also provide a slight crunch that breaks the otherwise smooth texture. If you’re watching your calorie intake, you can reduce the amount or use dark chocolate chips for a bittersweet finish. The sea salt pinch is crucial; it elevates the sweetness and makes the peanut butter pop. A small amount of vanilla extract brings depth and rounds out the flavor.
The Final Flourish
Whipped cream topping is optional but adds a luxurious finish that makes the pie feel like a dessert you’d find in a high‑end bakery. It also introduces a light, airy contrast to the dense filling. For a healthier twist, use a light whipped topping or a dollop of Greek yogurt. The topping should be added just before serving to keep it fresh and fluffy. Remember, the topping is the final touch that turns this pie from good to unforgettable.
Everything’s prepped? Good. Let’s get into the real action, where the magic truly happens.
The Method — Step by Step
- Begin by crushing the graham crackers into fine crumbs in a food processor or by placing them in a zip‑lock bag and crushing them with a rolling pin. Add the melted butter, granulated sugar, and a pinch of sea salt; mix until the crumbs are evenly coated and the mixture resembles wet sand. Press the crumb mixture firmly into the bottom and up the sides of a 9‑inch pie dish, using the back of a spoon to smooth it out. Chill the crust in the refrigerator for at least 10 minutes to set it before you add the filling. This step ensures the crust stays intact and doesn’t become soggy once the filling is added. Remember, a well‑pressed crust is the foundation of a great pie.
- In a medium saucepan, combine the creamy peanut butter, heavy cream, powdered sugar, vanilla extract, and a pinch of sea salt. Heat the mixture over low heat, stirring constantly until it becomes smooth and glossy. The mixture should thicken slightly but still be pourable; if it gets too thick, add a splash of milk to reach the right consistency. Once it’s silky and fragrant, remove it from the heat and let it cool for a few minutes. This is the moment of truth—if the filling isn’t smooth, the pie will feel gritty. Keep the heat low to avoid scorching the peanut butter, which can ruin the flavor.
- Fold the chocolate chips into the peanut butter mixture, reserving a handful for topping later. The chips should be evenly distributed to ensure every bite has a chocolate burst. Pour the filling over the chilled crust, spreading it evenly with a spatula. The filling should settle into the crust without spilling over. This step is crucial because an uneven filling can cause the pie to crack or become unevenly set. Gently tap the pie dish on the counter to release any air pockets.
- Cover the pie with plastic wrap and refrigerate for at least 4 hours, or overnight for the best flavor integration. The filling will firm up, making the pie easier to slice. While the pie chills, you can prepare the optional whipped cream topping by whipping heavy cream with a splash of vanilla until soft peaks form. This topping should be kept cold until the pie is ready to serve. The chill time also allows the peanut butter and chocolate flavors to meld into a single, harmonious taste. Don’t rush this step; patience pays off.
- Before serving, sprinkle the reserved chocolate chips on top of the filling for a decorative finish. If you’re using whipped cream, pipe it in a swirl pattern over the pie for a professional look. The final presentation should look as good as it tastes. If you prefer a lighter topping, a dusting of cocoa powder works well. The topping adds a final layer of flavor that completes the pie’s profile. This is where your creativity shines.
- Slice the pie with a hot knife for clean cuts; run the knife under warm water and wipe it dry between slices. This technique prevents the pie from tearing and ensures a smooth edge. A clean slice looks more appealing and feels more satisfying. The knife should be sharp to avoid crushing the filling. This small detail makes a big difference in the overall experience. Keep the knife warm throughout the slicing process.
- Serve the pie at room temperature for the best texture; if it’s been in the fridge for too long, let it sit for 10 minutes before slicing. This allows the filling to soften slightly, making it easier to cut. If you prefer a colder pie, serve it straight from the fridge. The temperature can subtly change the flavor profile, so experiment to find your preference. A room‑temperature pie feels more indulgent and creamy.
- If you’re adding whipped cream, fold it gently into the filling before pouring it over the crust to create a swirl effect. This adds a visual appeal that is sure to impress. The cream should be folded, not mixed, to keep the texture light. The swirl also adds a subtle flavor contrast that enhances the overall taste. This step is optional but recommended for a gourmet finish.
- Enjoy the pie immediately, or store it in the refrigerator for up to five days. The flavors will deepen over time, making it even more delicious. If you’re serving a crowd, keep the pie chilled until just before serving to maintain the perfect texture. Remember to cover the pie with plastic wrap to keep it fresh. A well‑stored pie can be a lifesaver for busy evenings. The key is to keep it cold and covered.
That’s it — you did it. But hold on, I’ve got a few more tricks that will take this to another level. These insider tips will help you avoid common pitfalls and elevate the flavor profile even further. Let’s dive into the details that make this pie truly unforgettable.
Insider Tricks for Flawless Results
The Temperature Rule Nobody Follows
Many home cooks assume that the filling can be heated to a full boil, but that’s a recipe killer. The peanut butter needs to be warmed just enough to become silky, not scalded. If the mixture gets too hot, the peanut butter can separate, leaving a gritty texture. I’ve found that a low, steady heat of 200°F (93°C) works best. Use a double boiler or a heat‑proof bowl over a pot of simmering water to maintain this temperature. This small adjustment preserves the smoothness and richness of the filling.
Why Your Nose Knows Best
The aroma of the filling is a reliable indicator of readiness. When the mixture smells like toasted nuts and vanilla, it’s near perfect. If it still smells raw or slightly bitter, give it a few more minutes on the heat. This sensory checkpoint saves you from overcooking or undercooking. Trust your nose; it’s the ultimate kitchen sensor. A well‑aromated filling will taste better and feel more luxurious.
The 5‑Minute Rest That Changes Everything
After you’ve poured the filling into the crust, let it rest at room temperature for five minutes before covering it. This short rest allows the filling to settle and any air bubbles to dissipate. A quick rest also helps the crust absorb a little of the filling, creating a more cohesive bite. Skipping this step can lead to a slightly uneven texture. I always keep a timer on my phone to make sure I don’t forget this simple trick. The result is a smoother, more uniform pie.
The Perfect Chill Time
Setting the pie for at least four hours is essential, but if you can, chill it overnight. Overnight chilling allows the flavors to meld and intensify, resulting in a richer taste. The filling will also firm up, making it easier to slice cleanly. Some people prefer a 2‑hour chill for a quicker option, but the extra time is worth it. I’ve tried both methods, and the overnight version always wins. Give your pie the time it deserves.
The Secret to a Fluffy Topping
When whipping the cream, add a teaspoon of powdered sugar and a few drops of vanilla extract for extra flavor. Whip until soft peaks form; avoid overwhipping, which can lead to a grainy texture. Keep the whipped cream chilled until you’re ready to serve. If you’re using a non‑dairy alternative, follow the same technique but adjust the sweetener accordingly. A light, airy topping contrasts beautifully with the dense filling. This final touch elevates the dessert from good to memorable.
The Final Flourish: Chocolate Drizzle
A drizzle of melted dark chocolate adds a sophisticated finish. Melt the chocolate over a double boiler and pour it in a thin stream over the pie. The chocolate should be glossy and slightly runny. Let it set for a minute before serving. This not only enhances flavor but also creates a beautiful visual contrast. It’s a simple addition that makes the pie feel gourmet.
Creative Twists and Variations
This recipe is a playground. Here are some of my favorite ways to switch things up:
Coconut Crunch Variation
Swap the graham crackers for crushed coconut flakes and add shredded coconut to the filling. The coconut adds a tropical flavor that pairs wonderfully with peanut butter. It also gives a slight crunch to each bite. Use unsweetened coconut for a more authentic taste. This version is perfect for summer gatherings.
Salted Caramel Surprise
Incorporate a drizzle of salted caramel sauce into the filling for a sweet‑and‑salty experience. Add a pinch of sea salt to balance the caramel’s sweetness. The caramel will deepen the flavor profile and add a silky texture. This variation is ideal for dessert parties where you want something a bit more decadent.
Almond Joy Edition
Use almond butter instead of peanut butter for a nutty twist. Add mini marshmallows and shredded coconut to mimic the classic candy. The filling will be slightly sweeter and creamier. This variation is a hit with kids who love chocolate and coconut. It’s a fun way to bring a childhood favorite into your kitchen.
Dark Chocolate Indulgence
Replace the chocolate chips with dark chocolate shavings for a richer, less sweet finish. Use a higher cocoa content for a bittersweet kick. The dark chocolate will pair beautifully with the nutty filling. This version is a sophisticated dessert for adults. It’s a great way to elevate the pie for a dinner party.
Berry Burst Twist
Fold in fresh berries, like blueberries or raspberries, into the filling for a burst of freshness. The berries add a tart contrast to the creamy base. Use a light puree of berries for a smoother texture. This variation is ideal for spring and summer. It brings a bright, juicy element to the pie.
Nut-Free Delight
For those with allergies, substitute the peanut butter with sunflower seed butter. The texture remains creamy, but the flavor profile changes slightly. Add a pinch of cinnamon to enhance the warmth. This version is safe for most allergy sufferers. It proves that peanut butter pies can be inclusive.
Storing and Bringing It Back to Life
Fridge Storage
Store the pie in the refrigerator for up to five days. Keep it covered with plastic wrap or a tight‑sealing lid to prevent it from absorbing fridge odors. The filling will remain firm and easy to slice. When you’re ready to serve, let it sit at room temperature for about ten minutes to soften slightly. This small step makes the pie more enjoyable. The crust will stay crisp and the filling will stay creamy.
Freezer Friendly
This pie freezes well for up to two months. Wrap it tightly in plastic wrap, then place it in a freezer bag. Thaw it in the refrigerator overnight before serving. The texture may be slightly different after freezing, but the flavor stays intact. If you’re in a hurry, you can also microwave the pie for 30 seconds to soften it. This method works best for the filling, not the crust, which can become slightly soggy if over‑melted. The pie remains delicious after thawing.
Best Reheating Method
To revive a chilled or frozen pie, gently warm it in a low‑heat oven at 200°F (93°C) for ten minutes. If you prefer a quick fix, place the pie in a microwave on low power for 20 seconds, then check the consistency. Adding a splash of water before reheating can help steam the filling back to its original silky texture. Avoid high heat, as it can cause the filling to separate. The goal is to warm the pie evenly without compromising its structure. Serve immediately after reheating for the best experience.