Love this? Pin it for later! 📌
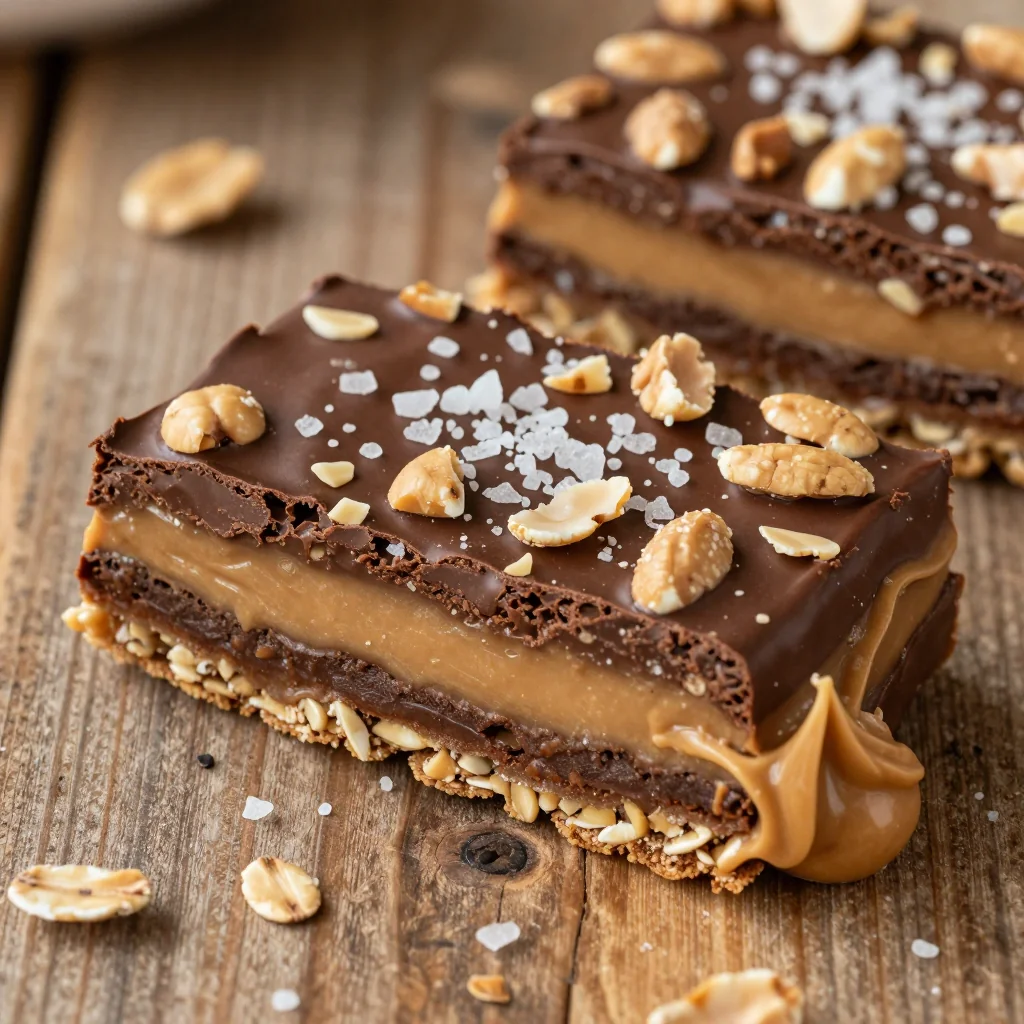
There are recipes that fill your stomach, and then there are recipes that fill your heart. These No Bake Peanut Butter Chocolate Oat Bars fall squarely into both categories. I first whipped up a pan of these beauties on a frantic Tuesday night when my daughter’s bake-sale contribution was due the next morning, the oven was on the fritz, and I had exactly 20 minutes before the bedtime story marathon began. What started as a last-minute rescue mission has since become the most-requested treat in our house—surpassing even my from-scratch cinnamon rolls, which is saying something.
Every time I pull these from the fridge, I’m transported back to that chaotic evening: the kitchen lights glowing warm against the dusk outside, tiny hands sneaking chocolate chips when they thought I wasn’t looking, and the smell of peanut butter mingling with the faint vanilla candle burning on the windowsill. These bars are more than the sum of their humble pantry ingredients; they’re edible nostalgia. They’re the dessert you bring to a new neighbor, the snack you tuck into a college-care package, the sweet you stir together when life feels too heavy for anything requiring a candy thermometer. They’re sturdy enough to survive a potluck commute yet tender enough to feel like comfort food at its finest. And because they require zero oven time, they’re the hero recipe of sweltering summer afternoons and holiday kitchen traffic jams alike.
Why This Recipe Works
- No oven required: Perfect for dorm rooms, hot days, or when your stove is occupied with a 12-pound turkey.
- One bowl, one pan: Minimal dishes means you’ll actually enjoy the process instead of dreading cleanup.
- Whole-grain goodness: Old-fashioned oats keep you satisfied far longer than the usual marshmallow cereal treats.
- Balanced sweetness: A kiss of honey tempers the chocolate so the bars taste like a treat, not a sugar crash.
- Customizable canvas: Swap nut butters, fold in dried fruit, or drizzle with white chocolate—no rulebook here.
- Kid-approved texture: Chewy, slightly crunchy, and studded with melty chocolate chips—what’s not to love?
- Make-ahead magic: They slice cleaner after a night in the fridge, so you can prep early and dazzle later.
- Portable protein: Peanut butter delivers staying power, making these bars breakfast-appropriate in my book.
Ingredients You'll Need
Before we dive in, let’s talk ingredient strategy. Quality matters here, but convenience isn’t sacrificed. Think of these staples as friendly teammates, each bringing a unique skill to the no-bake game.
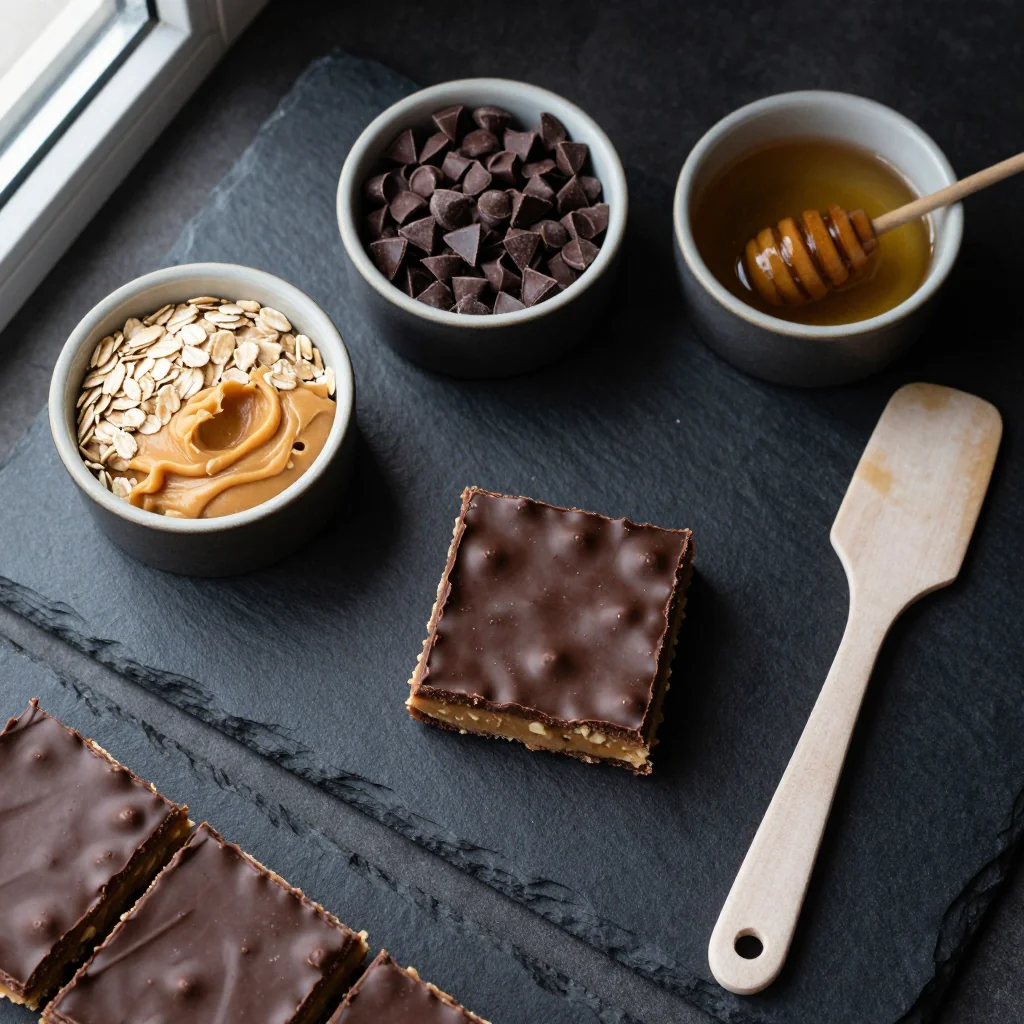
Old-fashioned rolled oats: The backbone of our bars. Their hearty texture prevents the dreaded gummy bite you sometimes get with quick oats. If gluten is a concern, look for certified gluten-free oats; contamination is surprisingly common in bulk bins. Store any extras in the freezer to keep them fresh and bug-free.
Creamy peanut butter: The glue—literally. Natural varieties work, but make sure it’s well-stirred and not the watery top layer. I keep a “stir-free” brand on hand specifically for no-bake desserts; the emulsifiers keep the bars stable at room temp. Crunchy peanut butter is welcome if you enjoy nutty pops in every bite.
Local honey: Honey lends floral notes and helps the mixture bind without reaching candy-stage temperatures. Clover honey is mild, wildflower is assertive—pick your pleasure. If you’re vegan, swap in brown rice syrup; it’s viscous enough to mimic honey’s clingy nature.
Unsalted butter: Just a smidge for richness. If you only have salted, omit the pinch of salt later. Coconut oil stands in beautifully for a dairy-free version, adding faint tropical perfume that plays nicely with chocolate.
Pure vanilla extract: The aromatic amplifier. I splurge on Madagascar bourbon because its round, creamy flavor screams “homemade.” Imitation extract works in a pinch, but expect a slightly sharper profile.
Semisweet chocolate chips: I keep a bag of 60 % chips in the pantry for everyday treats, but if you adore darker chocolate, push to 70 %. Mini chips disperse more evenly, while chunks create molten pockets. For a refined finish, chop a bar by hand; the irregular shards melt into gorgeous marbling.
Ground cinnamon: Optional but transformative. A whisper of warmth makes the chocolate taste deeper, similar to how espresso powder amplifies cocoa. If you’re cinnamon-averse, swap in a teaspoon of instant espresso for mocha vibes.
Sea salt: Flaky salt sprinkled on top creates that crave-worthy sweet-salty contrast. I keep a small jar of Maldon by the stove for moments like this.
How to Make No Bake Peanut Butter Chocolate Oat Bars
Prep your pan and ingredients
Line an 8-inch square baking pan with parchment paper, leaving overhang on two sides like handles. Lightly grease the exposed sides with butter or non-stick spray. Measure everything before you start; once the warm mixture hits the oats, you’ll need to move quickly to prevent uneven setting.
Toast the oats (optional but worth it)
Place oats in a dry skillet over medium heat. Stir constantly for 4–5 minutes until they smell nutty and turn a shade darker. Toasting intensifies flavor and removes excess moisture, extending shelf life. Cool completely before mixing so they don’t melt the chocolate prematurely.
Simmer the wet ingredients
In a medium saucepan over low heat, combine peanut butter, honey, and butter. Stir until just melted and glossy—do not let it bubble. Overheating can cause the mixture to seize once it meets the oats. Remove from heat and whisk in vanilla, cinnamon, and a pinch of salt.
Fold in the oats
Dump toasted oats into the warm peanut-butter mixture. Using a sturdy silicone spatula, fold until every flake is coated. The batter will look wet and slightly shiny; this ensures the bars hold together once chilled.
Add the chocolate chips
Let the oat mixture cool for 2 minutes so the chips don’t completely melt. Fold gently; some streaking is desirable—it creates pretty marbling. Reserve a tablespoon of chips for topping if you like visual pizzazz.
Pack into the pan
Scrape mixture into prepared pan. Lay a second sheet of parchment on top and press firmly with the flat bottom of a measuring cup or jar. Compact layers prevent crumbling when sliced. Pay special attention to corners; an offset spatula helps level the surface.
Chill to set
Cover with foil and refrigerate at least 2 hours, preferably overnight. The honey needs time to crystallize slightly, ensuring clean cuts. If you’re in a hurry, 30 minutes in the freezer works, but the center may be slightly softer.
Slice and serve
Lift the slab out using parchment handles. Place on a cutting board and, using a sharp chef’s knife, score into quarters then slice each quarter into three rectangles. Wipe the blade between cuts for bakery-worthy edges. Sprinkle with flaky salt just before serving to keep it crunchy.
Expert Tips
Temperature matters
Warm peanut-butter mixture helps oats absorb flavor, but too hot and you’ll scramble the honey sugars. Aim for baby-bottle warm—test with your finger.
Line generously
Leave a 2-inch overhang. Once chilled, the bars are firm and can be lifted cleanly; short flaps make removal frustrating and may cause cracks.
Patience pays
If the mixture feels oily, it’s too warm. Let it sit 5 minutes before pressing into the pan; otherwise the chocolate will sink and separate.
Drizzle drama
Melt 2 extra tablespoons chips with ½ tsp coconut oil, then stripe the top before chilling. The glossy finish looks gourmet and hides any press marks.
Even edges
Score lines with a bench scraper before fully chilled; the indentations guide your knife and prevent crumbling when you slice for serving.
Travel ready
Slip individual bars into muffin liners before packing in lunchboxes. The paper keeps sticky fingers at bay and makes sharing more sanitary.
Variations to Try
- Almond Joy twist: Swap almond butter for peanut butter and fold in ½ cup toasted coconut plus ¼ cup chopped almonds.
- SunButter special: For nut-free classrooms, use sunflower-seed butter and replace honey with rice syrup to avoid any trace allergens.
- Trail-mix energy: Stir in ⅓ cup dried cranberries and 2 tablespoons pumpkin seeds for a tart crunch and autumn color.
- Mocha madness: Dissolve 1 tablespoon instant espresso in 1 teaspoon hot water, then whisk into the warm peanut-butter mixture.
- White-chocolate raspberry: Use white chocolate chips and swirl ¼ cup freeze-dried raspberry powder through the oat mixture for a pink pop.
- Salted caramel swirl: Warm 3 tablespoons caramel sauce just enough to loosen, then marble on top before chilling; finish with smoked salt.
Storage Tips
These bars keep beautifully, which is why I routinely double the batch. Store sliced bars in an airtight container with parchment between layers. They’ll stay fresh in the refrigerator for up to 1 week, though they rarely last that long. For longer storage, freeze individual bars on a sheet pan until solid, then transfer to a zip-top bag with as much air removed as possible. They thaw in 10 minutes at room temp or can be enjoyed straight from the freezer for a firmer, candy-like bite. Avoid storing in direct sunlight or a warm car; the honey softens and bars will slump into a sticky puddle. If taking on the go, tuck a cold pack into the lunch bag.
Frequently Asked Questions

No Bake Peanut Butter Chocolate Oat Bars
Ingredients
Instructions
- Prep pan: Line an 8-inch square pan with parchment, leaving overhang.
- Toast oats: In a dry skillet over medium heat, stir oats 4–5 minutes until fragrant; cool.
- Melt wet ingredients: Combine peanut butter, honey, and butter in a small saucepan over low heat until melted and smooth. Remove from heat; stir in vanilla, cinnamon, and salt.
- Mix: Fold toasted oats into warm mixture until coated. Let stand 2 minutes.
- Add chocolate: Fold in chocolate chips; reserve a few for topping if desired.
- Pack & chill: Press mixture firmly into lined pan. Top with reserved chips and flaky salt. Chill at least 2 hours, then slice.
Recipe Notes
Bars slice cleanest when cold. For picnics, transport in a cooler; at room temperature they soften but still hold shape up to 75 °F.