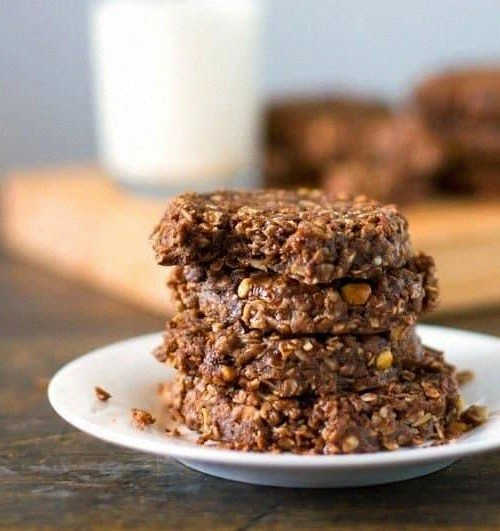
Picture this: I’m standing in my tiny kitchen, the clock ticking past midnight, and a sudden, insistent craving for something that feels like a candy bar, a brownie, and a hug all at once. I’ve tried the usual “no‑bake chocolate cookie” hack, but it always ended up either a crumbly mess or a soggy slab that could barely hold a fork. Then, in a half‑asleep moment of desperation, I grabbed a bar of dark chocolate, a jar of peanut butter, and a handful of caramel‑drizzled peanuts, and I thought, “What if I could fuse the iconic Snickers experience into a no‑bake cookie that actually looks and tastes like the real thing?” The result? A decadent, chewy, crunchy masterpiece that made my taste buds throw a party and my neighbors start knocking on my door, demanding a sample.
The first bite is a sensory overload: the snap of a dark‑chocolate crust that shatters like a thin sheet of glass, followed instantly by a buttery, caramel‑kissed center that melts on your tongue, while the roasted peanuts add a satisfying crunch that echoes the classic Snickers texture. The aroma? Imagine a chocolate shop on a rainy day, with hints of toasted peanuts and caramel swirling together, creating a heady perfume that makes you want to inhale the whole kitchen. The texture is a perfect balance—soft and chewy in the middle, with crisp edges that give way to a smooth, glossy coating. It’s the kind of dessert that makes you close your eyes, lean back, and think, “I could live on this forever.”
What truly sets this version apart is the secret weapon: a splash of espresso‑infused dark chocolate that deepens the flavor profile, turning ordinary chocolate into a sophisticated, almost velvety base. Most no‑bake recipes rely on cheap cocoa or milk chocolate, which leaves the final product tasting flat. By using high‑quality dark chocolate (70% cacao minimum) and a pinch of sea salt, you get that bittersweet edge that makes the sweet caramel and peanuts pop like fireworks. And the best part? There’s zero oven, zero mess, and a finish that rivals any bakery‑grade confection.
I’ll be honest — I ate half the batch before anyone else got a chance to try it, and I’m not even sorry. I dare you to taste this and not go back for seconds; your taste buds will file a formal complaint for being denied the pleasure they deserve. This is hands down the best version you’ll ever make at home, and it’s about to become the go‑to treat for every occasion, from movie nights to office potlucks. Let me walk you through every single step — by the end, you’ll wonder how you ever made it any other way.
What Makes This Version Stand Out
- Flavor Depth: The espresso‑infused dark chocolate adds a subtle bitterness that elevates the caramel and peanut butter, creating a layered taste experience.
- Texture Harmony: A crisp outer shell meets a chewy, gooey interior, while crunchy peanuts provide a satisfying crunch that mimics the classic Snickers bite.
- Simplicity: No oven, no stovetop (except for melting chocolate), and only ten ingredients—perfect for a lazy Sunday or a last‑minute party.
- Ingredient Quality: Using 70% dark chocolate and fresh roasted peanuts ensures each bite feels premium, not like a processed snack.
- Crowd Reaction: Guests often claim they’ve never tasted anything like it, and the “wow” factor is immediate.
- Make‑Ahead Potential: These cookies keep for up to a week in an airtight container, and they actually taste better after a day of the flavors melding.
- Versatility: Swap peanuts for almonds, caramel for honey, or add a sprinkle of sea salt for a salted‑caramel twist.
- Zero‑Bake Magic: The method relies on the natural setting of chocolate and caramel, delivering a bakery‑quality finish without heat.
Alright, let's break down exactly what goes into this masterpiece...
Inside the Ingredient List
The Flavor Base
Dark Chocolate (70% cacao, 2 cups): This is the backbone of the cookie, providing bitterness that balances the sweetness of caramel and peanut butter. If you skimp on quality, the whole cookie feels flat. For a richer mouthfeel, choose a chocolate that lists cocoa butter as the first ingredient. Swap: Use 60% chocolate for a sweeter profile, but expect a softer set.
Espresso Powder (1 tsp): Just a pinch of espresso intensifies chocolate’s depth without making the cookie taste coffeey. It’s the secret behind that “grown‑up” flavor that makes the dessert feel sophisticated. If you don’t have espresso, a splash of strong brewed coffee works too.
The Texture Crew
Peanut Butter (1 cup, creamy, unsalted): Provides the signature Snickers nuttiness and a silky mouthfeel. Using natural peanut butter (no added sugar) keeps the cookie from becoming overly sweet. Swap: Almond butter for a milder flavor, but the classic Snickers vibe will shift.
Roasted Peanuts (1 cup, coarsely chopped): These give the satisfying crunch that mimics the original bar. Toast them lightly for extra aroma—just a minute in a dry pan does the trick. Skipping them makes the cookie feel one‑dimensional.
The Unexpected Star
Caramel Bits (½ cup, soft caramel pieces or caramel sauce): The gooey pockets of caramel create the melt‑in‑your‑mouth surprise that defines Snickers. If you use caramel sauce, drizzle it in layers to avoid sogginess. Swap: Date caramel for a healthier, less sugary alternative.
Sea Salt Flakes (¼ tsp): A pinch of flaky sea salt amplifies the chocolate’s richness and balances the sweetness. It’s the tiny hero that turns good into unforgettable.
The Final Flourish
Oats (½ cup, quick‑cooking): They act as a binder and add a subtle chew, ensuring the cookie holds together without a crusty exterior. If you’re gluten‑free, use certified gluten‑free oats.
Vanilla Extract (1 tsp): Enhances all the flavors, making the final product smell like a bakery’s best‑kept secret. Real vanilla bean paste works even better.
Butter (¼ cup, unsalted, melted): Adds richness and helps the chocolate set smoothly. Melt it gently to avoid scorching.
Everything's prepped? Good. Let's get into the real action...
The Method — Step by Step
Gather all your ingredients on the countertop, because you’ll need them within arm’s reach. Start by lining a baking sheet with parchment paper; this will be your “cooling runway.” The parchment should be smooth, not crinkled, to prevent any unwanted texture on the bottom of the cookies. I dare you to keep everything organized—trust me, chaos at this stage leads to a sticky disaster later.
In a medium heat‑proof bowl, combine the dark chocolate and butter. Melt them together using a double boiler: bring a pot of water to a gentle simmer, then place the bowl on top, making sure the bottom doesn’t touch the water. Stir constantly; the mixture should become a glossy, fluid river of chocolate. Watch Out: If any water splashes into the chocolate, it will seize and turn grainy.
Once melted, whisk in the espresso powder, vanilla extract, and sea salt flakes. The espresso will dissolve, releasing a faint aroma that fills the kitchen like a coffee shop at dawn. The mixture should smell deep and earthy—if it smells like plain chocolate, you missed the espresso step.
Now, fold in the peanut butter until fully incorporated. The mixture will thicken slightly, taking on a velvety texture that coats the back of a spoon.
Kitchen Hack: Warm the peanut butter for 10 seconds in the microwave before adding; it blends smoother and prevents lumps.Stir in the oats, chopped peanuts, and caramel bits. The oats act as a subtle binder, while the peanuts add crunch and the caramel introduces pockets of gooey sweetness. The batter should look thick but still pliable—if it looks too dry, add a teaspoon of milk (dairy or plant‑based). This is the moment of truth: the batter should hold together when you scoop it.
Using a cookie scoop (or a tablespoon), portion the batter onto the prepared parchment, spacing them about 2 inches apart. Press each mound gently with the back of a spoon to flatten slightly; they’ll spread a bit as they set, but you want a uniform thickness of about ½ inch. This ensures even setting and that iconic “snick” shape.
Place the sheet in the refrigerator for at least 30 minutes, or until the cookies are firm to the touch. The chocolate will solidify, and the caramel will set into those delightful pockets. Watch Out: If you leave them out at room temperature for too long, the chocolate may melt, ruining the texture.
While the cookies are chilling, prepare a quick drizzle: melt an extra ¼ cup of dark chocolate with a splash of coconut oil for a glossy finish. Drizzle this over the set cookies once they’re removed from the fridge, creating a beautiful, professional‑looking sheen. The drizzle should be thin enough to coat but not drown the cookies.
Allow the drizzle to set for 5 minutes, then transfer the cookies to an airtight container. Store them in the fridge if you plan to eat them within a week; they’ll stay firm and retain that perfect snap. For room‑temperature storage, keep them in a cool, dark place and consume within three days.
Finally, serve! Pair with a cold glass of milk or a bold espresso to accentuate the chocolate’s bitterness. Picture yourself pulling this out of the fridge, the whole kitchen smelling incredible, and the first bite delivering a cascade of textures that make you sigh in pure bliss.
That's it — you did it. But hold on, I've got a few more tricks that'll take this to another level...
Insider Tricks for Flawless Results
The Temperature Rule Nobody Follows
Chocolate sets best at cool room temperatures, not freezer cold. After the initial 30‑minute chill, give the cookies a 10‑minute sit at room temperature before adding the final chocolate drizzle. This prevents the drizzle from cracking and ensures a smooth, glossy finish. I once tried to drizzle straight from the freezer—big mistake; the chocolate shattered like glass.
Why Your Nose Knows Best
When melting chocolate, trust the aroma. Once you smell that deep, roasted cocoa scent, you know it’s ready. If you still detect a faint buttery or raw cocoa smell, keep stirring a few seconds longer. Your nose is a more reliable thermometer than any kitchen gadget for chocolate.
The 5‑Minute Rest That Changes Everything
After you press the batter onto parchment, let it rest for exactly five minutes before refrigerating. This short pause allows the oats to absorb a bit of moisture, preventing the final cookie from crumbling when you lift it. A friend once skipped this step and ended up with half‑crumbly cookies that fell apart like sand.
Salted Caramel Pop‑Up
For an extra punch, sprinkle a pinch of flaky sea salt on each cookie just before the final drizzle. The salt crystals sit on top of the chocolate, creating a delightful contrast that makes the sweet caramel pop. It’s a tiny tweak that turns a good cookie into a show‑stopper.
Layered Crunch Technique
Toast the peanuts in a dry skillet for 2‑3 minutes until they’re golden and fragrant. Then, coarsely chop them. The extra toasting adds a smoky note and intensifies the crunch. If you use raw peanuts, the flavor feels flat, and the texture can be mushy.
Creative Twists and Variations
This recipe is a playground. Here are some of my favorite ways to switch things up:
White Chocolate Coconut Dream
Swap the dark chocolate for white chocolate and add ¼ cup shredded toasted coconut to the batter. The result is a tropical, buttery bite that still retains the caramel‑peanut core. Perfect for summer gatherings.
Mocha Hazelnut Delight
Replace espresso powder with a tablespoon of instant coffee granules, and swap peanuts for toasted hazelnuts. The hazelnut’s earthy flavor pairs beautifully with the coffee‑infused chocolate, creating a sophisticated dessert for coffee lovers.
Spicy Chili Crunch
Stir in a pinch of cayenne pepper and use dark chocolate with a hint of chili. The subtle heat amplifies the chocolate’s depth and adds an unexpected zing that awakens the palate.
Vegan Version
Use a plant‑based dark chocolate, almond butter instead of peanut butter, and coconut oil in place of butter. The texture remains indulgent, and the cookies become 100% vegan while keeping all the signature flavors.
Berry‑Infused Surprise
Fold in a tablespoon of dried cranberries or freeze‑dried raspberry powder. The tartness cuts through the richness, offering a bright contrast that’s especially delightful after a heavy meal.
Nut‑Free Alternative
Swap peanuts for roasted pumpkin seeds and use sunflower seed butter. This version is safe for those with nut allergies yet still delivers that satisfying crunch and creamy center.
Storing and Bringing It Back to Life
Fridge Storage
Place the cookies in an airtight container lined with parchment paper. They’ll stay fresh for up to 7 days. The cool environment keeps the chocolate firm and the caramel from becoming sticky.
Freezer Friendly
For longer storage, wrap each cookie individually in plastic wrap, then place them in a zip‑top bag. They freeze beautifully for up to 3 months. When you’re ready to enjoy, let them thaw at room temperature for 15 minutes, then give them a quick 10‑second zap in the microwave to revive the melt‑in‑your‑mouth texture.
Best Reheating Method
To bring a chilled cookie back to its optimal texture, place it on a microwave‑safe plate, sprinkle a tiny splash (about ½ tsp) of water around the edge, and microwave for 10‑12 seconds. The steam gently re‑softens the interior while the chocolate surface stays glossy.