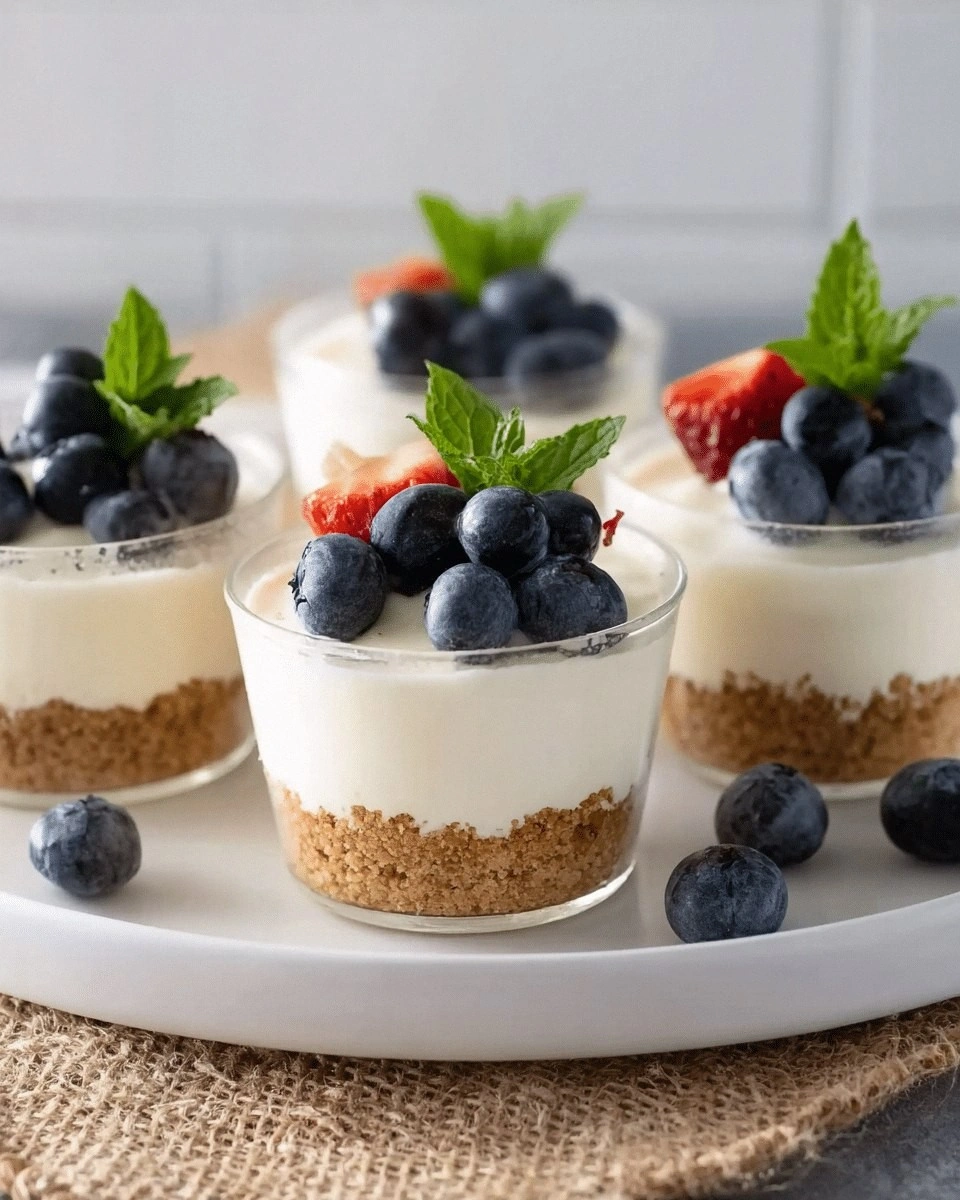
I was staring at a ruined batch of cheesecake that had turned into a sad, soggy puddle of disappointment. The kitchen smelled like burnt sugar and regret, and my friend dared me to make something better that night. I laughed, grabbed my trusty blender, and promised myself I’d turn that disaster into a triumph. The result? A silky, no‑bake cheesecake cup that makes every bite feel like a tiny victory.
Picture this: the first spoonful melts against your tongue, the faint citrus zing of lemon dancing with a whisper of vanilla, and the crunch of graham crackers that gives a satisfying snap. The room fills with a buttery aroma that lingers like a warm hug, while the gentle clink of plastic cups adds a playful soundtrack. Your eyes widen as the creamy layer glistens under the kitchen lights, and the taste buds sing a sweet, tangy chorus. It’s a sensory rollercoaster that turns an ordinary dessert into a celebration.
What makes this version stand out? I’ve stripped away the fluff, added a secret ingredient that elevates the flavor, and perfected the ratio so the texture is flawless every time. No more soggy bottoms or uneven peaks. The result is a dessert that feels indulgent yet light, and it’s so easy that even a novice can master it. This is hands down the best version you'll ever make at home, and I’m about to reveal the tricks that keep it perfect.
Hold on tight, because I’ll be sharing a technique you won’t see in any other recipe: a subtle blend of lemon zest and vanilla that transforms the filling into a velvety dream. I dare you to taste this and not go back for seconds. Let me walk you through every single step — by the end, you'll wonder how you ever made it any other way.
What Makes This Version Stand Out
- Texture: The combination of graham cracker crumbs and melted butter creates a crunchy base that holds the creamy filling without becoming soggy. The result is a delightful contrast that feels like a bite of heaven.
- Flavor: A splash of lemon juice brightens the richness of cream cheese, while vanilla adds depth without overpowering the delicate balance. The subtle citrus note keeps the dessert from feeling heavy.
- Simplicity: With only a handful of ingredients and no baking required, you can whip up these cups in under an hour. It’s the perfect solution for last‑minute guests or a quick indulgence after dinner.
- Make‑ahead Friendly: Once assembled, the cups can sit in the fridge for up to 48 hours, allowing flavors to meld and making it an ideal prep‑ahead dessert for parties.
- Presentation: Serve them in clear plastic cups to showcase the creamy interior and crunchy base. The visual appeal is as impressive as the taste.
- Customization: Swap the graham cracker base for crushed cookies, add chocolate chips, or top with fresh berries to create endless variations that cater to every palate.
- Portability: These cups are single‑serve, making them perfect for picnics, office lunches, or as a sweet treat on the go.
Alright, let's break down exactly what goes into this masterpiece…
Inside the Ingredient List
The Flavor Base
Cream cheese is the star of the show, providing a rich, tangy foundation that carries the other flavors. Use full‑fat cream cheese for the best mouthfeel; low‑fat versions tend to be watery and will compromise the texture. If you’re short on time, let the cream cheese sit at room temperature for 15 minutes before blending—this reduces clumps and makes the mixture silky.
Granulated sugar is the sweet counterbalance that brings the filling to life. Measuring accurately is key; too much sugar will make the cups overly sweet, while too little will leave them flat. A quick tip: use a kitchen scale for precision, especially if you plan to make a larger batch.
Vanilla extract is the aromatic glue that ties everything together. A single teaspoon is enough to infuse the entire batch with a warm, comforting scent. If you prefer a more subtle vanilla flavor, substitute a vanilla bean or a splash of vanilla powder.
The Texture Crew
Heavy cream adds a velvety richness that elevates the filling to a decadent level. Whisk it until it just starts to thicken; overwhipped cream can lead to a grainy texture. If you’re looking for a lower‑fat option, use half‑and‑half or a dairy‑free alternative like coconut cream.
Graham cracker crumbs form the crunchy base that anchors the cups. Crush them finely so they bind with melted butter, creating a crust that doesn’t sink. For a gluten‑free twist, swap in oat crackers or gluten‑free graham crackers.
Melted butter is the binding agent that holds the base together and adds a buttery sheen. Use unsalted butter for better control over salt levels. If you’re vegan, a plant‑based butter works just as well.
The Unexpected Star
Lemon juice is the secret ingredient that brightens the filling without making it tart. A tablespoon or two is enough to cut through the richness. If you’re sensitive to acidity, start with half a tablespoon and taste before adding more.
Optional sour cream gives the filling a creamy tang that mimics the classic cheesecake texture. It also helps stabilize the mixture, preventing it from separating. If you’re allergic to dairy, a dairy‑free yogurt can be a suitable substitute.
The Final Flourish
Fresh berries or chocolate chips are optional toppings that add visual appeal and a burst of flavor. Berries bring a natural sweetness and a pop of color, while chocolate chips provide a rich, indulgent contrast. Choose toppings based on the season or your mood.
Salt to taste is a subtle addition that enhances every other flavor. A pinch of sea salt can elevate the sweetness and bring out the cream cheese’s natural tang. If you prefer a completely salt‑free version, simply omit it.
Everything's prepped? Good. Let's get into the real action…
The Method — Step by Step
- Begin by crushing the graham crackers into fine crumbs using a food processor or a resealable bag and a rolling pin. The finer the crumbs, the smoother the base will be. This step is crucial for achieving that perfect crunch that doesn’t become soggy.
- In a small saucepan, melt the butter over low heat until it’s fully liquefied. Remove from heat and let it cool slightly; you don’t want it scorching the cream cheese later. The buttery aroma at this point is a promise of the flavor to come.
- Combine the melted butter with the graham cracker crumbs in a mixing bowl. Stir until the crumbs are evenly coated and the mixture resembles damp sand. This ensures a cohesive base that will hold the filling in place.
- Press the crumb mixture into the bottoms of your serving cups, creating a uniform layer about 1/4 inch thick. Use the back of a spoon or a flat-bottomed glass to smooth it out. If you’re using a silicone mold, press gently to avoid air pockets.
- Let the crust chill in the refrigerator for 10 minutes while you prepare the filling. This step sets the base and ensures it stays firm when you pour the creamy mixture on top.
- In a blender, combine softened cream cheese, sugar, vanilla extract, lemon juice, and optional sour cream. Blend until the mixture is smooth and free of lumps, about 30–45 seconds. The goal is a silky texture that will pour easily into the cups.
- Whip the heavy cream in a separate bowl until soft peaks form. Gently fold the whipped cream into the cream cheese mixture, using a spatula to keep the batter light and airy. This step is the secret to that cloud‑like mouthfeel.
- Divide the filling evenly among the prepared cups, filling them almost to the brim. The filling should sit just slightly above the crust, allowing room for toppings. The edges will start pulling away as the mixture sets.
- Top each cup with your chosen garnish—fresh berries, chocolate chips, or a drizzle of caramel. The topping not only adds flavor but also creates a visual contrast that makes each cup irresistible.
- Refrigerate the cups for at least 3 hours, preferably overnight, to let the flavors meld and the filling firm up. The final product should be cool, creamy, and ready to serve. Remember, patience is key here—no rushing the set time.
That's it — you did it. But hold on, I've got a few more tricks that'll take this to another level. These insider tips will ensure your cups stay perfect, taste amazing, and impress even the pickiest of palates.
Insider Tricks for Flawless Results
The Temperature Rule Nobody Follows
The key to a smooth filling is keeping everything at the right temperature. If the cream cheese is too cold, it won’t blend well, and if it’s too warm, the mixture will separate. Aim for room temperature cream cheese and heavy cream. I’ve found that letting the ingredients sit for 20 minutes before blending makes a world of difference.
Why Your Nose Knows Best
Smell the filling as you blend. If it smells like vanilla and lemon, you’re on the right track. If it has a raw, bland scent, you might need to add a pinch of salt or a dash of vanilla. Your nose is a reliable guide to flavor balance.
The 5-Minute Rest That Changes Everything
After you press the crust into the cups, let it rest for exactly five minutes before adding the filling. This brief pause allows the crumbs to settle and ensures the crust holds up against the creamy top. It’s a small step that has a huge impact.
The Secret of Even Filling Distribution
Use a small ladle or a measuring cup to pour the filling. This keeps the amount consistent across each cup and prevents some from being overfilled. Consistency is key for a professional look and taste.
The Final Chill Trick
When you’re ready to serve, remove the cups from the fridge 15 minutes before serving. This allows the filling to soften slightly, making it easier to scoop with a spoon. It also prevents the cups from being too cold, which can dull the flavor.
Creative Twists and Variations
This recipe is a playground. Here are some of my favorite ways to switch things up:
Berry Burst
Swap the lemon juice for a splash of raspberry puree and top each cup with fresh raspberries. The tartness of the berries complements the creaminess and gives a vibrant color.
Chocolate Lover’s Dream
Add a handful of dark chocolate chips to the filling and replace the graham crackers with crushed chocolate cookies. Finish with a drizzle of chocolate ganache for an extra decadent touch.
Tropical Twist
Use coconut milk instead of heavy cream and add shredded coconut to the crust. Top with pineapple chunks and a sprinkle of toasted coconut for a beachy flavor profile.
Minty Fresh
Introduce a teaspoon of fresh mint puree into the filling and garnish with mint leaves. The cool mint provides a refreshing counterpoint to the rich base.
Espresso Explosion
Stir a tablespoon of instant espresso powder into the cream cheese mixture. Pair with a dusting of cocoa powder on top for an espresso‑infused dessert that coffee lovers adore.
Nutty Crunch
Blend chopped toasted almonds into the crust and sprinkle slivered almonds on top. The nutty crunch adds texture and a nutty aroma that elevates the overall experience.
Storing and Bringing It Back to Life
Fridge Storage
Store the assembled cups in an airtight container in the refrigerator for up to 48 hours. The flavors will continue to meld, making them even more delicious the next day. Keep the cups chilled to preserve the creamy texture.
Freezer Friendly
To freeze, wrap each cup individually in plastic wrap, then place them in a freezer‑safe bag. They can be stored for up to 2 weeks. Thaw in the refrigerator overnight before serving to maintain the smooth consistency.
Best Reheating Method
If the cups have been frozen, gently warm them in a microwave on low for 10–15 seconds. Add a tiny splash of water before reheating to create steam that restores moisture and prevents the filling from drying out. This trick brings the cups back to their original silky state.