I still remember the day I almost ruined my entire kitchen. I was trying to impress a group of friends with a “quick carrot cake” that I’d seen on a food blog, and instead of a fluffy, moist cake, I ended up with a sticky, soggy mess that clung to the pan like a bad rash. The moment the batter hit the heat, the aroma of caramelized sugar hit me like a wave, but the texture was a disaster. I laughed, because I’ve always been the one to turn kitchen mishaps into culinary experiments, and I knew I could do better. That night, I stared at the ruined batter and whispered, “No, not again.” That whisper became a dare to myself: “I dare you to taste this and not go back for seconds.” And so, the No Bake Carrot Cake Bites were born.
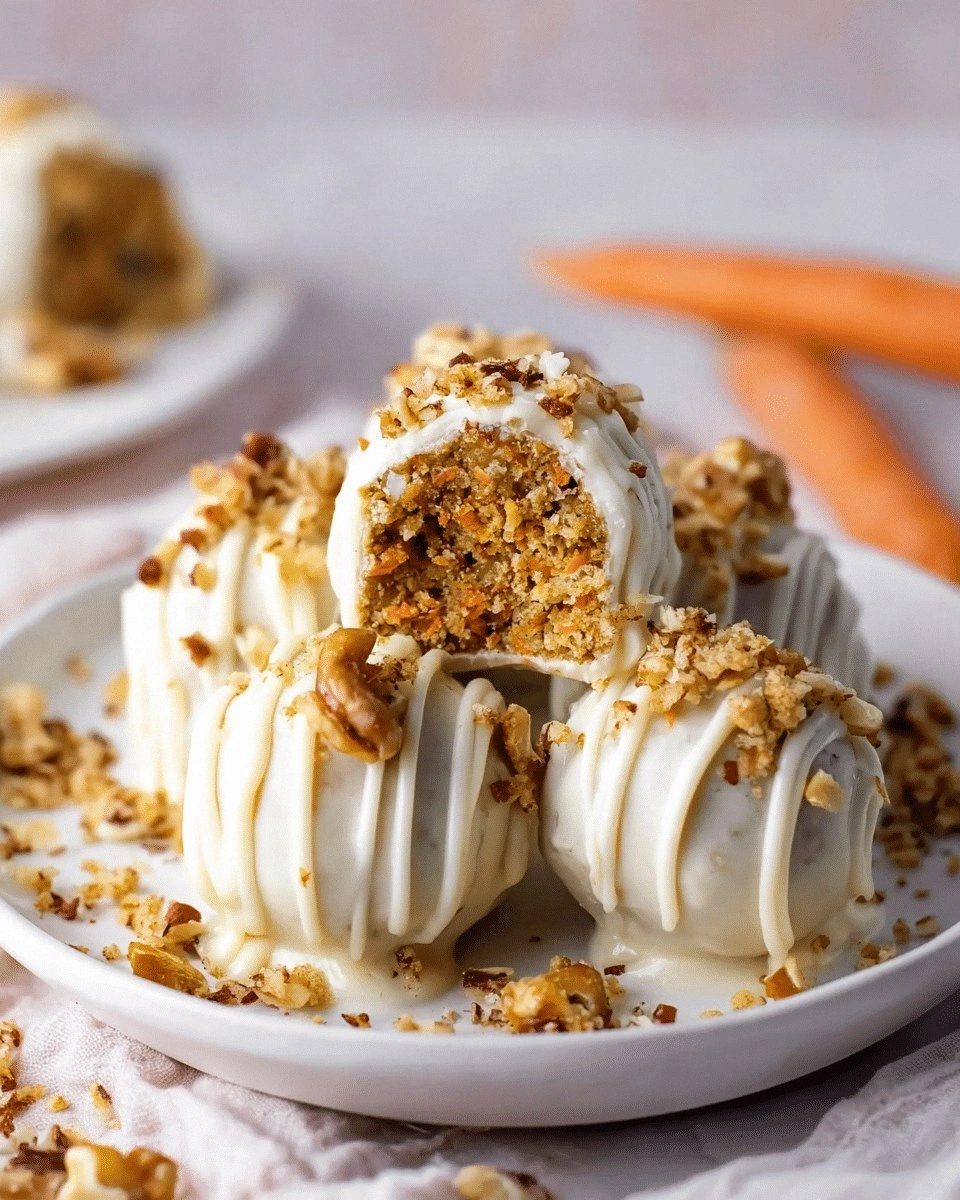
Picture this: a bowl filled with the golden glow of shredded carrots, the subtle perfume of cinnamon and nutmeg dancing in the air, and the sweet, syrupy promise of honey and maple syrup. The sound of the spoon stirring is like a gentle drumbeat, each swirl turning the mixture into a glossy, almost liquid dough. When you press the mixture into a silicone mold, you feel the firmness of oats and coconut binding everything together, the texture promising a bite that’s chewy yet tender. The first bite releases a burst of carrot sweetness, a hint of nutty almond butter, and a whisper of citrus from lemon zest—an explosion of flavors that feels like a hug in a bite. If you’re skeptical, I’ll be honest: I ate half the batch before anyone else even got a taste.
What makes this version stand out is that it’s a no-bake delight, so you can whip it up in 30 minutes without turning on the oven. The combination of rolled oats and shredded carrots gives it a hearty texture, while the coconut adds a subtle tropical twist. The almond butter provides a creamy, nutty backbone that keeps the bites from drying out, and the honey and maple syrup balance sweetness without overpowering. The frosting, made from cream cheese and a splash of vanilla, adds a silky finish that coats the bites like velvet. Most recipes get this completely wrong by overcomplicating the batter or using too much liquid, but here we keep it simple, flavorful, and, most importantly, crowd-pleasing.
And here’s the kicker: the secret ingredient that gives these bites their signature “wow” factor is a splash of lemon zest in the frosting. It brightens the sweet profile, adds a subtle citrus pop, and keeps the bites from feeling too heavy. If you’re ready to experience the ultimate no-bake dessert that will have everyone asking for a second helping, let me walk you through every single step—by the end, you’ll wonder how you ever made it any other way.
What Makes This Version Stand Out
- Flavor: The blend of carrots, oats, and coconut creates a complex base that’s both sweet and earthy. The honey and maple syrup bring natural sweetness, while the almond butter adds depth.
- Texture: Each bite offers a chewy core with a slightly crunchy exterior from the oats, and the coconut gives a subtle snap.
- Ease: No oven required—just a saucepan and a silicone mold. You can prepare the entire batch in under 30 minutes.
- Versatility: Swap almond butter for peanut or cashew butter, or use coconut milk to keep it dairy-free.
- Make‑Ahead: Store in the fridge for up to a week or freeze for longer. They thaw beautifully.
- Crowd Appeal: Perfect for parties, potlucks, or a quick dessert after dinner. Even the picky eater will love the carrot flavor.
Alright, let's break down exactly what goes into this masterpiece…
Inside the Ingredient List
The Flavor Base
At the heart of these bites is a harmonious trio: rolled oats, shredded carrots, and shredded coconut. The oats act as a binder, giving structure and a gentle chew. Carrots bring natural sweetness and a burst of color, while coconut adds a tropical nuance that elevates the overall profile. If you skip any of these, the bites will lose their signature texture; without oats, they’ll crumble, and without carrots, they’ll feel bland.
The Texture Crew
Almond butter is the secret sauce that brings everything together. Its creamy consistency keeps the mixture cohesive, while its nutty flavor provides a subtle depth that balances the sweetness. Honey and maple syrup act as natural sweeteners, but they also contribute to the glossy sheen. If you’re on a low-carb diet, you can substitute honey with a sugar-free syrup, but keep in mind the texture might change slightly.
The Unexpected Star
Lemon zest in the frosting is the little twist that sets these bites apart. It adds a bright, citrusy note that cuts through the richness of the cream cheese frosting, preventing the bites from feeling heavy. If you’re allergic to citrus, a pinch of orange zest works as a suitable alternative, offering a similar brightening effect.
The Final Flourish
The cream cheese frosting is the finishing touch. It’s made with a blend of cream cheese, powdered sugar, coconut oil, maple syrup, vanilla, and lemon zest. This frosting is silky, tangy, and slightly sweet, coating each bite like velvet. If you prefer a dairy-free version, replace cream cheese with coconut cream and use a dairy-free powdered sugar.
Everything's prepped? Good. Let's get into the real action…
The Method — Step by Step
- Gather Your Gear. Before you start, make sure you have a medium saucepan, a silicone mold or a lined loaf pan, a whisk, and a silicone spatula. I love using a silicone mold because it releases the bites effortlessly and keeps them from sticking. If you’re using a loaf pan, line it with parchment for easy removal.
- Heat the Sweeteners. In the saucepan, combine honey and maple syrup. Warm them over medium heat until they’re just about to bubble, about 2 minutes. This step helps dissolve the sugars and makes the mixture silky. The aroma that fills the kitchen at this point is the first hint that you’re on the right track.
- Add the Butter. Stir in the almond butter until it’s fully incorporated. The mixture should look glossy and slightly runny. If it’s too thick, add a splash of oat milk to loosen it. The almond butter not only adds flavor but also acts as a binder, ensuring the bites hold together.
- Introduce the Flavors. Pour in vanilla extract, ground cinnamon, nutmeg, ginger, and a pinch of salt. Stir until the spices are evenly distributed. The spices should fill the air with warm, comforting scents, like a cozy cabin in the woods.
- Fold in the Texture. Add the rolled oats, shredded coconut, and shredded carrots. Mix until the dry ingredients are fully coated by the wet mixture. You should see the oats swell slightly and the mixture become thick enough to hold its shape when scooped. If it feels too dry, add a teaspoon of water or more maple syrup.
- Optional Add-ins. If you like nuts or dried fruit, fold in walnuts, raisins, or chocolate chips at this point. They’ll add crunch and surprise bursts of flavor. I personally love the contrast of chocolate chips melting into the sweet base.
- Press into Molds. Spoon the mixture into your silicone mold, pressing firmly to eliminate air pockets. The mixture should be packed tightly, but not overfilled. If you’re using a loaf pan, fill each compartment about three-quarters full. Once filled, tap the pan gently on the counter to level the surface.
- Chill. Place the mold in the refrigerator for at least 30 minutes, or until the bites firm up. The chilling process allows the flavors to meld and the mixture to set into a cohesive, bite‑size shape. While they chill, you can start preparing the frosting.
- Make the Frosting. In a bowl, beat cream cheese until smooth. Add powdered sugar, coconut oil, maple syrup, vanilla, and lemon zest. Beat until the frosting is airy and glossy. The lemon zest should give the frosting a bright, citrusy aroma that contrasts with the sweet base.
- Finish and Serve. Once the bites are firm, remove them from the mold. Spread or pipe the frosting onto each bite. Let the frosting set for a few minutes before serving. The result is a bite that’s crunchy on the outside, chewy on the inside, and coated in a silky, tangy frosting that melts in your mouth.
That's it — you did it. But hold on, I've got a few more tricks that'll take this to another level…
Insider Tricks for Flawless Results
The Temperature Rule Nobody Follows
Many people think the mixture should be at room temperature, but it actually works best when it's warm. Warm ingredients blend more easily, ensuring a smoother dough. I keep the saucepan on low heat and stir constantly to avoid scorching. If you notice the mixture is too thick, add a splash of oat milk or almond milk to loosen it.
Why Your Nose Knows Best
When the spices hit the pan, the aroma is a tell‑tale sign that everything is on track. If the cinnamon and nutmeg smell like burnt sugar, you’re overcooking them. Keep the heat low and stir until the spices are fragrant, not burnt.
The 5-Minute Rest That Changes Everything
After pressing the mixture into the mold, let it rest at room temperature for 5 minutes before refrigerating. This brief pause allows the oats to fully absorb the liquid, creating a more cohesive bite. If you skip this step, the bites might separate when you try to remove them.
Frosting Consistency is Key
If the frosting is too thick, it will not spread easily and will look chunky. Beat the frosting until it reaches a soft-serve consistency. If it’s too runny, add a bit more powdered sugar or a pinch of salt to thicken.
Keep It Cool
Store the finished bites in an airtight container. If you’re storing them in the fridge, keep them at a consistent temperature; fluctuations can cause the frosting to melt and re‑solidify, leading to a gummy texture. For longer storage, freeze them and thaw slowly in the fridge.
Creative Twists and Variations
This recipe is a playground. Here are some of my favorite ways to switch things up:
Chocolate Carrot Crunch
Swap the coconut for dark chocolate chips and add a teaspoon of cocoa powder to the batter. The chocolate adds a rich depth that pairs beautifully with the carrot sweetness.
Spiced Apple Carrot Bites
Add finely grated apple and a dash of ground cinnamon to the mixture. The apple brings a juicy sweetness and the cinnamon amplifies the warm spice profile.
Peanut Butter Power
Use peanut butter instead of almond butter for a classic nut flavor. Add a pinch of sea salt to enhance the sweet‑salty contrast.
Dairy-Free Delight
Replace cream cheese with coconut cream and use a dairy-free powdered sugar. The result is a silky, vegan-friendly frosting that still delivers on flavor.
Minty Fresh Twist
Add a few drops of peppermint extract to the frosting and sprinkle crushed mint candies on top. The mint adds a refreshing finish that’s perfect for summer gatherings.
Nut-Free Option
Omit the nuts and replace them with dried apricots or dates for a chewy texture. The natural sweetness of the fruits keeps the bite balanced.
Storing and Bringing It Back to Life
Fridge Storage
Place the bites in an airtight container and store them in the refrigerator for up to 5 days. The frosting will stay firm, and the bites will retain their chewy texture. If you notice the frosting has softened, simply let them sit at room temperature for a few minutes before serving.
Freezer Friendly
For longer storage, wrap each bite individually in parchment paper and place them in a freezer bag. Freeze for up to 3 months. When you’re ready to enjoy them, thaw at room temperature for 20 minutes. The texture will remain intact, and the frosting will set beautifully.
Best Reheating Method
If you prefer a slightly warmer bite, pop them in a preheated oven at 300°F for 5 minutes. Alternatively, microwave on low power for 10 seconds per bite. Add a tiny splash of water before reheating to keep the bites from drying out and to help the frosting melt into a silky glaze.