I’ll never forget the day I tried to make a batch of ordinary green tea cookies for a friend’s tea party and ended up with a flat, bland brick that could double as a paperweight. The kitchen was a battlefield of burnt sugar, a butter‑laden mess, and a lingering scent that screamed “failure” louder than any fire alarm could. I stared at the dough, feeling the weight of disappointment, and thought, “If I’m going to ruin a recipe, I might as well turn it into something unforgettable.” That moment sparked a daring experiment that would eventually give birth to the most melt‑in‑your‑mouth matcha butter cookies you’ll ever taste.
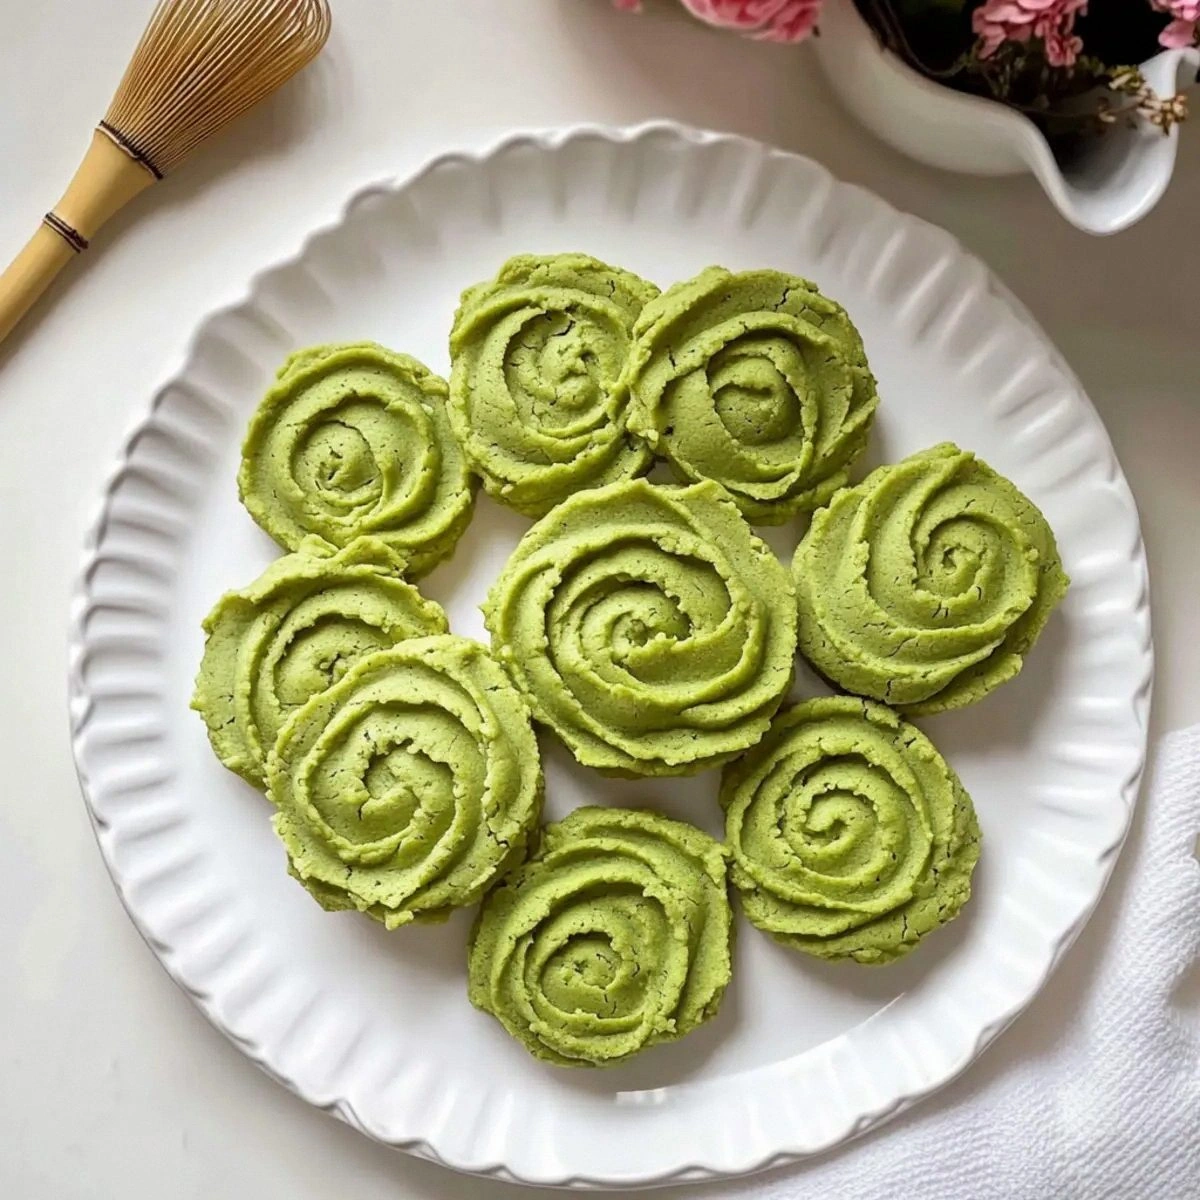
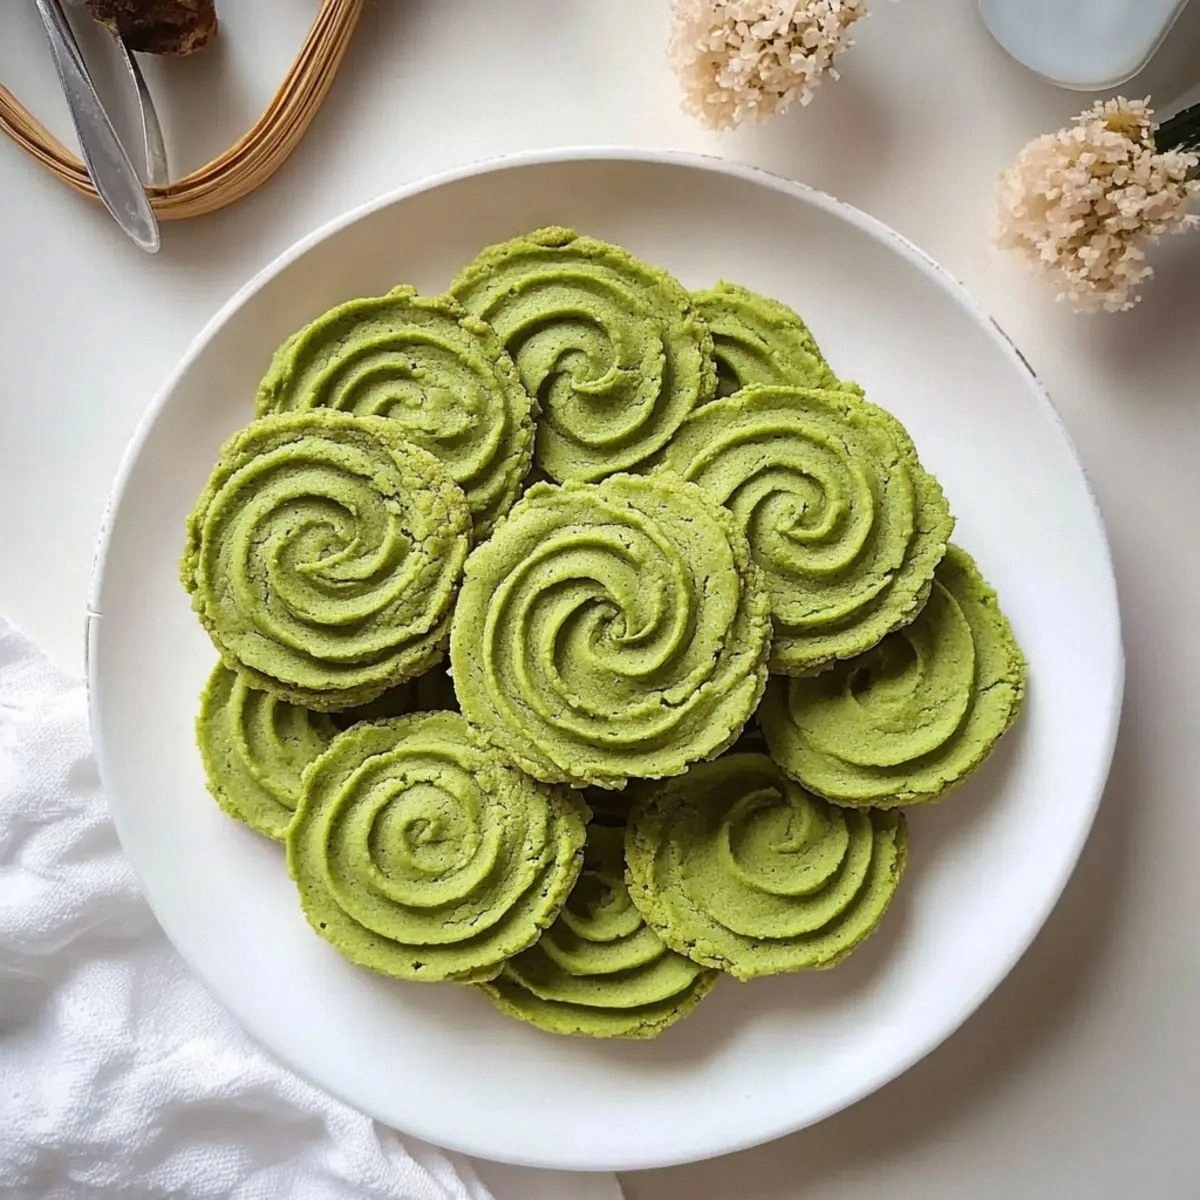
Picture this: the oven door swings open and a gentle, earthy aroma of fresh matcha wafts through the air, mingling with the sweet perfume of caramelized butter. The cookies, golden‑brown on the edges and a delicate jade hue in the center, sit on the cooling rack like tiny, edible jewels. When you bite into one, the first thing you notice is the crisp snap of the outer shell, followed instantly by a buttery, melt‑away interior that practically dissolves on your tongue. It’s the kind of texture that makes you pause, stare, and then devour the whole batch without a second thought. I dare you to taste this and not go back for seconds.
What makes this version truly stand out is a secret weapon: ceremonial‑grade matcha combined with a precise balance of all‑purpose and cake flour. Most recipes either over‑sweeten the flavor or under‑mix the dough, resulting in a cookie that’s either too dense or too crumbly. I’ve cracked the code by using a two‑flour system that creates a tender crumb while preserving that coveted melt‑in‑your‑mouth feel. And let’s not forget the butter—softened just enough to coat the flour, yet kept cool enough to keep the dough from turning into a greasy paste. This is hands down the best version you’ll ever make at home.
But I’m not stopping at just a great cookie. I’m going to walk you through every single step—down to the exact temperature of the butter, the precise moment you should add the matcha, and the exact timing for that perfect bake. By the end, you’ll wonder how you ever managed to make cookies any other way. Okay, ready for the game‑changer? Let’s dive in.
What Makes This Version Stand Out
- Taste: The ceremonial‑grade matcha delivers a vibrant, grassy note that’s balanced by the sweet, buttery base, creating a flavor harmony that feels both sophisticated and comforting.
- Texture: A buttery crust gives way to a soft, almost creamy interior that literally melts in your mouth—no more dry, crumbly disappointments.
- Simplicity: Only nine ingredients, all pantry staples except for the matcha, make this recipe approachable for even the most timid bakers.
- Uniqueness: The combination of all‑purpose and cake flour yields a lightness you won’t find in standard cookie recipes, while the matcha adds that eye‑catching green pop.
- Crowd Reaction: Serve these at a gathering and watch the compliments roll in; they’re the kind of cookies that get Instagram likes before they’re even eaten.
- Ingredient Quality: Using ceremonial‑grade matcha ensures the flavor is pure, not bitter, and the color is a beautiful jade green that makes the cookies look as good as they taste.
- Make‑Ahead Potential: These cookies keep their melt‑in‑your‑mouth texture for days, so you can bake a batch ahead of time and still wow your guests.
Inside the Ingredient List
The Flavor Base
The star of the show is ceremonial grade matcha powder. This isn’t your everyday culinary-grade green tea; it’s harvested from the youngest leaves and stone‑ground into a fine, vibrant powder. Its delicate flavor is both earthy and sweet, providing that unmistakable green tea aroma that instantly transports you to a Japanese tea garden. If you skip it or use a lower‑grade version, you’ll end up with a dull, bitter taste that defeats the whole purpose of these cookies. A good rule of thumb: always give the matcha a quick whisk with a splash of milk before folding it in, just to ensure it’s fully hydrated and free of clumps.
The Texture Crew
All‑purpose flour gives the dough structure, while cake flour contributes a tender crumb thanks to its lower protein content. This duo is the secret behind that melt‑in‑your‑mouth sensation. If you were to use only all‑purpose flour, the cookies would be sturdier and less delicate; swap it for cake flour alone, and they’d be too fragile to hold together. The salt isn’t just a flavor enhancer—it also strengthens the gluten network just enough to keep the cookies from spreading too thin.
The Butter Brigade
Unsalted butter is the backbone of any good cookie. It provides richness, flavor, and that coveted crisp edge. The key is to use butter that’s softened but still cool—think of it as the Goldilocks of butter: not too hard, not too melted. If the butter is too warm, the cookies will spread uncontrollably; too cold, and they’ll stay dense and under‑baked. The granulated sugar works with the butter to create a light, airy dough through creaming, which traps tiny air pockets that expand in the oven, giving you that perfect lift.
The Final Flourish
The egg yolks add richness and act as an emulsifier, binding the butter and flour together while also contributing to the cookie’s soft interior. Using only yolks (no whites) ensures the cookies stay tender and don’t become cakey. Vanilla extract adds a subtle sweet backdrop that rounds out the matcha’s earthiness, and the whole milk provides just enough moisture to bring the dough together without making it soggy. If you’re out of milk, a splash of almond milk works fine, but stick with whole milk for the best texture.
Everything’s prepped? Good. Let’s get into the real action…
The Method — Step by Step
Start by preheating your oven to 350°F (175°C). While the oven warms up, line two baking sheets with parchment paper. This prevents sticking and ensures an even bake. I like to set the sheets on a cooling rack for a few minutes; it gives the parchment a chance to dry out a tad, which helps the cookies crisp up on the bottom.
In a large mixing bowl, combine 2 cups of all‑purpose flour, 1 cup of cake flour, 1/2 teaspoon of salt, and 2 tablespoons of ceremonial‑grade matcha powder. Whisk them together until the matcha is evenly distributed and you no longer see any green specks. This step? Pure magic. It guarantees that every bite gets a uniform hit of that vibrant matcha flavor.
Kitchen Hack: Sift the flour‑matcha mixture through a fine mesh to avoid any clumps and to aerate the flour for a lighter cookie.In a separate bowl, cream 1 cup of unsalted butter with 3/4 cup of granulated sugar using a handheld mixer on medium speed. Continue for about 3‑4 minutes until the mixture turns pale, fluffy, and you can see a faint perfume of caramelized butter. This is the moment of truth—if the butter isn’t fully creamed, the cookies will be dense.
Add the 3 large egg yolks one at a time, beating well after each addition. Follow with 1 teaspoon of vanilla extract and 2 tablespoons of whole milk. The dough should look glossy and slightly thick, with the yolks fully incorporated. If the mixture looks curdled, keep mixing; the fat from the butter will bring it back together.
Gradually fold the dry flour‑matcha mixture into the wet butter‑egg blend. Use a spatula and a gentle hand—over‑mixing will develop gluten and make the cookies tough. The dough should come together in a soft, slightly sticky ball that holds its shape when scooped.
Kitchen Hack: Chill the dough for 20 minutes after mixing; this firms up the butter and makes portioning a breeze.Using a tablespoon or a small ice‑cream scoop, portion out dough onto the prepared baking sheets, spacing each mound about 2 inches apart. Watch Out: If the dough is too warm, the cookies will spread excessively, resulting in thin, crispy edges that lack the signature melt‑in‑your‑mouth center. The solution? Return the dough to the fridge for another 10 minutes before scooping.
Watch Out: Over‑crowding the pan leads to uneven baking; give each cookie room to breathe.Slide the trays into the preheated oven and bake for 12‑14 minutes. The edges should turn a light golden brown while the centers stay pale and slightly soft. You’ll notice the cookies beginning to pull away from the parchment—this is a visual cue that they’re done. Do not overbake; they’ll continue to set as they cool, and you want that buttery melt.
Remove the trays and let the cookies rest on the parchment for 5 minutes. This allows the steam to finish cooking the center without drying out the exterior. Then, transfer them to a wire rack to cool completely. As they cool, the cookies will firm up just enough to hold their shape while retaining that melt‑in‑your‑mouth texture.
Finally, store the cookies in an airtight container. If you’re feeling indulgent, drizzle a thin ribbon of melted white chocolate over a few cookies for an extra layer of decadence. And remember: these cookies taste even better the next day, once the flavors have had time to meld.
That's it — you did it. But hold on, I've got a few more tricks that'll take this to another level…
Insider Tricks for Flawless Results
The Temperature Rule Nobody Follows
Never bake these cookies straight from a warm kitchen. Let the dough chill for at least 20 minutes after mixing. This small temperature drop prevents the butter from melting too quickly in the oven, which would cause the cookies to spread and lose that coveted soft center. I once tried to skip this step and ended up with a batch that resembled flat biscuits—lesson learned.
Why Your Nose Knows Best
When the cookies are about 10 minutes into the bake, give your kitchen a quick sniff. The moment you catch that faint, nutty aroma of butter turning golden, you’re on the right track. If you smell a sharp, burnt scent before the timer is up, lower the oven temperature by 10°F and keep an eye on them. Your nose is a more reliable gauge than any timer.
The 5‑Minute Rest That Changes Everything
After removing the cookies from the oven, let them sit on the parchment for exactly five minutes before moving them to a wire rack. This short rest lets the residual heat finish cooking the center without over‑drying the edges. Skipping this step results in a cookie that’s crisp all the way through, missing that melt‑in‑your‑mouth magic.
The Butter Softening Shortcut
If you’re short on time, cut the butter into small cubes and microwave for 5‑7 seconds on low power. This softens it just enough for creaming without turning it liquid. Be careful not to melt it completely—once it’s too soft, the dough will become greasy and the cookies will spread.
Matcha Color Boost
For an even deeper jade hue, sift the matcha powder twice before adding it to the dry ingredients. The extra sifting aerates the powder and removes any larger particles that could cause speckles. The result is a uniformly green cookie that looks as good as it tastes.
Creative Twists and Variations
This recipe is a playground. Here are some of my favorite ways to switch things up:
White Chocolate Matcha Swirl
Melt white chocolate, drizzle it over the cooled cookies, and use a toothpick to create a marble effect. The sweet creaminess balances the earthy matcha, making each bite a surprise.
Citrus Zest Boost
Add the zest of one lemon or orange to the wet ingredients. The bright citrus notes cut through the richness and give the cookies a fresh, summery vibe.
Nutty Crunch
Fold in ½ cup of toasted sliced almonds or pistachios just before shaping the dough. The nuts add a pleasant crunch and a subtle nutty flavor that pairs beautifully with matcha.
Vegan Version
Swap the butter for a plant‑based solid margarine, use coconut sugar instead of granulated sugar, and replace the egg yolks with 3 tablespoons of aquafaba (chickpea water). The texture stays buttery, and the flavor remains true.
Spiced Matcha
Add a pinch of ground ginger and a dash of cinnamon to the dry mix. This creates a warm, comforting cookie perfect for cooler evenings.
Storing and Bringing It Back to Life
Fridge Storage
Place the cooled cookies in an airtight container and store them in the refrigerator for up to a week. The cool environment preserves the buttery softness, and the matcha flavor stays vibrant. If you notice any condensation, simply let the container sit at room temperature for a few minutes before serving.
Freezer Friendly
These cookies freeze like a dream. Layer them between parchment sheets in a freezer‑safe bag, and they’ll keep for up to three months. When you’re ready to indulge, let them thaw at room temperature for 15 minutes, then pop them in a 300°F oven for 5 minutes to revive that fresh‑out‑of‑the‑oven texture.
Best Reheating Method
To bring a day‑old cookie back to life, preheat your oven to 325°F, place the cookie on a baking sheet, and add a tiny splash (about 1 teaspoon) of water on the side of the sheet. The steam generated will re‑hydrate the interior, making it melt‑in‑your‑mouth again. Watch the edges turn golden in just 3‑4 minutes.