I remember the night I almost ruined a dinner party because the dessert was a disaster. A half‑baked loaf of bread, a mis‑mixed batter, and a frantic scramble to salvage something that could be called edible. That chaos left me with a craving that could only be satisfied by a dessert that sings, not screams. I was determined to find the holy grail of lemon‑poppy‑seed treats, and I finally stumbled onto a recipe that felt like a secret handshake between flavor and texture.
Picture this: the kitchen lights dim, the aroma of fresh lemons and toasted butter fills the air, and a golden crust crackles under your fingertips. The sound of a spoon hitting the mixing bowl is almost music, the tang of citrus bright enough to make your eyes water, and the buttery crumb that melts in your mouth like a whisper of summer. I swear that moment when the first bite hits your tongue is a revelation—sweetness and acidity dancing in perfect harmony, with poppy seeds popping like tiny confetti. If you’ve ever wondered what a dessert that feels like a sunrise could taste like, you’re in for a treat.
What sets this version apart from every other lemon‑poppy‑seed cookie or cheesecake out there is the balance of ingredients and the precise technique that locks in moisture while keeping the edges crisp. It’s not just a cookie; it’s a canvas that showcases the brightness of lemon zest, the subtle crunch of poppy seeds, and the richness of cream cheese. I dare you to taste this and not go back for seconds. This is hands down the best version you’ll ever make at home, and I’m here to show you how to get it right every single time.
The secret? A little twist in the batter that keeps the cookies tender inside but crisp outside, a touch of poppy seed that adds a nutty depth, and a finishing touch of lemon that cuts through the sweetness. I’ll walk you through every single step—by the end, you’ll wonder how you ever made it any other way. Let’s dive in.
What Makes This Version Stand Out
- Flavor: The bright citrus of lemon zest and juice cuts through the richness of butter and cream cheese, creating a layered taste that lingers on the palate. The poppy seeds add a subtle nutty crunch that complements the smoothness of the dough.
- Texture: The batter’s unique ratio of sugars and fats produces cookies that are soft and chewy inside, yet crisp edges that crackle like thin ice when you bite. The final result is a satisfying contrast that keeps you coming back.
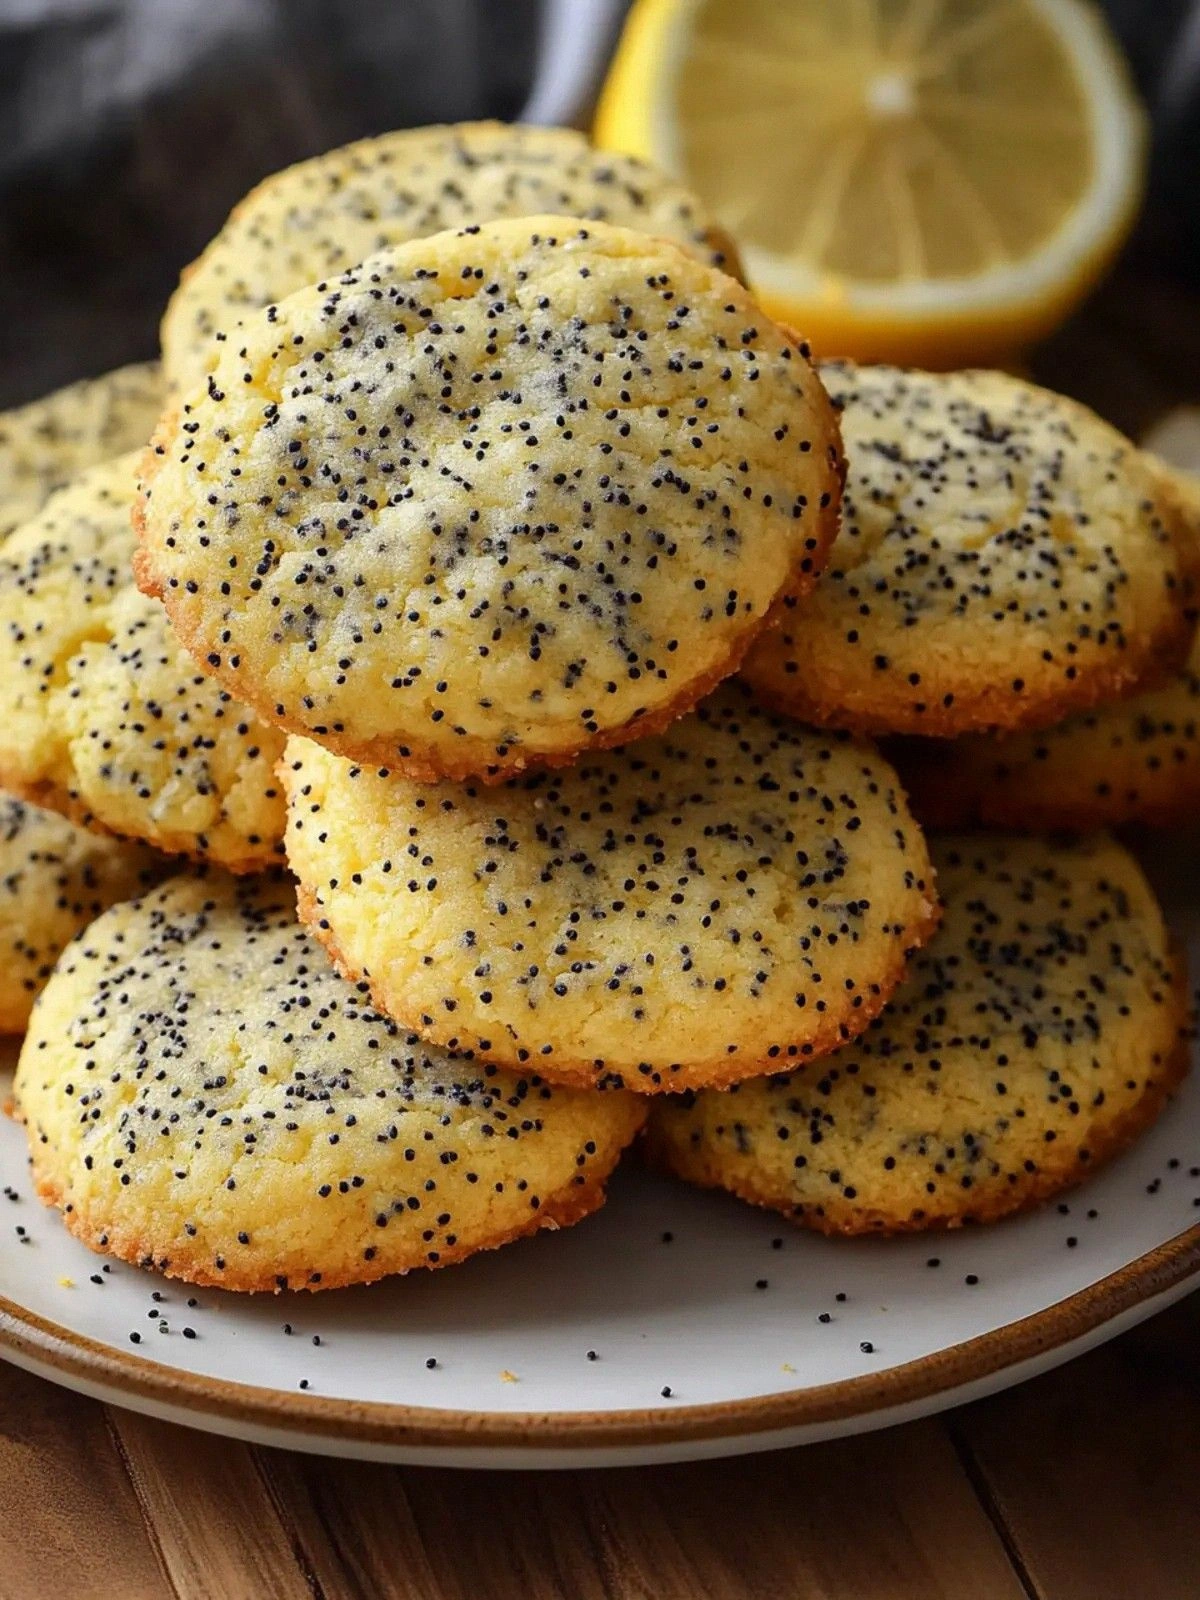
- Visual Appeal: The golden-brown finish glistens like sunshine, and the poppy seeds scatter across the surface like tiny specks of stardust. When you pull them out of the oven, the whole kitchen smells incredible, and you can’t help but smile.
- Ease of Preparation: All steps are straightforward, with no complicated equipment or advanced techniques required. Even a novice can follow along and produce professional‑looking results.
- Versatility: The base can be tweaked with different extracts, sweeteners, or add‑ins, making it a playground for culinary experimentation.
- Make‑Ahead Potential: The cookies store well in an airtight container for up to a week, and they even taste better the next day as the flavors meld together.
- Crowd Reaction: Friends and family always ask for the recipe after tasting these cookies, and the first bite often triggers an instant “wow” moment.
- Ingredient Quality: Using premium butter, fresh lemons, and real poppy seeds elevates the flavor profile and ensures a consistently delightful experience.
Alright, let's break down exactly what goes into this masterpiece...
Inside the Ingredient List
The Flavor Base
Butter, the unsung hero of many desserts, provides a silky, buttery foundation that carries the lemon’s brightness. A cup of butter at room temperature ensures a smooth blend, preventing lumps and promoting even browning. If you’re short on butter, a 1:1 swap with coconut oil keeps the flavor profile but adds a subtle tropical nuance.
The Texture Crew
Cream cheese, in its 8‑ounce glory, adds richness and a slight tang that balances the sweetness. It also acts as a stabilizer, keeping the cookies tender inside while allowing the edges to crisp. Skipping it would turn the cookies into something far less decadent. For a vegan version, use a plant‑based cream cheese alternative and adjust the fat content accordingly.
The Unexpected Star
Poppy seeds might look like a garnish, but they’re a flavor powerhouse. Their earthy undertones add depth to the citrus brightness, creating a multi‑dimensional taste. If you’re allergic or simply don’t have them on hand, ground flaxseed can provide a similar texture and nutritional boost.
The Final Flourish
All‑purpose flour ties everything together, giving structure without making the cookies too dense. The 2 cups of flour are measured dry to avoid clumping. If you prefer a gluten‑free version, substitute with a 1:1 blend of rice flour and tapioca starch, but be mindful of the slightly different crumb.
Everything's prepped? Good. Let's get into the real action...
The Method — Step by Step
- Preheat your oven to 350°F (175°C) and line two baking sheets with parchment paper or silicone mats. The parchment prevents sticking, and the mats help maintain an even surface. I’ve found that a 10‑minute preheat gives the best rise. Let the oven settle before placing the trays inside.
- In a large mixing bowl, beat the butter with a hand mixer or stand mixer until it’s light and fluffy. The goal is to incorporate air, which will give the cookies a lighter crumb. This usually takes about 2 minutes on medium speed. If the butter is too soft, the batter will spread too much.
- Add the granulated sugar and brown sugar to the butter mixture, and continue beating until the sugars are fully dissolved and the batter is silky. The brown sugar brings a subtle molasses note, while the white sugar keeps the cookies from becoming overly dense. Mix for another 2 minutes, watching the batter change color.
- In a separate bowl, whisk the cream cheese until smooth, then fold it into the butter‑sugar mixture. The cream cheese should be at room temperature to avoid lumps. This step is crucial for achieving the creamy interior that melts in your mouth.
- Sift together the flour, baking powder, and salt in a small bowl. Sifting removes any clumps and ensures even distribution of leavening agents. Add the dry mix to the wet batter in two portions, alternating with the lemon zest and juice. This layering helps keep the batter from becoming too wet.
- Fold in the poppy seeds last, ensuring they’re evenly distributed. The seeds should be visible throughout the dough, giving each cookie a burst of texture. At this point, the batter should be thick yet pliable. If it’s too stiff, add a teaspoon of milk to loosen it.
- Drop heaping tablespoons of dough onto the prepared baking sheets, spacing them about 2 inches apart. The cookies will spread slightly, so leave enough room to avoid merging. Use a spoon to flatten the tops gently, creating a uniform thickness.
- Bake for 12–15 minutes, or until the edges are golden brown and the centers look set. The cookies should still be slightly soft in the middle; they’ll firm up as they cool. Keep an eye on them—oven temperatures can vary, and the first batch might need a minute more or less.
- Remove the trays from the oven and let the cookies cool on the sheet for 5 minutes before transferring them to a wire rack. The cooling period allows the structure to set, preventing them from breaking apart. Once cooled, you can enjoy them immediately or store them.
That's it — you did it. But hold on, I've got a few more tricks that'll take this to another level...
Insider Tricks for Flawless Results
The Temperature Rule Nobody Follows
Many bakers bake at 350°F, but the sweet spot for these cookies is 350°F to 375°F. The lower temperature allows the butter to melt slowly, creating a tender crumb, while the higher temperature crisps the edges. I’ve found that a quick ramp up in the last 3 minutes gives the best finish without burning.
Why Your Nose Knows Best
Trust the aroma as your cue for doneness. When the cookies smell nutty and buttery, with a faint citrus undertone, they’re ready. If the scent is too sweet or metallic, they need more time. This sensory checkpoint saves you from overbaking.
The 5‑Minute Rest That Changes Everything
Letting the cookies rest on the baking sheet for 5 minutes after baking sets the structure and locks in moisture. This simple pause prevents them from breaking apart when transferred to the rack. The rest also allows the flavors to meld, giving the final bite a deeper complexity.
A Pinch of Salt Makes the Sweetness Pop
Adding 1/2 tsp of salt balances the sweetness and enhances the lemon’s brightness. Salt acts as a flavor enhancer, making each bite more vibrant. If you’re on a low‑sodium diet, you can reduce the salt to 1/4 tsp but expect a slightly muted flavor.
Use a Silicone Mat for Perfect Shape
A silicone baking mat prevents the cookies from sticking and ensures an even rise. It also makes cleanup a breeze. If you don’t have one, parchment paper works fine, but the cookies might spread a bit more.
Cooling on a Wire Rack Prevents Sogginess
Transferring the cookies to a wire rack right after cooling on the sheet allows air to circulate around them, preventing moisture buildup that can make the edges soggy. This simple step keeps the texture crisp for longer.
Creative Twists and Variations
This recipe is a playground. Here are some of my favorite ways to switch things up:
Honey‑Glazed Lemon Popcorn
Swap granulated sugar for honey and add a splash of vanilla. The honey adds depth and a caramelized finish, while the vanilla lifts the citrus. This version is perfect for a summer afternoon.
Chocolate‑Dipped Popcorn
After baking, drizzle melted dark chocolate over the warm cookies. The chocolate hardens into a crunchy coating, adding a bittersweet contrast. A pinch of sea salt on top elevates the flavor.
Almond‑Infused Crunch
Add 1/4 cup of chopped toasted almonds to the dough. The nuts give a delightful crunch and a nutty undertone that pairs well with the lemon. The almonds also add a subtle protein boost.
Coconut‑Lemon Popcorn
Replace the butter with coconut oil and sprinkle toasted shredded coconut on top before baking. The coconut adds a tropical twist, and the oil keeps the cookies chewy. This version is a hit during beach parties.
Poppy‑Seed Shortbread
Reduce the lemon zest to half and increase the butter to 1 1/2 cups. The result is a buttery shortbread with poppy seeds for texture. It’s a great accompaniment to tea or coffee.
Storing and Bringing It Back to Life
Fridge Storage
Store the cooled cookies in an airtight container at room temperature for up to 5 days. Keep them in a single layer or use parchment between layers to prevent sticking. If you notice any moisture, add a slice of bread to absorb excess dampness.
Freezer Friendly
For longer storage, freeze the cookies in a zip‑top bag or an airtight container for up to 3 months. When you’re ready to eat, thaw at room temperature for 30 minutes. The cookies retain their crunch and flavor after freezing.
Best Reheating Method
Reheat the cookies in a preheated 350°F oven for 5 minutes, or on a skillet over low heat for 2 minutes per side. Add a tiny splash of water before reheating; it steams the cookies back to perfection, restoring moisture and crispness.


