Introduction
Picture this: a midnight snack run, a craving for something zesty, and a kitchen that feels like a battlefield. I was juggling a bag of frozen wings, a lemon on the counter, and a stubborn recipe that never quite hit the mark. The result? A disaster that tasted like cardboard and disappointment. That night, I decided to rewrite the playbook and craft a version of Lemon Pepper Chicken Wings that would make my taste buds do a double take.
The aroma that greeted me was a bright citrus burst mingling with smoky paprika, a scent that pulled the whole house into the kitchen. The sound of sizzling oil was a rhythmic drumbeat, the sizzle itself a promise of crisp edges. As the wings browned, the heat kissed the skin, turning it into a golden, crackling canvas. The first bite was a revelation: a tangy citrus punch balanced by the earthy depth of cracked pepper, all wrapped in a crispy shell that shattered like thin ice.
What makes this version stand out is that it doesn’t rely on a generic blend of spices or a bland coating. Instead, it marries a bright lemon zest with a bold pepper profile, and it introduces a buttery finish that keeps the skin moist yet crunchy. The technique is simple yet game‑changing: a quick dry brine, a dry coating of flour and spices, and a final glaze that locks in flavor. This is hands down the best version you’ll ever make at home, and I dare you to taste it and not go back for seconds.
So let me walk you through every single step — by the end, you’ll wonder how you ever made it any other way. Picture yourself pulling these wings out of the oven, the whole kitchen smelling incredible, and your friends scrambling for the last bite. The journey starts now, and it’s going to be deliciously addictive.
What Makes This Version Stand Out
- Flavor: The bright lemon zest and fresh juice cut through the richness of the chicken, creating a citrusy zing that lingers on the tongue. The pepper is bold but not overpowering, giving each bite a subtle heat that awakens the palate. It’s a flavor profile that feels both familiar and daring.
- Crispiness: The flour coating, combined with a dry brine, pulls moisture out of the skin, turning it into a crisp, golden shell. When you bite, the crunch is audible and satisfying, like a crisp snap that signals perfection. That texture is the secret to why these wings never feel greasy.
- Ease: No complicated marinades or time‑consuming steps. A quick dry brine, a simple flour mix, and a single glaze step are all you need. Even a novice can master this recipe with minimal prep.
- Versatility: The base recipe is a playground. Swap in different spices, add heat, or even switch to baked wings, and you’ll still hit the same level of flavor.
- Crowd‑pleaser: These wings bring people to the table. The bright citrus and peppered crunch are crowd‑friendly, making them perfect for parties, game nights, or a casual family dinner.
- Ingredient Quality: Fresh, high‑quality ingredients elevate the dish. Using real lemons, good‑quality pepper, and fresh chicken makes all the difference.
- Make‑Ahead Potential: The wings can be prepped a day ahead, marinated in the fridge, and baked right before serving, saving you time on the day of the event.
- Healthier Twist: By using olive oil and butter in moderation, you keep the wings flavorful without drowning them in excess fat.
Alright, let’s break down exactly what goes into this masterpiece…
Inside the Ingredient List
The Flavor Base
The cornerstone of these wings is the citrusy brightness that comes from fresh lemon zest and juice. The zest adds a fragrant, aromatic layer that is far more vibrant than bottled lemon extract. If you skip the zest, the wings will feel flat and lack that signature zing. For an extra punch, grate the zest directly into the flour mix; the oils release instantly when heated.
The Texture Crew
Flour is the unsung hero that creates the crispy shell. Coating the wings in a seasoned flour blend ensures even browning and a delightful crunch. Olive oil helps the flour adhere and adds a subtle, nutty flavor. Butter, added at the end, bastes the wings, locking in moisture and giving a silky finish. Without these, the skin would be soggy and the flavor would be diluted.
The Unexpected Star
Smoked paprika is the secret ingredient that gives the wings a depth of flavor. Its smoky undertone balances the sharpness of the lemon and the heat of the pepper. If you’re allergic or simply don’t like smoke, paprika can be replaced with regular paprika or even a pinch of cumin. The result is still delicious, but the smoky nuance is what sets this version apart.
The Final Flourish
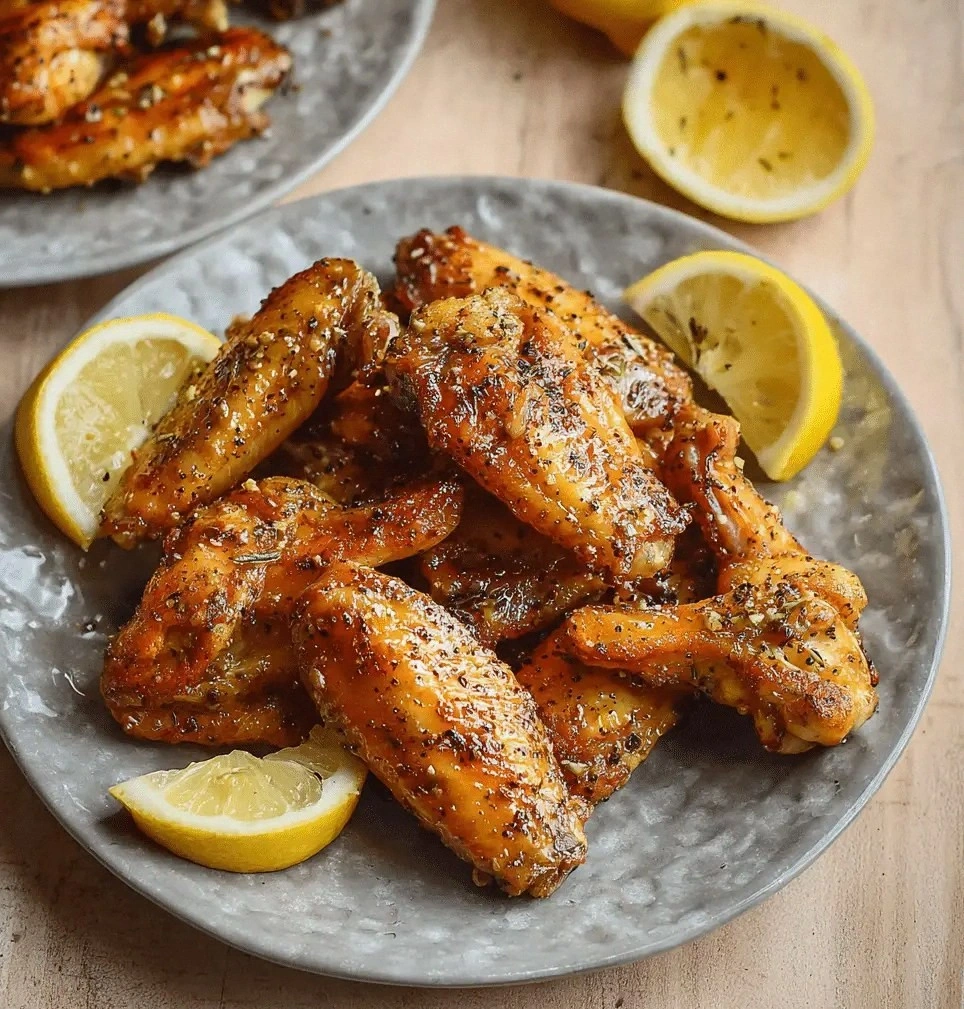
Fresh cracked black pepper and a drizzle of lemon juice are added just before serving to bring the dish to life. The pepper adds a fresh, peppery bite that complements the citrus, while the lemon juice brightens the entire plate. Garnishing with lemon slices not only adds a pop of color but also amplifies the citrus aroma, making the dish visually stunning.
Everything's prepped? Good. Let's get into the real action…
The Method — Step by Step
- Dry‑brine the wings: Pat the chicken wings dry with paper towels. Sprinkle 1 tsp of salt and 1 tsp of black pepper evenly over the entire surface. Let them sit at room temperature for 30 minutes to an hour; this draws out moisture and intensifies flavor. The wings will be ready for a crisp, golden coating.
- Prepare the flour coating: In a large bowl, combine 2 cups of all‑purpose flour, 1 tsp smoked paprika, 1 tsp garlic powder, and a generous pinch of salt. Whisk until the mixture is uniform. The flour will trap the spices and create a crunchy crust.
- Coat the wings: Toss each wing in the flour mixture, shaking off any excess. The coating should be light but even, ensuring each piece gets a flavorful crust. If you prefer a thicker crust, double‑dip the wings in the flour for extra crunch.
- Heat the oil: Pour 2 tbsp of olive oil into a large skillet over medium‑high heat. When the oil shimmers, carefully add the wings in a single layer. Avoid overcrowding; the wings should sizzle immediately. This step ensures a crisp skin.
- Cook the wings: Flip the wings every 3–4 minutes, allowing each side to brown evenly. After about 10 minutes, the wings should be golden. If you’re using an oven, preheat to 425°F and transfer the wings to a baking sheet for the last 15 minutes of cooking.
- Glaze and finish: In a small bowl, whisk together 2 tbsp fresh lemon juice, 2 tbsp unsalted butter, and 1 tbsp lemon zest. Melt the butter in a saucepan over low heat, then stir in the lemon juice and zest. Drizzle the glaze over the wings, tossing to coat. The glaze will create a glossy, flavorful coating.
- Crack the pepper: Just before serving, sprinkle a generous amount of freshly cracked black pepper over the wings. The pepper’s heat will cut through the buttery glaze, creating a balanced bite.
- Garnish and serve: Arrange the wings on a platter, top with lemon slices, and serve immediately. The aroma will fill the room, and the first bite will confirm that this recipe is pure magic.
That's it — you did it. But hold on, I've got a few more tricks that'll take this to another level…
Insider Tricks for Flawless Results
The Temperature Rule Nobody Follows
Many cooks think that higher temperatures always produce crispier wings, but the truth is a moderate heat of 375°F is ideal. At this temperature, the skin has time to dry out and crisp without burning the exterior. If you’re pan‑frying, keep the heat steady; a sudden spike can cause the coating to harden prematurely.
Why Your Nose Knows Best
The scent of the lemon zest and butter as they sizzle is the first indicator of readiness. When the aroma turns from raw to toasted, the wings are almost done. Trust that instinct; it’s your best judge of doneness.
The 5‑Minute Rest That Changes Everything
After cooking, let the wings rest on a wire rack for five minutes. This allows the steam to escape, keeping the skin crisp. During this brief pause, the flavors settle, making each bite more cohesive.
Use a Meat Thermometer
Internal temperature should reach 165°F for safety and perfect texture. A quick check ensures you’re not overcooking or undercooking, preserving the juicy interior while maintaining a crunchy exterior.
Keep the Oil at the Right Temperature
If the oil is too hot, the coating will burn before the wings cook through. If it’s too cool, the wings will absorb oil and become greasy. Aim for a temperature where a small piece of flour sizzles instantly but doesn’t char.
Finish with a Splash of Lemon
Right before serving, squeeze a few drops of fresh lemon juice over the wings. This final burst of acidity brightens the dish and balances the butter’s richness.
Creative Twists and Variations
This recipe is a playground. Here are some of my favorite ways to switch things up:
Spicy Sriracha Kick
Swap the lemon zest for a drizzle of sriracha in the glaze. Add a pinch of cayenne pepper to the flour mix for an extra bite. This version is perfect for heat lovers.
Honey‑Garlic Glaze
Replace the lemon juice with honey and add minced garlic to the glaze. The sweetness pairs beautifully with the pepper, creating a sweet‑savory contrast.
Herb‑Infused Variation
Introduce fresh thyme or rosemary into the flour mix. The herbaceous notes complement the lemon and pepper, giving the wings a Mediterranean twist.
Asian Fusion Twist
Use a soy sauce and ginger glaze instead of lemon. Add toasted sesame seeds for crunch. This version offers a savory, umami-packed flavor profile.
Low‑Carb Option
Swap the flour coating for almond flour or crushed pork rinds. The result is a low‑carb, gluten‑free wing that still delivers that coveted crunch.
Baked Delight
Preheat the oven to 425°F, bake the wings for 25 minutes, then finish with the glaze. Baked wings are a healthier alternative that still taste incredible.
Storing and Bringing It Back to Life
Fridge Storage
Store leftovers in an airtight container in the refrigerator for up to 3 days. Keep the wings on a rack or paper towel to maintain crispness. The best practice is to cool them completely before sealing.
Freezer Friendly
Freeze cooked wings in a single layer on a parchment‑lined tray, then transfer to a freezer bag. They stay fresh for up to 2 months. Reheat directly from frozen for maximum convenience.
Best Reheating Method
Reheat in a preheated oven at 375°F for 10 minutes. Add a tiny splash of water before reheating to steam the wings back to perfection. This technique preserves the crisp skin while preventing dryness.