
I still remember the first time I tasted a jalapeño popper at a backyard barbecue in Austin. The heat of the pepper, the melt of the cheese, and that unexpected crunch of bacon created a flavor fireworks show that still dances on my palate today. That memory sparked an obsession: I wanted to capture that excitement in a single, shareable bite that could travel from my kitchen to any gathering without losing its magic.
The jalapeño popper cheese ball has its roots in classic American comfort food, where jalapeños are stuffed with cheese and deep‑fried. By reimagining it as a cold, handheld cheese ball coated in crisp bacon, we honor the tradition while giving it a sophisticated twist that feels right at any season.
In this article, I’ll walk you through every step—from selecting the perfect cream cheese to mastering the bacon crumble coating—so you can recreate a crowd‑pleasing appetizer that looks as impressive as it tastes. You’ll learn how to balance heat, creaminess, and smoky richness, ensuring each bite delivers a harmonious blend of textures.
Grab your apron, preheat that oven, and let’s dive into a recipe that will become the star of your next party spread!
🌟 Why This Recipe Will Captivate You
From the first bite to the last crumb, this cheese ball offers a perfect blend of heat, creaminess, and smoky indulgence.
- ✨ Irresistible Flavor Fusion: The creamy blend of cream cheese, cheddar, and mozzarella provides a buttery base that perfectly cushions the bright, peppery kick of jalapeños, while crisp bacon adds a savory depth you won’t find in ordinary poppers.
- ✨ Easy to Scale: Whether you’re feeding a small family gathering or a large cocktail party, the portion‑adjuster lets you multiply ingredients without guesswork, ensuring consistent taste every time.
- ✨ No Frying Required: By baking the ball and using a bacon‑panko crust, you get that satisfying crunch without the mess or health concerns of deep‑frying, making it a smarter choice for health‑conscious hosts.
- ✨ Visually Stunning: The vibrant red of jalapeños peeking through the golden‑brown bacon crust makes for a picture‑perfect appetizer that draws guests to the table before they even taste it.
- ✨ Customizable Heat Level: Want more fire? Add a pinch of cayenne or slice the jalapeños with seeds. Prefer milder? Use poblano peppers or reduce the amount of jalapeño. The recipe adapts to every palate.
- ✨ Makes-a-Memory Experience: The tactile pleasure of breaking off a piece, feeling the creamy interior melt against the crunchy exterior, creates a multisensory experience that leaves a lasting impression on your guests.
🥗 The Ingredients
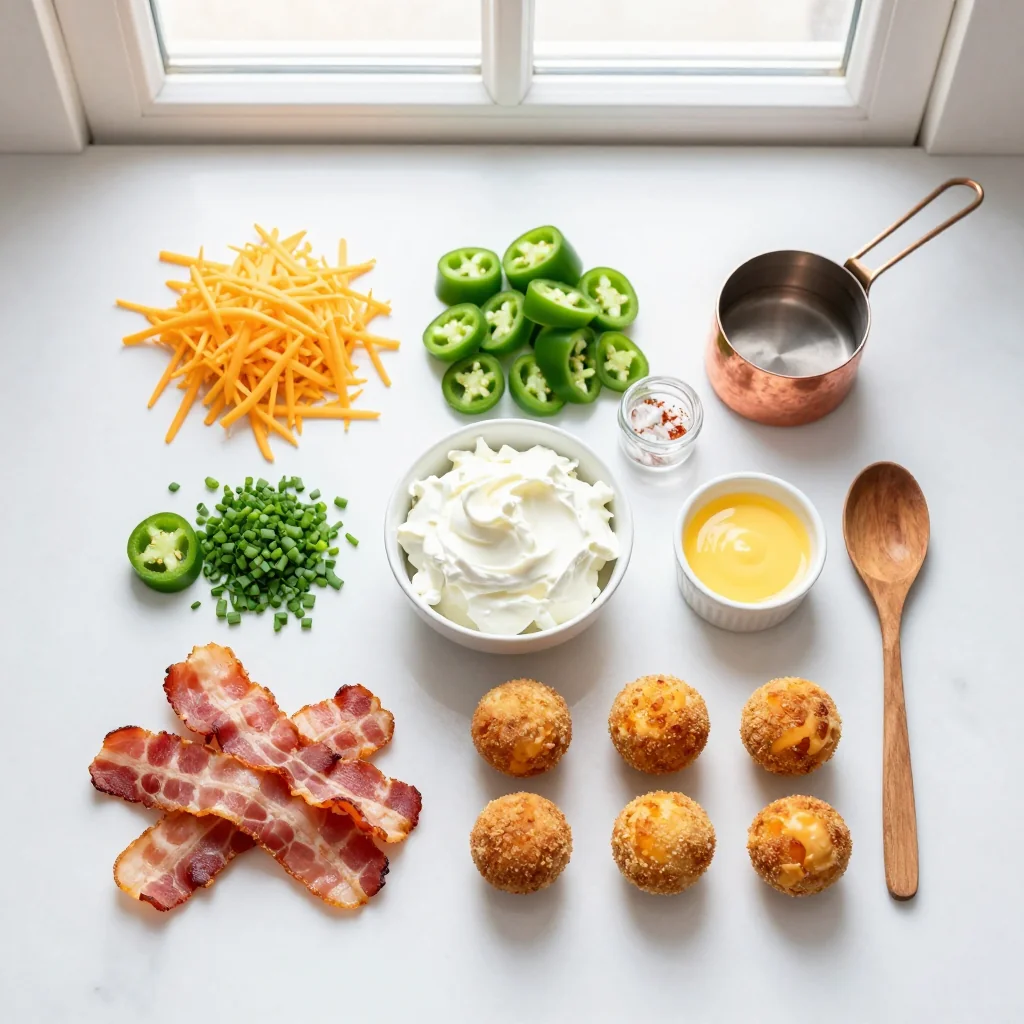
📝 Complete Ingredient List
For the Cheese Mixture:
For the Bacon Coating:
For Garnish (Optional):
🔍 Focus on Key Ingredients
Cream Cheese
Cream cheese provides the silky foundation that holds the ball together. Choose a full‑fat version for the richest texture; low‑fat varieties can become grainy when baked. Let it sit at room temperature for 15 minutes before mixing to avoid lumps.
Sharp Cheddar
The sharp cheddar adds a tangy bite that cuts through the richness of the cream cheese. Its crumbly nature also contributes to the slight chew you experience in each bite. Grate it fresh for the best melt and flavor.
Jalapeños
Fresh jalapeños bring a bright, vegetal heat. By removing the seeds you control the spice level, but feel free to leave a few if you love extra fire. Finely chopping ensures even distribution throughout the cheese mixture.
🔄 Quick Substitutions
| If you don’t have... | Use instead... |
|---|---|
| Cream cheese | Neufchâtel (slightly lighter) |
| Sharp cheddar | Gruyère or aged Gouda |
| Bacon | Turkey bacon or smoked tempeh for a vegetarian version |
👨🍳 Step‑by‑Step Instructions
Follow these detailed steps to create a cheese ball that’s crisp on the outside, creamy inside, and perfectly balanced in flavor.
📋 Phase 1: Preparation & Mise en Place
Before you start, gather all tools: a food processor, a large mixing bowl, parchment paper, and a baking sheet.
Soften the Cream Cheese
Place the cream cheese in a medium bowl and let it sit at room temperature for 15 minutes. If you’re short on time, microwave it on low power (10‑15 seconds) just until it becomes pliable. The goal is a smooth, spreadable consistency that will blend seamlessly with the shredded cheeses.
Combine Cheeses and Flavorings
In the food processor, add the softened cream cheese, shredded cheddar, shredded mozzarella, chopped jalapeños, heavy cream, and garlic powder. Pulse until the mixture is uniformly creamy, stopping to scrape down the sides as needed. The heavy cream ensures the mixture stays moist and prevents it from becoming too dense.
Shape the Cheese Ball
Transfer the cheese blend to a piece of parchment paper. Using your hands (wet them slightly to prevent sticking), shape the mixture into a compact ball roughly 8 inches in diameter. Place the ball on a plate, cover with plastic wrap, and refrigerate for at least 30 minutes to firm up.
🔥 Phase 2: Coating & Baking
Now we’ll create that irresistible bacon‑panko crust.
Prepare the Bacon Crumble
Lay the bacon slices on a baking sheet lined with parchment and bake at 200 °C (400 °F) for 12‑15 minutes, or until crisp. Transfer to a paper towel to drain excess fat, then crumble into small pieces. Mix the crumbled bacon with panko breadcrumbs and melted butter until evenly coated.
Apply the Crust
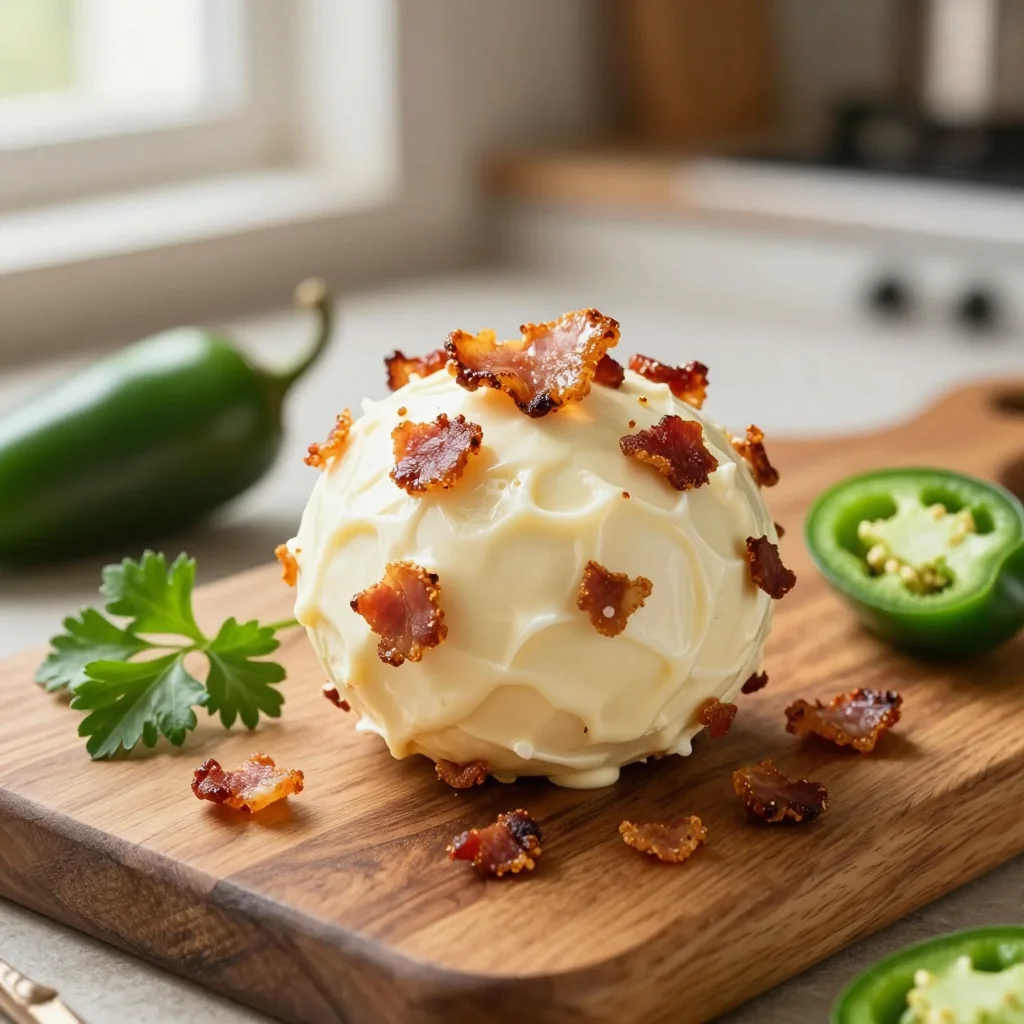
Remove the chilled cheese ball from the refrigerator. Gently roll it in the bacon‑panko mixture, pressing lightly so the coating adheres uniformly. The butter in the mixture helps the crust stick and adds a subtle richness.
Bake the Cheese Ball
Place the coated cheese ball on a parchment‑lined baking sheet. Bake in a preheated oven at 180 °C (350 °F) for 15‑20 minutes, or until the crust turns golden‑brown and the interior is hot and bubbly. A quick visual cue: the bacon should be crisp, and a faint aroma of toasted cheese will fill your kitchen.
✨ Phase 3: Finishing Touches & Serving
The final stage brings everything together for a stunning presentation.
Check for Doneness
Insert a thin skewer into the center; it should come out warm, and the cheese should be soft and melty. If the crust looks too dark before the interior is heated, loosely tent the ball with foil and continue baking for another 5 minutes.
Garnish
Transfer the hot cheese ball to a serving platter. Sprinkle chopped chives and a light dusting of smoked paprika over the top for a pop of color and an extra layer of smoky flavor.
Slice and Serve
Using a sharp serrated knife, cut the cheese ball into 1‑inch wedges. Serve immediately with crackers, sliced baguette, or fresh vegetable sticks. The cheese will stay creamy for about 30 minutes after cutting, giving guests ample time to enjoy each bite.
Optional Accompaniment
For an extra touch, drizzle a thin line of honey or a sweet chili sauce around the platter. The sweet contrast highlights the heat of the jalapeños and the saltiness of the bacon, creating a balanced flavor profile.
💡 Expert Tips & Tricks
🛒 Choosing the Best Ingredients
When selecting cream cheese, opt for the full‑fat version; it yields a richer texture and prevents the cheese ball from becoming grainy. For cheddar, a sharp, aged variety provides a more pronounced flavor that stands up to the bacon. Fresh jalapeños should be firm, glossy, and free of blemishes. If you can, buy thick‑cut bacon—its higher fat content creates a more flavorful crust.
🔪 Preparation Techniques
Finely chopping jalapeños ensures even heat distribution. Use a food processor to blend the cheeses; this eliminates lumps and creates a silky interior. When forming the ball, lightly wet your hands to prevent sticking, but avoid adding too much water, which can dilute flavor.
🌡️ Mastering the Cooking Process
Pre‑bake the bacon until just crisp; over‑cooking can make it overly salty. Keep the oven temperature steady at 180 °C (350 °F); a hotter oven may burn the crust before the interior heats through. If the crust browns too quickly, loosely cover with foil to finish cooking without over‑darkening.
🍽️ Presentation & Service
Place the cheese ball on a wooden board or slate platter for rustic charm. Garnish with bright green chives and a dusting of smoked paprika to add visual contrast. Pair with crisp crackers, toasted baguette slices, or raw veggies like carrot sticks for texture variety.
🏆 Pro Secrets
Professional chefs know that subtle adjustments can elevate a good dish to an unforgettable one.
- 🎯 Temperature Layering: Chill the cheese mixture for at least 30 minutes before coating. A colder ball creates a barrier that prevents the bacon crust from sliding off during baking, ensuring a uniform coating.
- 🎯 Fat Balance: The melted butter mixed with the panko helps the crust adhere and adds a glossy finish. Too much butter makes the crust soggy; the measured 1 tbsp is optimal for crispness.
- 🎯 Spice Control: If you prefer a smoky heat, add a pinch of smoked paprika directly into the cheese mixture. This infuses the interior with a subtle depth that complements the bacon.
- 🎯 Crumb Texture: For an ultra‑crunchy exterior, pulse the bacon and panko together a few times in the food processor after baking. This creates micro‑crystals that add a delightful snap.
- 🎯 Serving Timing: Serve the cheese ball within 30 minutes of removal from the oven. As it cools, the interior firms up, losing some of its creamy allure.
- 🎯 Plate Design: Position the cheese ball at the center of a platter surrounded by contrasting colors—think bright red pepper strips, green cucumber slices, and white cheese crackers—to draw the eye and stimulate appetite.
“Great food is about balance—heat, texture, and flavor must dance together.” — Thomas Keller
🔄 Variations & Adaptations
This cheese ball is a versatile canvas. Feel free to experiment with the following ideas to suit different dietary needs or flavor cravings.
🥬 Vegetarian / Vegan Version
Replace the bacon with smoked tempeh crumbles and use a plant‑based cream cheese (such as cashew‑based) alongside dairy‑free cheddar. Substitute heavy cream with coconut cream for richness. The result is a smoky, creamy ball that satisfies vegans while retaining the original’s texture.
- Smoked tempeh crumbles – 8 oz, toasted
- Cashew cream cheese – 226 g, softened
- Coconut cream – 120 ml
🌶️ Flavor Variations
Swap the jalapeños for other peppers or add complementary herbs to create new taste profiles.
Spicy Version
Increase the heat by adding 1 tsp of cayenne pepper to the cheese mixture and using serrano peppers instead of jalapeños.
Mediterranean Version
Incorporate sun‑dried tomatoes, Kalamata olives, and a sprinkle of oregano. Replace bacon with crisped pancetta for an Italian twist.
Asian‑Inspired Version
Mix in 1 tsp of toasted sesame oil, 1 tbsp of finely chopped scallions, and replace the bacon with toasted nori flakes for umami depth.
⚠️ Dietary Adaptations
Gluten‑Free
Swap panko breadcrumbs for gluten‑free almond flour or crushed pork rinds. This maintains crunch without gluten.
Lactose‑Free
Use lactose‑free cream cheese and dairy‑free shredded cheese alternatives. Coconut cream works as a substitute for heavy cream.
Low‑Calorie
Reduce the bacon to 4 slices, use reduced‑fat cream cheese, and replace heavy cream with low‑fat milk. The flavor remains satisfying while cutting calories.
👶 Kid‑Friendly Version
For younger palates, omit the jalapeños and use mild cheddar only. Replace bacon with finely diced ham. Serve with colorful veggie sticks and a mild ranch dip to make it approachable for children.
📦 Storage & Reheating
🧊 Conservation
Refrigerator
- Duration: 4 days
- Recommended container: airtight plastic container or tightly wrapped in cling film
- Tip: Store the cheese ball whole; slice only when ready to serve to preserve moisture.
Freezer
- Duration: 2 months
- Method: Wrap tightly in double layers of foil, then place in a freezer‑safe bag.
- Defrosting: Transfer to the refrigerator overnight, then let sit at room temperature for 30 minutes before reheating.
💡 For best texture, re‑bake the cheese ball after thawing to re‑crisp the bacon crust.
♨️ Reheating
🔥 Oven (Recommended)
- Preheat to 180 °C (350 °F).
- Cover loosely with aluminum foil to prevent over‑browning.
- Reheat for 10‑12 minutes.
- Remove foil and bake an additional 3‑4 minutes to restore crispness.
⚡ Microwave (Quick)
- Place on a microwave‑safe plate and cover with a microwave‑safe lid.
- Heat on medium power for 45 seconds, then check.
- Continue in 15‑second bursts until warmed through.
🍳 Skillet
Heat a non‑stick skillet over medium heat, add a drizzle of oil, and warm the cheese ball for 3‑4 minutes, turning gently to avoid burning the crust.
🍷 Perfect Pairings
🥗 Side Accompaniments
- Fresh Corn Salad: Sweet corn kernels, red bell pepper, and a light lime vinaigrette balance the richness.
- Pickled Red Onions: Their tangy bite cuts through the creaminess and adds a pop of color.
- Roasted Garlic Aioli: A silky dip that amplifies the savory notes without overwhelming the palate.
🍷 Wine & Beverage Matches
- Dry Riesling: Its crisp acidity and subtle sweetness complement the heat of jalapeños.
- Amber Ale: The maltiness mirrors the bacon’s smokiness while refreshing the palate.
- Non‑Alcoholic Sparkling Water with Lime: Keeps the palate clean between bites.
🍰 Complementary Courses
Start with a light citrusy arugula salad dressed with lemon vinaigrette, follow the cheese ball with a chilled cucumber‑mint sorbet, and finish with a silky chocolate mousse to round out the meal.
❓ Frequently Asked Questions
Q: Can I make this cheese ball ahead of time?
Yes! Prepare the cheese mixture and shape the ball up to 24 hours in advance. Keep it covered in the refrigerator. Add the bacon‑panko coating just before baking to maintain crispness.
Q: How spicy is the final dish?
The heat level is moderate, thanks to the seeded jalapeños. If you prefer milder flavor, reduce the jalapeños to one or use milder peppers like poblano. For extra heat, keep the seeds or add a pinch of cayenne.
Q: What can I substitute for heavy cream?
You can replace heavy cream with half‑and‑half, whole milk, or for a dairy‑free version, use coconut cream. The texture may be slightly less rich, but the flavor remains excellent.
Q: My bacon crust fell off during baking. Why?
This usually happens when the cheese ball is too warm or the coating isn’t pressed firmly. Ensure the ball is well‑chilled before coating and press the bacon‑panko mixture onto the surface evenly.
Q: Can I use a different cheese?
Absolutely. Gruyère, Monterey Jack, or even a smoked cheese can replace cheddar for a different flavor profile. Just keep the total cheese weight around 400 g to maintain consistency.
Q: Is there a way to make this low‑sodium?
Choose low‑sodium bacon or turkey bacon, reduce or omit added salt, and use unsalted butter. The natural flavors of the cheese and jalapeños will still shine.
🎉 To Your Kitchen!
This Jalapeno Popper Cheese Ball with Bacon combines the comforting creaminess of classic cheese spreads with the smoky allure of bacon and the bright heat of jalapeños. Whether you’re hosting a holiday gathering, a casual game night, or simply craving a bold snack, this recipe delivers on flavor, texture, and visual appeal. The portion‑adjuster ensures you can scale the recipe effortlessly, and the detailed steps guarantee consistent success.
Give it a try, experiment with the suggested variations, and share your results. Your friends will be asking for the recipe, and you’ll have a new signature appetizer to proudly showcase.
Have you tried this recipe?
Leave a comment and rating below! Share your photos on Instagram with #CheeseBallMagic for a chance to be featured.
Jalapeno Popper Cheese Ball with Bacon
A bold, creamy bite that marries smoky bacon with spicy jalapeño for an unforgettable party starter.
📝 Ingredients
Cheese Mixture
Bacon Coating
Garnish (Optional)
👨🍳 Instructions
- 1 Soften the cream cheese at room temperature for 15 minutes; optionally microwave briefly.
- 2 Blend cream cheese, cheddar, mozzarella, jalapeños, heavy cream, and garlic powder until smooth.
- 3 Shape the mixture into an 8‑inch ball, wrap in parchment, and chill 30 minutes.
- 4 Bake bacon until crisp, crumble, then mix with panko and melted butter.
- 5 Roll the chilled cheese ball in the bacon‑panko coating, pressing gently.
- 6 Bake at 180 °C (350 °F) for 15‑20 minutes until golden.
- 7 Remove, garnish with chives and smoked paprika.
- 8 Slice into 1‑inch wedges and serve with crackers or veggie sticks.
- 9 Optional: drizzle honey or sweet chili sauce for a sweet‑spicy contrast.
- 10 Enjoy immediately; leftovers store as described.
🥗 Nutritional Information (per serving)
*Nutritional values are estimates based on standard ingredients.
📚 You Might Also Like
Spicy Buffalo Chicken Wings
Cheddar Bacon Bombs
Roasted Red Pepper Hummus


💬 Comments & Reviews
Leave a Comment
No comments yet. Be the first to share your thoughts!