
I still remember the day I ruined my sister's birthday cake. There I was, standing in my tiny apartment kitchen, whisking egg whites for what was supposed to be an elegant coffee mousse layer. The recipe I'd found online had more steps than a French ballet, required ingredients I couldn't pronounce, and left me with a curdled mess that tasted like bitter disappointment. As I scraped the failed attempt into the trash, I made myself a promise: I would crack the code for a coffee mousse so simple, so foolproof, that even my sleep-deprived, caffeine-addicted self could nail it every single time. That night, fueled by desperation and three espresso shots, I stumbled onto something magical. What started as a kitchen disaster became an obsession that led me through dozens of trials, endless taste tests, and one revelation that changed everything. The result? A coffee mousse that needs no eggs, no gelatin, no special equipment, and absolutely no culinary degree. Just pure, cloud-like coffee bliss that comes together faster than you can say "Starbucks run."
Picture this: It's 9 PM on a Tuesday. You're in your pajamas, craving something sweet but sophisticated, caffeinated but comforting. You want that coffee shop dessert experience without putting on real pants or spending fifteen dollars on something smaller than your palm. This mousse answers that call with the enthusiasm of a golden retriever greeting its favorite human. The first spoonful hits your tongue like a velvet wave — airy yet intensely coffee-forward, sweet but with that dark chocolate backbone that keeps things interesting. It's the kind of dessert that makes you close your eyes involuntarily, the way people do when they taste something truly transcendent. I've watched grown adults fight over the last spoonful, witnessed self-proclaimed "not dessert people" scrape their cups clean, and seen coffee haters converted with a single bite. The magic lies in its simplicity: heavy cream whipped to billowy peaks, dark chocolate melted into submission, espresso that punches through all that richness, and just enough sugar to make it feel like dessert rather than breakfast.
But here's what really sets this apart from every other coffee mousse recipe cluttering the internet: we're not messing around with temperamental egg yolks or fussy gelatin blooms. This recipe understands that you want dessert now, not a chemistry experiment that might fail spectacularly. The technique is so straightforward that my twelve-year-old nephew nailed it on his first try, though he did eat half the batch "just to make sure it was safe." The texture achieves that impossible balance between light as air and rich as sin, with coffee flavor that doesn't just whisper but sings in perfect harmony with the chocolate. And the best part? You can make this in under fifteen minutes with ingredients you probably already have lurking in your kitchen. No special trips to fancy grocery stores, no hunting down obscure ingredients that cost more than your monthly coffee budget.
Okay, ready for the game-changer? We're using the cold brew method's cooler, more sophisticated cousin: concentrated espresso that we let bloom in warm cream before chilling everything down. This trick extracts every bit of coffee goodness without any bitterness, creating a base that's so intensely flavored that even coffee snobs will raise an eyebrow in appreciation. The chocolate isn't just there for show — it provides structure, richness, and that deep, complex flavor that makes people ask "what's your secret?" Stay with me here — this is worth it. By the time you finish reading this, you'll understand exactly why this method works so well that you'll never go back to traditional techniques again. Let me walk you through every single step — by the end, you'll wonder how you ever made it any other way.
What Makes This Version Stand Out
This isn't just another coffee mousse recipe — it's the coffee mousse recipe that will ruin all others for you. I know that's a bold claim, but I've got the empty ramekins and rave reviews to back it up. After testing what feels like every variation under the sun, from molecular gastronomy nightmares to grandma's handwritten cards, I've distilled it down to the essentials that actually matter. The result is something that tastes like it came from a Michelin-starred kitchen but requires less effort than making instant pudding. These are the non-negotiables that make this version the one you'll memorize and make on repeat until your friends start dropping hints about trying something new.
- Egg-Free Brilliance: Traditional mousse recipes read like a French textbook, demanding separated eggs, careful tempering, and prayers to the dessert gods. This version eliminates all that drama while achieving an even silkier texture. You get all the richness without worrying about raw eggs or accidentally scrambling your base. Plus, it's suddenly allergy-friendly and vegetarian, which means more people get to experience the joy.
- One-Bowl Wonder: Most dessert recipes leave you with a sink full of bowls, whisks, and measuring cups that require archaeological excavation to clean. This mousse comes together in a single bowl and one saucepan, meaning you can go from craving to satisfaction without creating a disaster zone. Your future self, staring at a clean kitchen, will thank you.
- Make-Ahead Magic: Unlike finicky desserts that demand eleventh-hour assembly, this mousse actually improves with a few hours in the fridge. The flavors meld and deepen, the texture sets to perfect spoonable consistency, and you can prep it days ahead of dinner parties. I've served this at three different gatherings, and each time guests assumed I spent hours slaving away when really I'd made it during my lunch break.
- Intensity Without Bitterness: The secret lies in how we handle the coffee — steeping it warm then cooling it down extracts all the complex flavors while leaving harsh bitterness behind. You get that authentic coffee shop taste that makes people ask if you used expensive beans (you didn't, but they'll think you did).
- Texture That Defies Physics: Somehow both airy like whipped cream and rich like chocolate truffles, this mousse achieves that impossible balance. It's substantial enough to feel indulgent but light enough that you don't feel like you swallowed a brick. The first spoonful melts on your tongue while the coffee flavor lingers like a pleasant memory.
- Foolproof Technique: I've deliberately sabotaged this recipe to test its limits — over-whipped cream, slightly burnt chocolate, espresso from a gas station — and it still tastes incredible. The method is forgiving because it relies on simple science rather than precise timing or temperature acrobatics.
Alright, let's break down exactly what goes into this masterpiece, because understanding your ingredients is what separates good cooks from kitchen wizards. Each component plays a crucial role, and once you understand why they matter, you'll never look at dessert the same way again.
Inside the Ingredient List
Every ingredient in this mousse earns its place through flavor, function, or sheer delicious necessity. Understanding what each component brings to the party transforms you from someone following instructions into a dessert whisperer who can improvise and adapt. I've spent months perfecting these ratios, and the beauty lies in how each element supports the others. The heavy cream provides body and richness, the chocolate gives structure and depth, the coffee delivers that essential flavor punch, and the sugar balances everything with just enough sweetness. But let's dive deeper into each player so you can shop with confidence and maybe even customize based on what you love.
The Flavor Foundation
Heavy cream is the canvas that carries all our other flavors, and quality matters more than you'd think. Skip the ultra-pasteurized stuff if you can find it — it whips up fluffier and tastes cleaner, less like dairy that survived a nuclear event. You want cream with at least 36% fat content; anything less won't hold the structure we need. When cream whips, its fat molecules create a network that traps air, giving us that cloud-like texture. If you've ever had mousse that deflated into a sad puddle, low-fat cream was probably the culprit. Store your cream in the coldest part of your fridge, and don't be tempted to substitute half-and-half or milk — this is not the place to cut calories unless you enjoy dessert soup.
Dark chocolate is where things get personal. I specify 70% cacao because it provides enough chocolate presence to complement the coffee without turning bitter, but anywhere between 60-80% works depending on your taste. The chocolate isn't just there for flavor — when melted and cooled, it creates a silky network that sets the mousse. Skip milk chocolate unless you want dessert that tastes like a candy bar, and avoid white chocolate entirely since it lacks the structure-building cocoa solids. Buy the best chocolate you can afford, but don't mortgage your house for it. I've tested this with everything from fancy single-origin bars to grocery store baking chocolate, and while premium stuff elevates the experience, even basic dark chocolate produces something delicious.
Espresso or strong coffee is the star that makes everyone swoon, but here's where most recipes go wrong. They dump in weak coffee and wonder why the mousse tastes like disappointment. You want coffee strong enough to make your eyebrows raise — think espresso shots or coffee brewed at double strength. The flavor intensifies as the mousse chills, so if it tastes perfect when warm, it'll be too strong when cold. I make my coffee in a moka pot or use double the grounds in my drip machine. Instant espresso powder dissolved in hot water works in a pinch, but please, for the love of dessert, don't use leftover morning coffee that's been sitting on the warmer for hours.
The Texture Team
Confectioners sugar dissolves instantly, eliminating the grainy texture that granulated sugar leaves behind. The small amount of cornstarch in powdered sugar also helps stabilize the whipped cream, buying you extra time before it deflates. If you're in a pinch, you can blitz granulated sugar in a spice grinder, but the texture won't be quite as silky. Start with the amount listed, then taste and adjust — some people like their mousse barely sweet, others want it dessert-sweet. Remember that cold dulls sweetness, so err on the slightly sweeter side if you're unsure.
Milk might seem redundant when we already have cream, but it plays a crucial role in diluting the coffee to the perfect intensity. Using straight espresso would overwhelm the other flavors, but cutting it with milk creates a balanced brew that enhances rather than dominates. Whole milk adds richness, but 2% works fine. Skip skim milk — we're making dessert, not diet food. The milk also helps cool down the hot coffee quickly, which prevents us from scrambling the cream when we combine everything.
The Unexpected Star
Here's where I get excited about the ingredient nobody expects: salt. Just a pinch, barely enough to taste, transforms the entire dessert. Salt doesn't make things salty — it makes things taste more like themselves. In this mousse, it amplifies the coffee notes, rounds out the chocolate, and prevents the sweetness from becoming cloying. It's the difference between a good dessert and one that makes people close their eyes in appreciation. Use kosher salt or sea salt, not iodized table salt which can taste metallic.
The Final Flourish
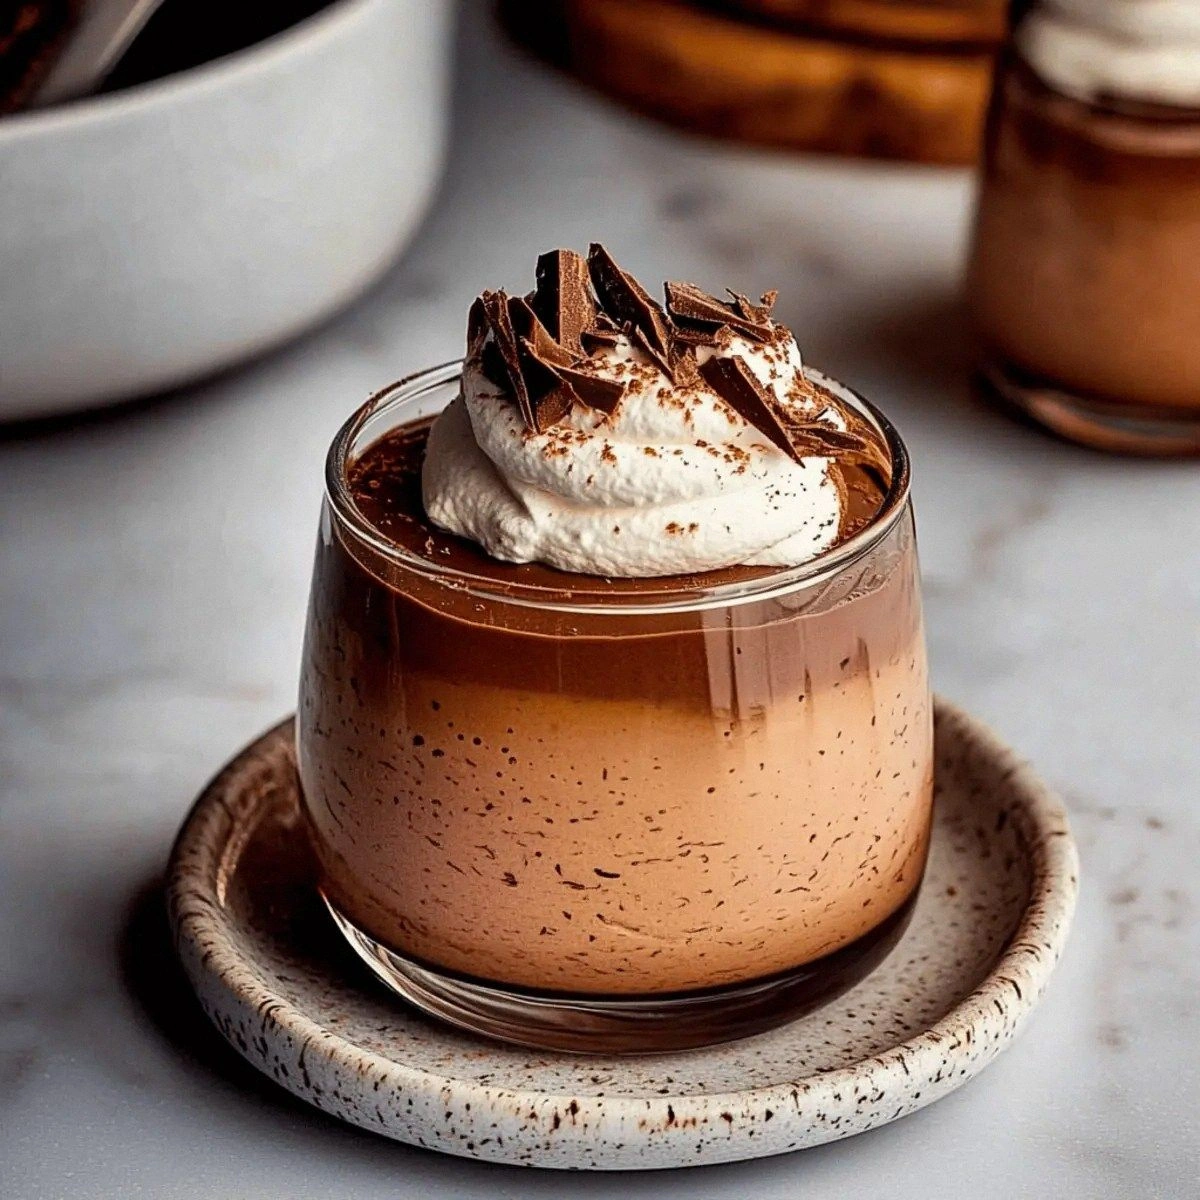
Cocoa powder for dusting isn't just pretty — it provides a bitter counterpoint to the sweet mousse and creates visual drama. Use natural cocoa powder rather than Dutch-processed for a brighter, more acidic flavor that cuts through the richness. A fine-mesh sieve is your friend here; you want a light, even dusting, not brown snow. Chocolate shavings add texture and reinforce the chocolate flavor, plus they make you look like you went to culinary school. Use a vegetable peeler on a bar of chocolate, or cheat with store-bought shavings if you're feeling lazy. Fresh berries provide acid and brightness, plus they make the dessert look restaurant-worthy with minimal effort.
Everything's prepped? Good. Let's get into the real action, because watching this come together is half the joy. The transformation from simple ingredients to ethereal dessert feels like kitchen magic every single time.
The Method — Step by Step
This is where the magic happens, and I want you to imagine me standing right next to you, coffee in hand, guiding you through each moment. The technique is so straightforward that you'll memorize it after the first attempt, but each step has little nuances that elevate your mousse from good to legendary. Pay attention to the sensory checkpoints — the way the chocolate melts into glossy submission, how the cream transforms from liquid to cloud, the moment when coffee and chocolate become best friends. These aren't just cooking instructions; they're your roadmap to dessert nirvana.
- Start by brewing your espresso or making incredibly strong coffee — think double strength if you're using drip. You need it hot to properly melt the chocolate, but not boiling hot. Aim for around 160°F if you have a thermometer, or just let it cool for a minute after brewing. Pour the hot coffee over your chopped chocolate in a heatproof bowl, making sure all the chocolate is submerged. Let it sit undisturbed for exactly two minutes — this is crucial. The chocolate needs time to soften so it will whisk into a smooth ganache instead of seizing into grainy bits.
- Now, whisk the chocolate and coffee together with the enthusiasm of someone who's discovered the secret to eternal happiness. Start slowly, making small circles in the center, then gradually work your way outward. The mixture should transform from a lumpy mess into glossy, fluid chocolate that coats the back of a spoon. If you still have stubborn chocolate chunks, microwave the bowl in 10-second bursts, whisking between each burst until smooth. Let this mixture cool completely — warm chocolate will deflate your whipped cream faster than a pin in a balloon.
- While your chocolate cools, whip the cream into soft peaks that hold their shape but still droop slightly at the tips. Start on medium speed until the cream thickens, then increase to high. You're looking for the moment when the whisk leaves visible trails but the peaks curl over when you lift the beaters. Over-whipping leads to butter, which makes dense mousse, so stay vigilant. If you walk away from the mixer here, you'll return to coffee-flavored butter, which is not the vibe we're going for.
- Sift the confectioners sugar over the whipped cream and gently fold it in using a rubber spatula. Cut down through the center, scrape along the bottom, and lift up and over — this motion preserves the air you've worked so hard to incorporate. The sugar should disappear into the cream without deflating it significantly. This is also when you'd add a pinch of salt, which will dissolve instantly and work its flavor-enhancing magic behind the scenes.
- Check that your chocolate mixture is cool but still fluid — if it's started to set, microwave it for 5 seconds to loosen it up. Pour about one-third of the whipped cream into the chocolate and stir vigorously. This sacrifice batch lightens the chocolate, making it easier to fold into the remaining cream without deflating everything. Think of it as the diplomat that introduces heavy chocolate to airy cream without causing an international incident.
- Now comes the moment of truth: folding the chocolate mixture into the remaining whipped cream. Plunge your spatula down through the center, scrape along the bottom of the bowl, and lift the cream up and over the chocolate. Rotate the bowl a quarter turn and repeat. You want to see streaks of chocolate marble through the cream — resist the urge to over-mix. Stop when you have a beautiful marbled effect with no large white patches. Over-mixing here leads to dense mousse, and nobody has time for that disappointment.
- Spoon or pipe the mousse into serving glasses — wine glasses look fancy, ramekins are classic, espresso cups are adorable for after-dinner portions. This recipe makes about four generous servings or six modest ones. The mousse will continue to set as it chills, so don't worry if it seems a bit soft. For the most impressive presentation, use a piping bag with a star tip, but a spoon works just fine for Tuesday night cravings.
- Chill for at least two hours or up to three days. The longer it sits, the more the flavors meld and the texture sets to that perfect spoonable consistency. Cover with plastic wrap pressed directly onto the surface if you're chilling longer than a few hours — this prevents a skin from forming. Before serving, let the mousse sit at room temperature for 5-10 minutes to take the chill off and let the flavors bloom.
- Just before serving, dust with cocoa powder through a fine-mesh sieve for that professional finish. Add chocolate shavings by running a vegetable peeler down the side of a chocolate bar — the warmer the chocolate, the better the curls. Fresh berries add color and acidity that cut through the richness, but the mousse is spectacular naked too. Serve with crisp cookies for textural contrast, or just grab a spoon and embrace the simplicity.
That's it — you did it. But hold on, I've got a few more tricks that'll take this to another level, secrets I've discovered through trial, error, and taste testing that definitely had nothing to do with eating mousse for breakfast. These insider tips separate the good from the legendary.
Insider Tricks for Flawless Results
After making this mousse what my roommate gently suggests might be "too often," I've discovered some game-changing techniques that aren't in any cookbook. These are the secrets that make people think you've been secretly attending culinary school, the kind of tips that get passed down from chef to apprentice in hushed tones. Some I discovered by accident (like the time I forgot the mousse in the fridge for two days and discovered it was even better), others through deliberate experimentation fueled by too much caffeine and not enough sleep.
The Temperature Rule Nobody Follows
Here's the thing about temperature that will change your dessert game forever: everything needs to be cold except the chocolate, which needs to be just warm enough to stay fluid. I keep my cream in the coldest part of the fridge, sometimes even in the freezer for 10 minutes before whipping. Cold cream whips faster and holds its structure longer, giving you stable peaks that won't weep and deflate. The chocolate mixture should feel neither hot nor cold when you touch it to your lip — think perfect baby bottle temperature. Too hot and it melts the cream into soup; too cold and it seizes into hard bits that refuse to incorporate. This sweet spot is narrower than you'd think, about 75-80°F, but your skin thermometer is more accurate than any gadget.
Why Your Nose Knows Best
Trust your sense of smell throughout this process — it's your most reliable indicator of when things are going right or terribly wrong. When the chocolate melts into the coffee, you should smell deep, complex chocolate with coffee undertones, not burnt or bitter notes. As the cream whips, it releases sweet dairy aromas that should make you want to dive face-first into the bowl. If you smell anything sour or off, your cream has turned and you need to start over — spoiled cream will not save your mousse, only ruin your day. The finished mousse should smell like a perfect coffee shop: warm, inviting, with chocolate and coffee in perfect balance. If the coffee aroma overpowers everything else, you've been too heavy-handed and need more cream.
The 5-Minute Rest That Changes Everything
After folding in the chocolate, let the mousse rest for exactly five minutes before portioning it into serving dishes. This brief pause allows the chocolate to begin setting, creating a slightly thicker mixture that holds its shape better. You'll notice the mousse becomes more billowy and less likely to spread into a puddle in your glasses. This is also the perfect time to taste and adjust — maybe you want a touch more sweetness, or perhaps a whisper of cinnamon would complement your coffee choice. Five minutes feels like forever when you're eager to taste, but it's the difference between amateur and professional results.
The Folding Secret That Separates Pros From Pretenders
Here's what culinary school doesn't teach you: stop folding when you still see thin streaks of white cream. Those streaks will disappear as you portion the mousse into serving dishes, giving you perfectly incorporated chocolate without over-mixing. The instinct is to keep folding until everything is uniformly brown, but by then you've deflated most of the air that makes mousse magical. Think of it like making biscuits — you want to see bits of butter, not a uniform dough. Those streaks ensure your mousse stays light and airy while still having rich chocolate distribution.
The Make-Ahead Miracle
This mousse actually improves with age, a rare quality in the dessert world. Make it up to three days ahead, and the flavors meld into something deeper and more complex. The coffee becomes less sharp, the chocolate more integrated, the whole dessert more sophisticated. Store it covered with plastic wrap pressed directly onto the surface to prevent skin formation. If you're serving to guests, portion into individual glasses before chilling — they keep better and look more elegant than scooping from a big bowl. Let them sit at room temperature for 10 minutes before serving to take the refrigerator chill off and let the flavors bloom.
Creative Twists and Variations
This recipe is a playground. Once you master the basic technique, you can customize it endlessly based on what you love, what's in season, or what your guests might enjoy. The beauty of this mousse lies in its adaptability — it plays well with flavors from around the world, elevates simple ingredients, and can be dressed up or down depending on the occasion. Here are some of my favorite variations that have emerged from late-night experimentation and "what if" moments that paid off spectacularly.
The Mexican Mocha Makeover
Add a pinch of cayenne and a teaspoon of cinnamon to your chocolate mixture for a mousse with gentle heat and warm spice. The cayenne shouldn't make it spicy — just enough to create a pleasant tingle that builds slowly. Use Mexican chocolate if you can find it, which already contains cinnamon and sugar, or add a tablespoon of brown sugar for that traditional Mexican hot chocolate flavor. Top with whipped cream dusted with cinnamon and a few cacao nibs for crunch. This version pairs beautifully with after-dinner tequila or coffee liqueur.
The Irish Coffee Dream
Replace one tablespoon of coffee with Irish whiskey for an adults-only version that tastes like your favorite after-dinner drink. The alcohol actually helps keep the mousse silkier and prevents it from freezing too hard if you want to serve it semifreddo-style. Add a touch more sugar to balance the whiskey's bite, and consider using a smoky Irish whiskey like Connemara for complexity. Top with freshly whipped cream and a drizzle of whiskey for the brave.
The Salted Caramel Seduction
Fold in two tablespoons of cooled salted caramel sauce along with the chocolate for ribbons of buttery sweetness throughout. The caramel adds another layer of flavor and creates beautiful marbling effects. Make your own caramel if you're feeling ambitious, or doctor up store-bought with a generous pinch of flaky salt. Reserve some caramel for drizzling on top just before serving — the contrast between cold mousse and room-temperature caramel is textural heaven.
The Mocha Mint Marvel
Add a few drops of peppermint extract to the chocolate mixture for a mousse that tastes like a gourmet peppermint mocha. Start conservative — you can always add more, but you can't take it out. The mint should complement, not overpower, the coffee. Crushed candy canes or peppermint bark on top add festive crunch and visual appeal. This version is particularly stunning during the holidays and converts even mint-chocolate skeptics.
The Nutella Knockout
Replace half the dark chocolate with Nutella for a hazelnut-coffee combination that tastes like spreading Italy on a spoon. The Nutella adds sweetness, so reduce the confectioners sugar by half. The hazelnut flavor pairs beautifully with coffee, creating a mousse that tastes like the best parts of a European café. Top with chopped toasted hazelnuts for crunch and a drizzle of warm Nutella for the Instagram shot.
The Tropical Twist
Use coconut cream instead of heavy cream and add a teaspoon of coconut extract for a dairy-free version that tastes like a coffee shop in the tropics. The coconut adds natural sweetness and a subtle flavor that complements coffee surprisingly well. Toast some coconut flakes for topping, and consider adding a rum float for a grown-up version that transports you to a beach somewhere. This variation is naturally vegan if you use dairy-free chocolate.
Storing and Bringing It Back to Life
Leftover mousse is a rare phenomenon in my kitchen, but when it happens, proper storage makes the difference between tomorrow's treat and tomorrow's trash. The enemy here is air exposure, temperature fluctuations, and that sad phenomenon where dairy absorbs refrigerator odors like a sponge. But with the right techniques, your mousse can taste as fresh on day three as it did when you first made it. I've perfected these methods through necessity — sometimes I make a double batch just to ensure leftovers, which tells you everything about my relationship with this dessert.
Fridge Storage
Portion your mousse into individual servings before storing — they keep better and you avoid the temptation to "even out the edges" every time you open the fridge. Press plastic wrap directly onto the surface of each portion to prevent skin formation and protect against refrigerator odors. Store in the coldest part of your fridge, not the door where temperatures fluctuate. Properly stored mousse keeps for up to four days, though it's best within the first 48 hours. If you notice any weeping or separation, just give it a gentle stir before serving — the texture might be slightly less perfect, but the flavor remains spectacular.
Freezer Friendly
This mousse freezes beautifully into a sophisticated frozen dessert that's like the love child of ice cream and mousse. Freeze in individual portions for easy serving, and let thaw for 10-15 minutes before eating for the perfect texture. Don't freeze in one large container — you'll need to thaw the whole thing and refreezing is a food safety no-no. Frozen mousse keeps for up to two months, though I've never had any last that long. The texture becomes denser and more ice cream-like, which is actually delightful in summer months.
Best Reheating Method
Here's the thing about mousse — you don't reheat it, but you do want to take the chill off. Remove from the fridge 10-15 minutes before serving to let the flavors bloom and the texture soften slightly. If you've frozen portions, let them sit at room temperature for 15-20 minutes until they're scoopable but still frozen in the center. The contrast between the cold center and slightly softened exterior is textural magic. Never microwave mousse unless you want chocolate-scented soup. If your mousse has wept slightly in storage, just give it a gentle fold before serving — it won't be quite as airy, but it will still taste incredible.


