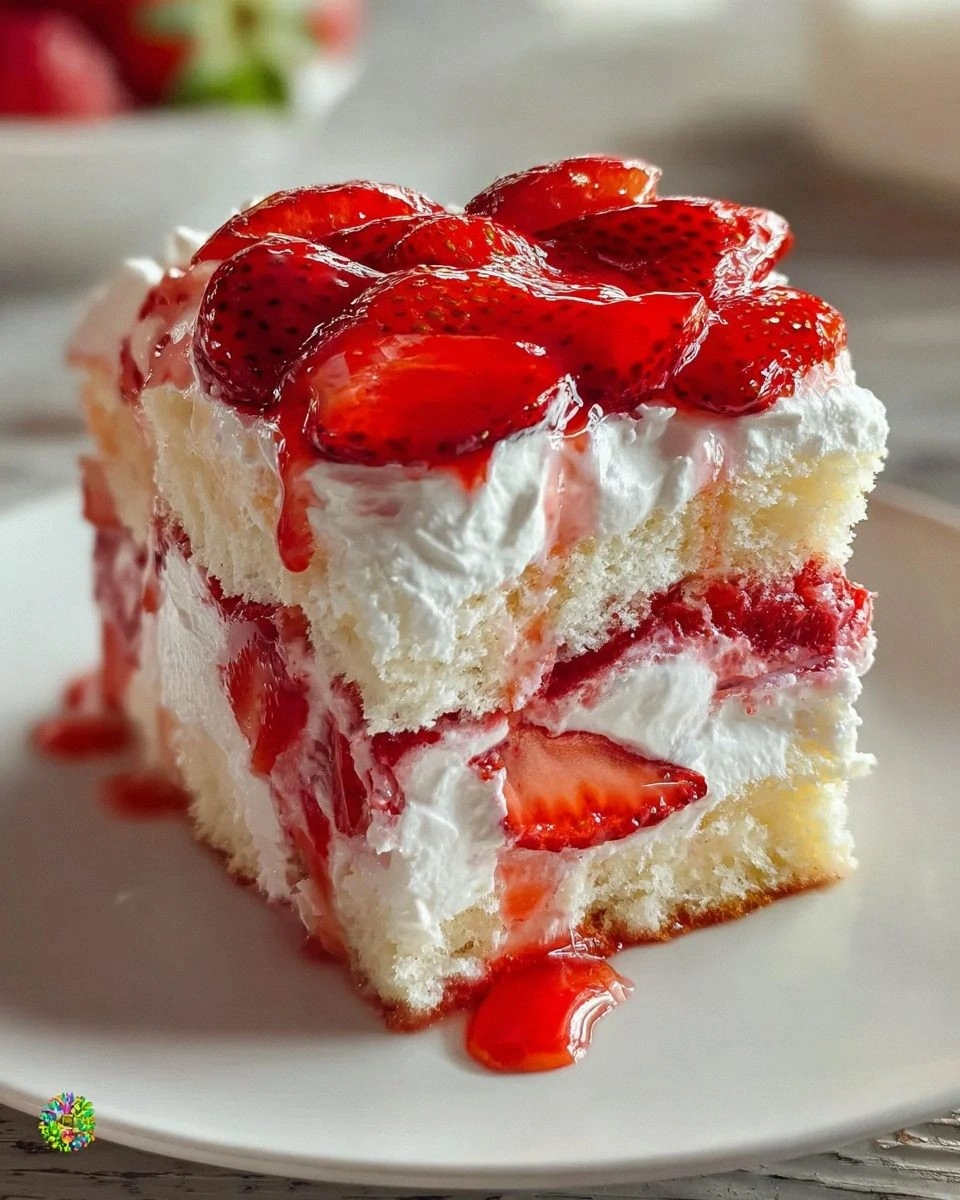
Picture this: a rainy Saturday afternoon, the kind that makes you want to curl up with a blanket, a good book, and something sweet that feels like a hug from the inside. I was battling a mountain of laundry, a half‑finished crossword, and a sudden craving for something that could turn the drab day into a celebration. I stared at my pantry, grabbed the first box of angel food cake mix I could find, and thought, “What if I could turn this humble mix into a dessert that literally feels like heaven?” The result? A cake that soaks up strawberry goodness, swirls with silky cream cheese pudding, and is crowned with airy whipped topping that melts on your tongue like a cloud. I dare you to taste this and not go back for seconds.
The kitchen was a symphony of sounds: the whir of the mixer, the gentle thud of the cake pan hitting the counter, and the faint pop of the oven’s heating element as it pre‑heated to a precise 350°F. The air was thick with the sweet perfume of strawberries mingling with a whisper of vanilla, while a faint citrus zing hinted at the lemon juice I’d daringly added. My fingertips felt the cool smoothness of softened cream cheese, and the anticipation built with every whisked bubble. When the batter hit the pan, it spread like a golden sunrise, promising a day that would end with a perfect, fluffy slice.
Most recipes for an “angel food cake” are either overly sweet, dry, or forget to give the cake a proper partner in crime. This version stands out because it marries the lightness of the cake with a luscious, tangy strawberry‑cream cheese layer that never overpowers but instead elevates each bite. The secret? A quick vanilla instant pudding mix that binds everything together, turning the cake into a moist, cohesive masterpiece that stays tender for days. And just when you think it can’t get any better, a generous dollop of Cool Whip crowns the top, creating a texture contrast that’s both airy and decadently creamy.
But wait—there’s a twist you won’t see coming. I’m about to reveal a technique that involves gently folding the pudding into the cream cheese while the mixture is still warm, creating a velvety consistency that you’ll swear is impossible to achieve without a professional pastry chef’s touch. Okay, ready for the game‑changer? Let me walk you through every single step — by the end, you’ll wonder how you ever made it any other way.
What Makes This Version Stand Out
- Taste: The strawberry‑pie filling brings a bright, tangy pop that cuts through the sweet cake, while the cream cheese adds a subtle richness that feels like a secret indulgence.
- Texture: Imagine the cake’s airy crumb soaked with a silky pudding, topped with a cloud‑like whipped topping—each forkful is a contrast of light and creamy that melts in your mouth.
- Simplicity: Only eight ingredients, most of which you probably already have on hand, and the steps are straightforward enough for a beginner yet satisfying for a seasoned baker.
- Uniqueness: The instant pudding isn’t just a filler; it’s a binding agent that keeps the cake moist for days, making leftovers just as glorious as the first slice.
- Crowd Reaction: Guests often claim this is the best dessert they’ve ever tasted, and they’ll be the first to ask for the recipe—yes, I’m talking about that “hands down the best version you’ll ever make at home” moment.
- Ingredient Quality: Using a high‑quality strawberry pie filling (or fresh strawberries) makes a world of difference; the natural fruit flavor shines through.
- Cooking Method: Baking the cake in a tube pan ensures even rise and perfect crumb structure, while the gentle folding technique guarantees a lump‑free pudding.
- Make‑Ahead Potential: This cake can be assembled a day ahead, refrigerated, and still taste fresh—perfect for parties, potlucks, or that last‑minute dessert craving.
Alright, let's break down exactly what goes into this masterpiece...
Inside the Ingredient List
The Flavor Base
Angel Food Cake Mix: This is the foundation of our dessert, providing that feather‑light structure that absorbs all the luscious flavors. It’s specially formulated with egg whites, which give it a natural rise without any added fat. Skipping this mix would mean losing the delicate crumb that makes the cake feel like a cloud. If you can’t find a brand you love, a homemade version with whipped egg whites and a touch of cornstarch works just as well.
The Sweet & Tangy Layer
Strawberry Pie Filling: The star of the show, this filling brings a burst of bright, slightly tart strawberry flavor that cuts through the sweetness of the cake. It also adds moisture, ensuring every bite is juicy. Fresh strawberries can be pureed and sweetened as a substitute, but the pre‑made filling guarantees consistency and a glossy finish. Look for a brand that uses real fruit puree rather than just artificial flavor.
The Creamy Crew
Cream Cheese: Softened cream cheese creates a rich, velvety pudding that adds depth and a subtle tang. It prevents the dessert from becoming cloyingly sweet and adds a luxurious mouthfeel. If you’re dairy‑free, a plant‑based cream cheese alternative works, though the texture will be slightly less dense. Be sure it’s at room temperature before mixing, or you’ll end up with lumps.
Vanilla Instant Pudding Mix: This instant pudding is the secret binding agent that turns the mixture into a smooth, glossy layer. It also contributes a gentle vanilla aroma that rounds out the strawberry’s acidity. Using a high‑quality pudding mix avoids a chalky texture; the best ones use real vanilla extract.
Whole Milk: Milk provides the liquid needed to activate the pudding mix and creates a silky base for the cream cheese. It also adds a subtle dairy richness that complements the whipped topping. If you prefer a lighter version, you can substitute half‑and‑half, but the cake will be a touch richer.
The Final Flourish
Cool Whip Whipped Topping: This airy topping crowns the cake, adding a light sweetness and a visual appeal that looks like a snow‑capped mountain. It’s the perfect contrast to the dense pudding layer beneath. For a fresher taste, you can whip heavy cream with a splash of vanilla, but Cool Whip saves time and stays stable longer.
Fresh Lemon Juice (optional): A splash of lemon juice brightens the entire dessert, cutting through the richness and adding a subtle zing that makes the flavors pop. If you’re not a fan of citrus, you can omit it, but you’ll miss that refreshing lift.
Sliced Almonds (optional): Toasted almond slices add a delightful crunch and a nutty undertone that elevates the texture profile. They’re optional, but they turn the cake from great to unforgettable. Sprinkle them just before serving for maximum crunch.
Everything's prepped? Good. Let's get into the real action...
The Method — Step by Step
Preheat your oven to 350°F (175°C) and lightly grease a 10‑inch tube pan. While the oven warms, measure out the angel food cake mix, and set it aside. This is the moment where you feel the anticipation building—your kitchen smells like a bakery in the making, and you can already picture the golden edges pulling away from the pan.
In a large mixing bowl, combine the angel food cake mix with the water, oil, and egg whites as instructed on the box. Beat on low speed until the batter is just combined, then increase to medium and beat for about 2 minutes. The batter should be smooth, glossy, and have a slightly thick consistency—if it looks too runny, add a tablespoon of flour; if too thick, a splash of milk will rescue it.
Kitchen Hack: Pour the batter into the pan using a spatula, then tap the pan gently on the counter three times to release any air bubbles and level the surface.Slide the pan onto the middle rack of the oven and bake for 30‑35 minutes, or until the top is a light golden brown and a toothpick inserted near the center comes out clean. You’ll hear a faint sigh as the cake rises—listen for it, because that’s the sound of perfection. When the cake is done, turn off the oven, crack the door open just a crack, and let the cake cool upside‑down in the pan for 15 minutes; this prevents it from collapsing.
While the cake is cooling, prepare the pudding‑cream cheese layer. In a saucepan over medium heat, whisk together the vanilla instant pudding mix, whole milk, and a pinch of salt until the mixture thickens—this usually takes about 2 minutes. Once thick, remove from heat and let it cool for a minute, then fold in the softened cream cheese until the mixture is completely smooth. If you’re adding lemon juice, stir it in now; the citrus will brighten the flavor dramatically.
Watch Out: Do not over‑mix the cream cheese once added, or the pudding will become grainy instead of silky.When the cake has cooled enough to handle, carefully run a thin knife around the edges of the pan to loosen it, then invert the cake onto a large serving platter. The cake should spring up with a perfect dome—if it sticks, a quick tap with a silicone spatula will release it. At this point, you can see the fluffy interior that’s just waiting for the strawberry soak.
Spread the strawberry pie filling evenly over the top of the cake, using a spatula to push it gently into the sides so the flavors seep into every crevice. The filling should ooze slightly, creating a glossy, ruby‑red layer that looks as good as it tastes. If you’re using fresh strawberries, crush them lightly before spreading for extra texture.
Now comes the magic: drizzle the warm pudding‑cream cheese mixture over the strawberry layer, allowing it to cascade down the sides like a silky waterfall. Use a spatula to smooth the top, making sure the pudding reaches the edges. This step binds everything together, ensuring each bite gets a balanced hit of cake, fruit, and cream.
Kitchen Hack: Chill the pudding mixture for 5 minutes before spreading; it will be easier to control and won’t slide off the cake.Top the entire creation with a generous swirl of Cool Whip, using a piping bag or a simple spoon. The whipped topping should blanket the cake like a fluffy snowcap, providing that final contrast of airy lightness. If you love crunch, sprinkle toasted sliced almonds over the whipped topping now, letting them stick to the soft surface.
Refrigerate the assembled cake for at least 2 hours, preferably overnight. This chilling time allows the flavors to meld, the pudding to set, and the cake to fully absorb the strawberry juices. When you finally slice into it, you’ll notice the layers holding together perfectly—no crumbly disaster, just a cohesive slice that looks as gorgeous as it tastes.
That's it — you did it. But hold on, I've got a few more tricks that'll take this to another level...
Insider Tricks for Flawless Results
The Temperature Rule Nobody Follows
Never bake an angel food cake with cold ingredients. Let the egg whites, water, and oil sit at room temperature for at least 30 minutes before mixing. This ensures maximum air incorporation, giving the cake its signature lift. I once tried a shortcut and ended up with a dense, flat cake—lesson learned: temperature is the silent hero of airy desserts.
Why Your Nose Knows Best
When the pudding mixture is thickening, trust your sense of smell. A faint vanilla aroma signals that the starches have gelatinized and the mixture is ready to be removed from heat. If you rely solely on timing, you risk under‑cooking and ending up with a runny layer. Your nose is a built‑in timer—listen to it.
The 5‑Minute Rest That Changes Everything
After folding the cream cheese into the pudding, let the mixture rest for five minutes before spreading. This short pause allows the fats to meld, creating a smoother texture that won’t separate later. Skipping this rest is the same as skipping the beat in a song—everything feels off.
Almond Toasting Secret
For the sliced almonds, toast them in a dry skillet over medium heat for just 2‑3 minutes, stirring constantly. You’ll hear a gentle sizzle, and the almonds will turn a golden hue, releasing a nutty fragrance that elevates the final bite. Burnt almonds are a no‑no; they bring bitterness that clashes with the sweet layers.
Cool Whip Stability Hack
If you plan to serve the cake a few hours after assembly, fold a tablespoon of melted white chocolate into the Cool Whip. This stabilizes the topping, preventing it from weeping and keeping that pristine cloud‑like appearance. I tried serving it straight from the fridge once, and the topping turned watery—this trick saved the day.
Creative Twists and Variations
This recipe is a playground. Here are some of my favorite ways to switch things up:
Chocolate Dream
Swap the strawberry pie filling for a rich chocolate ganache and add a tablespoon of cocoa powder to the pudding mix. The result is a decadently dark cake that satisfies any chocolate lover’s cravings. Top with shaved dark chocolate instead of almonds for extra flair.
Tropical Breeze
Replace the strawberry filling with a mango‑passionfruit coulis, and stir a teaspoon of coconut extract into the pudding. Garnish with toasted coconut flakes for a sun‑kissed island vibe that transports you to a beachside cabana.
Nutty Banana Split
Layer sliced bananas over the strawberry base and sprinkle chopped peanuts or hazelnuts on top of the whipped topping. The banana adds a mellow sweetness that pairs perfectly with the tangy strawberry, while the nuts provide crunch.
Matcha Magic
Incorporate a teaspoon of matcha powder into the pudding mix for a subtle earthiness and a beautiful green hue. Pair with a raspberry coulis instead of strawberry for a contrasting color palette that’s as Instagram‑ready as it is tasty.
Vegan Velvet
Swap the cream cheese for a vegan cream cheese alternative, use almond milk in place of whole milk, and choose a dairy‑free whipped topping. The flavor profile remains intact, and you’ll have a fully plant‑based version that still feels like heaven.
Storing and Bringing It Back to Life
Fridge Storage
Cover the cake loosely with plastic wrap or store it in an airtight container. It will stay fresh for up to 4 days, and the flavors will continue to meld, making each day’s slice even more harmonious. If the whipped topping starts to separate, give it a quick whisk before serving.
Freezer Friendly
Freeze individual slices wrapped tightly in parchment paper and then placed in a freezer bag. They’ll keep for up to 2 months. To thaw, move the slice to the fridge overnight; the texture remains creamy, and the strawberry filling stays vibrant.
Best Reheating Method
When you want to enjoy a warm slice, place it on a microwave‑safe plate, sprinkle a tiny splash of water around the edges, and microwave for 15‑20 seconds. The steam revives the cake’s softness without drying it out, and the strawberry filling becomes luscious again.