I was standing in my kitchen on a crisp October evening, the kind where the wind whistles through the cracked windows and the scent of pine needles sneaks in from the porch. I had just tried to make a batch of regular sugar cookies for a Halloween party, and they turned out flatter than a vampire’s ego—no bite, no drama, just bland. In a moment of sheer desperation (and a dare from my roommate that I couldn’t refuse), I grabbed a tub of sour cream, a splash of orange food coloring, and a handful of black sprinkles, promising myself that the next batch would be a “spooktacular” success. I won’t lie, I ate half the batch before anyone else could even sniff the kitchen, but the rest of the night was a glorious parade of buttery, chewy bars that looked like little pumpkins and ghosts in perfect harmony.
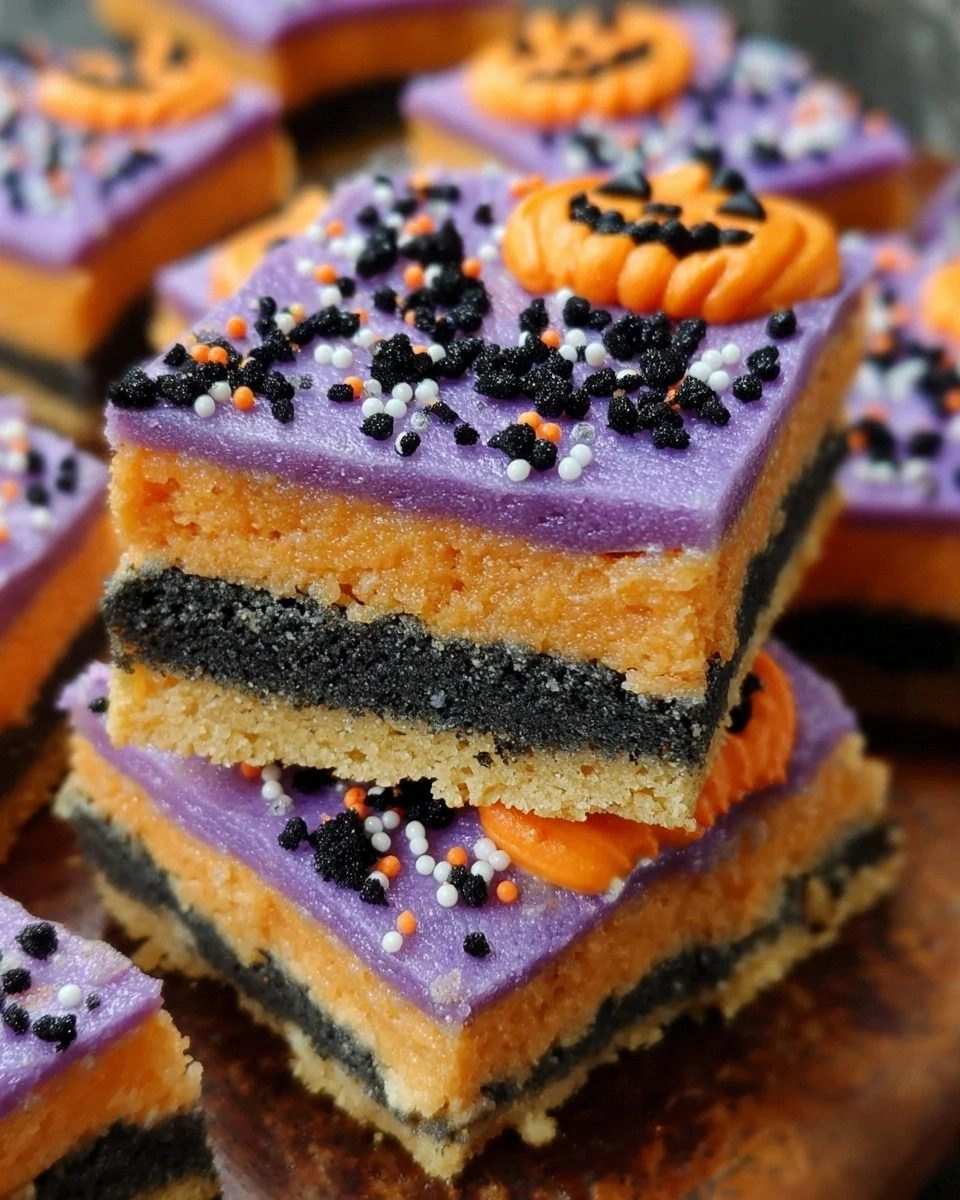
Picture this: the oven door swings open, and a wave of warm vanilla and caramelized sugar rolls over you like a cozy blanket, while the faint orange glow of the frosting catches the light and makes the whole room feel like a haunted bakery. The bars themselves have a crisp edge that snaps like a fresh autumn leaf, yet the center stays soft and chewy, almost melt‑in‑your‑mouth soft, with a tangy whisper from the sour cream that keeps the sweetness from becoming cloying. When you bite into one, the frosting shatters with a satisfying crack, releasing a burst of purple‑hued sweetness that’s as playful as a trick‑or‑treat surprise. The aroma alone is enough to make your neighbors wonder if you’ve hired a professional pastry chef for the night.
What makes this version truly stand out is the secret weapon: a duo of food colorings that create a bold, contrasting visual that most recipes completely miss. Most sugar cookie bars stay in the safe, beige zone—this one screams Halloween without being garish, thanks to the strategic use of black and orange swirls in the dough and a pop‑purple frosting that looks like it was painted by a mischievous goblin. And the texture? It’s the result of a precise balance between the richness of salted butter, the tang of sour cream, and a whisper of baking powder that lifts the bars just enough to keep them airy without losing that coveted chew.
Let me walk you through every single step — by the end, you’ll wonder how you ever made it any other way. Okay, ready for the game‑changer? This next part? Pure magic. I dare you to taste this and not go back for seconds.
What Makes This Version Stand Out
- Taste: The buttery base is amplified by a subtle tang from sour cream, giving the bars a depth that ordinary sugar cookies lack.
- Texture: A crisp edge frames a soft, chewy center, creating a delightful contrast that feels like biting into a caramelized dream.
- Simplicity: Despite the impressive look, the ingredient list is straightforward, and the method uses everyday kitchen tools.
- Uniqueness: Dual food coloring in the dough creates a marbled effect that’s both festive and sophisticated—most recipes miss this entirely.
- Crowd Reaction: Guests can’t help but comment on the vibrant frosting and the “spooky” swirl, making it a conversation starter at any party.
- Ingredient Quality: Using real vanilla extract (not imitation) and high‑quality salted butter elevates the flavor profile dramatically.
- Cooking Method: Baking on a parchment‑lined sheet ensures even heat distribution, preventing soggy bottoms.
- Make‑Ahead Potential: These bars keep beautifully for up to a week, and the frosting can be frozen for future hauntings.
Inside the Ingredient List
The Flavor Base
The heart of these bars starts with Salted Butter. This isn’t just any butter—it’s the kind that carries a whisper of sea‑salt, enhancing every other flavor and adding that luxurious melt‑in‑your‑mouth richness. If you skimp on butter or use a low‑fat version, you’ll notice a dry, crumbly texture that feels more like a biscuit than a bar. I always recommend using European‑style butter if you can find it; the higher butterfat content makes a world of difference. And remember, the butter should be softened, not melted, so it mixes evenly without creating a greasy dough.
White Sugar is the classic sweetener that gives the bars their golden caramel notes as they bake. It also contributes to the delicate crispness on the edges, especially when you bake them just long enough for the sugars to caramelize. If you substitute brown sugar, you’ll get a deeper molasses flavor but lose some of that clean, sweet snap that defines a perfect sugar cookie bar.
Egg acts as the binding agent, ensuring the dough holds together while still staying tender. A single large egg is enough for this batch; adding more can make the bars cakier, which is not what we’re aiming for. If you’re dealing with an egg allergy, a flax‑egg (1 tbsp ground flaxseed + 3 tbsp water) works surprisingly well, though the texture will be slightly denser.
The Texture Crew
Vanilla Extract is the aromatic hero that lifts the overall flavor. A splash (about 2 teaspoons) adds depth without overwhelming the sweet notes. I always reach for pure vanilla beans when possible; scraping the seeds into the batter gives a speckled, gourmet look that’s worth the extra effort. Skipping vanilla is a crime—your bars will taste flat, like a costume without any flair.
Sour Cream introduces a subtle tang that cuts through the richness, keeping the bars moist and preventing them from becoming overly sweet. This ingredient also adds a tender crumb, much like how buttermilk works in pancakes. If you’re out of sour cream, Greek yogurt (full‑fat) is a solid stand‑in, though it adds a slightly tangier profile.
All‑Purpose Flour forms the structural backbone. Two cups provide enough bulk to hold the bars together while still allowing the butter and sugar to shine. For a gluten‑free version, a 1:1 blend of rice flour, tapioca starch, and potato starch works, but be prepared for a slightly different texture.
The Unexpected Star
Food Coloring (Black and Orange) is where the Halloween magic truly begins. A few drops of black food coloring swirl into the dough, creating a midnight‑marble effect, while orange adds a pumpkin‑like pop that’s instantly recognizable. If you’re concerned about artificial dyes, opt for natural colorings derived from beet juice (red) and activated charcoal (black). The colors are adjustable—feel free to experiment with green or purple for a different spooky vibe.
The Final Flourish
Confectioner’s Sugar and Half & Half combine to make a frosting that’s fluffy, sweet, and just the right amount of creamy. The sugar provides the smooth texture, while the half & half adds a velvety sheen that spreads like a dream. Vanilla Extract appears again in the frosting, tying the flavors together in a seamless loop. Finally, a dash of Purple Food Coloring turns the frosting into a whimsical, otherworldly glaze that looks like it was painted by a mischievous goblin.
Everything's prepped? Good. Let’s get into the real action…
The Method — Step by Step
- Preheat and Prepare: Set your oven to 350°F (175°C) and line a 9×13‑inch baking pan with parchment paper, allowing the edges to overhang for easy removal later. While the oven warms, gather all your ingredients and give the butter a quick whisk to ensure it’s uniformly softened. This is the moment of truth—if the butter is still cold, you’ll get a lumpy dough that won’t spread evenly.
- Cream Butter and Sugar: In a large mixing bowl, beat the softened salted butter with the white sugar on medium speed until the mixture is pale, fluffy, and smells like a bakery. This should take about 3‑4 minutes—don’t rush it. The air you incorporate now will later translate into that coveted light crumb. When the mixture is ready, it should have a silky texture that slides off the beaters like a slow‑moving river.
- Add Egg and Vanilla: Crack the egg into the bowl, add the vanilla extract, and continue beating just until everything is combined. Over‑mixing at this stage can develop gluten, leading to a tougher bar, so stop as soon as you see a uniform, glossy batter. I dare you to taste a tiny spoonful at this point; you’ll notice a buttery sweetness that’s already hinting at the final flavor.
- Incorporate Sour Cream: Gently fold in the sour cream using a rubber spatula. This is where the dough gets its moisture, and you’ll see it become a little looser—don’t panic, that’s exactly what we want. The sour cream should meld seamlessly, creating a batter that looks slightly glossy and thick.
- Dry Ingredients Meet Wet: In a separate bowl, whisk together the all‑purpose flour, salt, and baking powder. Then, gradually add this dry mixture to the wet batter, stirring just until combined. Over‑mixing here is the biggest villain; it can develop gluten and make the bars dense. Stop as soon as you no longer see flour streaks.
- Colorful Swirl: Divide the dough into three equal parts. To one portion, add a few drops of black food coloring; to another, add orange. Using a knife or a small offset spatula, swirl the colors together in the pan, creating a marbled effect that looks like a night sky over a pumpkin patch. The key is to keep the swirls loose; too much mixing will blend the colors into a muddy brown.
- Spread and Bake: Transfer the marbled dough into the prepared pan, spreading it evenly with the spatula. Bake for 25‑30 minutes, or until the edges are golden brown and a toothpick inserted into the center comes out with just a few crumbs attached. The top should have a faint sheen and a subtle crackle—this is the aroma cue that says “we’re done.”
- Cool, Frost, and Finish: Allow the bars to cool completely in the pan—this prevents the frosting from melting. Meanwhile, whisk together confectioner’s sugar, half & half, vanilla, and a few drops of purple food coloring until you achieve a smooth, pipe‑able frosting. Once the bars are cool, spread the frosting generously, letting it drip over the edges for that “just out of the cauldron” look. Let the frosting set for at least 15 minutes before slicing.
- That’s it — you did it. But hold on, I’ve got a few more tricks that’ll take this to another level…
Insider Tricks for Flawless Results
The Temperature Rule Nobody Follows
Never bake these bars straight from the fridge. Let the dough sit at room temperature for 10‑15 minutes before it hits the oven; this ensures even baking and prevents the edges from over‑darkening while the center stays undercooked. I once tried to speed things up by popping a cold pan straight into a hot oven and ended up with a burnt perimeter and a gummy middle—lesson learned.
Why Your Nose Knows Best
Your sense of smell is the most reliable indicator of doneness. When the bars start to emit a sweet, caramel‑like scent, you’re within minutes of perfection. If you’re ever unsure, open the oven door briefly (quickly!) to sniff; that aromatic cue beats any timer.
The 5‑Minute Rest That Changes Everything
After pulling the bars from the oven, let them rest in the pan for exactly five minutes before transferring them to a wire rack. This short pause allows the interior to set, making slicing clean and preventing crumbs from scattering like confetti.
Frosting Consistency Hack
If your frosting is too thick, whisk in a teaspoon of half & half at a time until you reach a spreadable consistency. Too thin? Add a spoonful of confectioner’s sugar. The goal is a glossy glaze that holds its shape but still drips slightly—think of it as a silky spider‑web on a moonlit night.
The Secret of the Overhang
Leaving parchment overhang on the sides of the pan isn’t just for easy removal; it also creates a natural “hand‑hold” for cutting clean squares without the bars sliding around. When you lift the parchment, the bars stay intact, giving you perfect, uniform pieces every time.
Creative Twists and Variations
This recipe is a playground. Here are some of my favorite ways to switch things up:
Spooky Oreo Crumble
Fold crushed Oreo cookies into the dough for a chocolatey surprise that pairs perfectly with the orange‑black swirl. The cookies add a crunchy texture that contrasts nicely with the soft interior, and the dark specks look like tiny tombstones.
Pumpkin Spice Infusion
Add a teaspoon of pumpkin spice to the dry ingredients and swap half the orange food coloring for a warm amber hue. This variation brings a cozy autumn flavor that’s perfect for Thanksgiving leftovers.
Gluten‑Free Ghosts
Replace the all‑purpose flour with a gluten‑free blend and use almond milk instead of half & half for the frosting. The bars remain tender, and the almond milk adds a subtle nutty note that complements the vanilla.
Chocolate‑Dipped Delight
After the frosting has set, dip half of each bar into melted dark chocolate and sprinkle with edible silver glitter. The chocolate adds a bitter edge that balances the sweetness, while the glitter gives a magical sparkle.
Miniature Bite‑Size Bars
Press the dough into a mini muffin tin and bake for 12‑15 minutes. These bite‑size treats are perfect for party platters and look adorable when topped with a dollop of purple frosting and a tiny candy eyeball.
Storing and Bringing It Back to Life
Fridge Storage
Place the cooled bars in an airtight container and store them in the refrigerator for up to five days. The chilled environment keeps the frosting firm and prevents the bars from drying out. Before serving, let them sit at room temperature for 20 minutes to let the flavors fully awaken.
Freezer Friendly
Wrap each bar individually in plastic wrap, then place them in a zip‑top freezer bag. They’ll stay fresh for up to three months. When you’re ready to enjoy, thaw them in the fridge overnight, then bring them to room temperature for that just‑baked feel.
Best Reheating Method
To revive a day‑old bar, preheat your oven to 300°F (150°C), place the bar on a parchment‑lined tray, and heat for 5‑7 minutes. Add a tiny splash of water to the tray (just a few drops) before heating; the steam will revive the crumb, making it as soft as the first day.