Picture this: you’re in the middle of a Sunday dinner rush, the fridge is empty, and the only thing that’s left is a bag of ground turkey. You’re staring at the stove, a half‑finished pot of onions, and a craving for something that feels like a hug in a bowl. The kitchen is a little chaotic—sizzling onions, the faint scent of garlic, the hum of the fridge, and your heart racing for that satisfying, comforting dish. It’s a moment that could have ended in a bland turkey scramble, but instead, it became the spark that lit a new chili obsession.
That night, I dared myself to turn the humble turkey into something that would have everyone reaching for seconds. I added a splash of smoky paprika, a pinch of cayenne, and a generous ladle of tomatoes that were as bright as a summer sky. The pot started to sing, the aroma rolled in waves that made the kitchen feel like a cozy campfire. I tasted a spoonful and the flavors exploded—sweet, spicy, and utterly comforting. The moment the chili finished simmering, I knew I had stumbled upon the ultimate version of a classic.
What makes this version stand out? It’s not just the ingredients; it’s the technique, the balance, and the way every element sings together. I’ve distilled it into a handful of secrets that will make you wonder how you ever made it any other way. From the first sizzle to the final garnish, every step is a deliberate act of flavor building. And trust me, once you try this, you’ll be saying “I dare you to taste this and not go back for seconds.”
Let me walk you through every single step—by the end, you’ll wonder how you ever made it any other way. The result? A chili that’s hands down the best version you’ll ever make at home, with a texture that feels like velvet against the tongue and a depth that makes the whole kitchen smell incredible. Ready? Let’s dive in.
What Makes This Version Stand Out
- Taste: The combination of smoked paprika and fresh tomatoes gives the chili a smoky sweetness that’s hard to resist. The subtle heat from cayenne adds a kick without overpowering the other flavors. The result is a balanced profile that satisfies both the mild and the adventurous palate.
- Texture: Ground turkey remains moist and tender thanks to a quick sear and a controlled simmer. The beans stay plump, and the corn provides a pleasant crunch. This contrast keeps each bite exciting.
- Simplicity: You only need one pot and a handful of pantry staples. No need for exotic ingredients or complicated steps. It’s a recipe that fits into any busy weeknight routine.
- Uniqueness: The addition of a touch of lime juice at the end brightens the dish, while a splash of beer during simmering deepens the flavor profile. These small twists set the recipe apart from standard chili.
- Crowd Reaction: Friends who’ve tried it say it’s “the best chili I’ve ever tasted.” The dish is a guaranteed hit at gatherings, and the leftovers are even better.
- Ingredient Quality: Using fresh bell pepper, diced tomatoes, and low‑sodium broth elevates the overall taste. Quality ingredients translate to a richer, more satisfying bowl.
- Cooking Method: A gentle simmer allows the spices to meld without drying out the turkey. The technique preserves moisture and flavor.
- Make‑Ahead Potential: The chili tastes even better the next day, making it perfect for meal prep or a busy schedule.
Alright, let’s break down exactly what goes into this masterpiece…
Inside the Ingredient List
The Flavor Base
Onion, garlic, and bell pepper form the aromatic foundation of any great chili. They provide a sweet, savory backdrop that balances the heat from the spices. Sautéing them until translucent releases their natural sugars, creating a subtle caramelized sweetness. If you skip this step, the chili will taste flat and underdeveloped. For a deeper flavor, toast the onions slightly longer before adding the turkey.
Olive oil is the medium that carries the aromatics and helps the turkey brown evenly. A tablespoon is enough to coat the pan without making the dish greasy. Using a neutral oil like canola can also work, but olive oil adds a slight fruitiness that complements the tomatoes. The oil’s smoke point allows you to sear the meat at a higher temperature, locking in juices.
Tomato paste is a concentrated burst of umami that thickens the sauce and adds depth. It’s essential for a rich, velvety texture. If you prefer a lighter chili, reduce the amount slightly, but do not skip it entirely. The paste also helps bind the spices together, ensuring a cohesive flavor profile.
The Texture Crew
Ground turkey is the star protein in this recipe. It’s lean, quick to cook, and absorbs flavors beautifully. Using 1 lb for four servings gives a hearty bite without being too heavy. If you’re watching calories, you can reduce the portion or switch to ground turkey breast.
Kidney beans and black beans add both protein and a creamy texture that balances the meat. Rinsing them before adding removes excess sodium and helps them absorb the chili’s flavors. If you’re allergic or vegan, substitute with lentils or chickpeas for a different texture.
Corn kernels bring a sweet crunch that contrasts the softness of beans and meat. Fresh or frozen corn works, but fresh gives a brighter flavor. A pinch of sugar can enhance the corn’s natural sweetness, but this is optional.
The Unexpected Star
A splash of beer during the simmer adds a subtle malty undertone that deepens the overall taste. The alcohol evaporates, leaving behind the nuanced flavor profile. If you’re not a fan of beer, replace it with an equal amount of beef or chicken broth for a milder version.
Lime juice, added at the very end, brightens the chili and cuts through the richness. The acidity balances the sweetness from the tomatoes and corn. A teaspoon is enough; too much and it will overpower the dish.
The Final Flourish
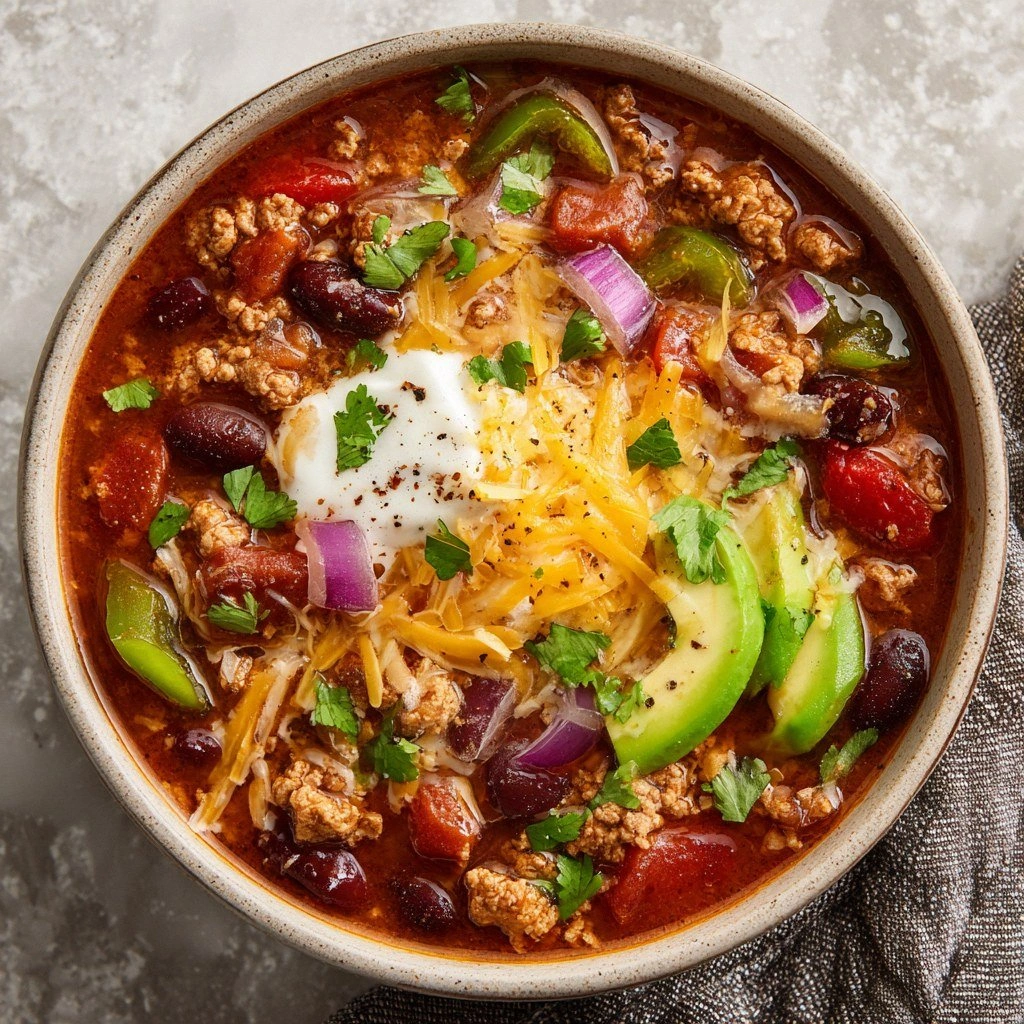
Fresh cilantro, shredded cheddar, and a dollop of sour cream are optional but highly recommended toppings. They add freshness, creaminess, and a burst of flavor that takes the chili from good to unforgettable. Each topping can be customized to suit personal preferences or dietary restrictions.
Everything's prepped? Good. Let's get into the real action…
The Method — Step by Step
- Heat the olive oil in a large pot over medium‑high heat. Add diced onion, minced garlic, and bell pepper, sautéing until the vegetables become translucent and fragrant—about five minutes. The aroma should fill the kitchen like a warm hug. This is where the foundation of flavor begins to form. Keep stirring to prevent sticking.
- Add the ground turkey to the pot, breaking it up with a wooden spoon. Cook until the turkey turns a deep, rich brown, which should take about eight minutes. Watch for browned edges that signal the meat is caramelized. Avoid over‑stirring; let the turkey form a crust for extra flavor. This is the moment of truth.
- Stir in tomato paste, chili powder, cumin, smoked paprika, oregano, and cayenne pepper. Cook for one to two minutes until the spices toast and release their aromas. The pot should smell toasty, like a campfire. This step is crucial for depth. Kitchen Hack: If you want a smokier flavor, add a teaspoon of chipotle powder or a splash of smoked paprika.
- Pour in diced tomatoes, drained kidney beans, drained black beans, corn, and the cup of low‑sodium chicken broth. Stir everything together so the ingredients are well distributed. Bring the mixture to a gentle simmer. The pot should bubble lightly, not boil vigorously. This allows the flavors to mingle. Let the chili sit uncovered for a moment to reduce the liquid slightly.
- Reduce the heat to low, cover the pot, and let the chili simmer for twenty minutes. The slow cooking helps the spices penetrate the meat and beans. Check the consistency; if it’s too thick, add a splash more broth. This step ensures the chili is thick yet saucy. Kitchen Hack: For a quicker version, use a pressure cooker and cook on high for 10 minutes.
- Taste the chili and season with salt and pepper to taste. If you prefer a sweeter note, add a teaspoon of honey or maple syrup. The balance should feel harmonious—neither too salty nor too spicy. Adjust the cayenne if you like it hotter. The aroma should be inviting.
- Stir in a tablespoon of lime juice for a bright, citrusy lift. This acidity cuts through the richness and adds a fresh pop. If you want a deeper flavor, replace lime juice with a splash of beer before simmering. The citrus will keep the chili from feeling too heavy.
- Turn off the heat, let the chili rest for five minutes. This resting period allows the flavors to settle and the chili to thicken slightly. It also makes it easier to ladle. The pot will still be hot, so use oven mitts.
- Serve the chili hot, topped with shredded cheddar, a dollop of sour cream, chopped cilantro, sliced jalapeños, and avocado slices if desired. Each topping adds a layer of flavor and texture. The combination of creamy, spicy, and fresh makes every bite a new experience. Enjoy with crusty bread or over rice for a complete meal.
That’s it — you did it. But hold on, I’ve got a few more tricks that will take this to another level…
Insider Tricks for Flawless Results
The Temperature Rule Nobody Follows
Many people think a high simmer is the key to a good chili, but it actually dries out the turkey. Keep the heat low and let the chili gently bubble. This preserves moisture and ensures a tender bite. I once tried a high‑heat method and the turkey came out rubbery. Lesson learned: low and slow wins the race.
Why Your Nose Knows Best
Your sense of smell is your best judge of doneness. When the chili smells toasty and the spices are fragrant, it’s almost ready. Don’t rely solely on the timer; let the aroma guide you. This subtle cue can save you from over‑cooking or under‑seasoning.
The 5-Minute Rest That Changes Everything
Letting the chili sit after cooking allows the flavors to meld fully. The rest period also lets the spices settle, making the chili less sharp. The result is a richer, more cohesive taste. Skip this step and you’ll miss out on that subtle depth.
Keep the Beans Tender
Beans can become mushy if you over‑simmer them. Add them in the last ten minutes of cooking to preserve their shape. This ensures each bite has a satisfying bite. If you prefer softer beans, add them earlier but keep an eye on the consistency.
Add a Touch of Sweetness
A teaspoon of honey or maple syrup balances the acidity and brings a subtle sweetness that rounds out the chili. This is especially useful if you’re using low‑sodium tomatoes or broth. The sweetness also helps the spices integrate smoothly.
Make‑Ahead Magic
Chili tastes even better the next day because the flavors have more time to develop. Store it in an airtight container in the fridge for up to four days. Reheat gently on the stove or in the microwave with a splash of water to keep it moist.
Creative Twists and Variations
This recipe is a playground. Here are some of my favorite ways to switch things up:
Mexican Street Tacos
Serve the chili in warm corn tortillas, topped with diced onions, fresh cilantro, and a squeeze of lime. The tortilla adds a chewy texture, and the fresh toppings brighten the dish. This version is perfect for a casual lunch or a quick dinner.
Southwest Sweet Chili
Add diced apples and a pinch of cinnamon for a sweet twist. The apples provide a crisp sweetness that balances the heat. This variation is ideal for fall gatherings.
Italian-Style Chili
Replace beans with lentils and add oregano and basil for an Italian flavor profile. The lentils absorb the tomato base, creating a hearty texture. Pair it with a crusty baguette for a satisfying meal.
Low‑Carb Version
Omit the beans and serve the chili over cauliflower rice. The cauliflower adds bulk without the carbs, making it a great low‑carb option. Keep the spices the same for full flavor.
Vegan Swap
Use a plant‑based ground turkey alternative and replace the broth with vegetable stock. The texture remains similar, and the plant‑based protein keeps it hearty. This version is great for vegans or those looking to reduce meat.
Breakfast Chili
Add scrambled eggs on top or serve the chili over a baked potato. The eggs provide a creamy richness that pairs well with the spicy base. This makes a filling breakfast or brunch.
Storing and Bringing It Back to Life
Fridge Storage
Transfer the chili into an airtight container and refrigerate for up to four days. The flavors continue to develop, making it even tastier the next day. Keep the container at room temperature for the first 24 hours to avoid condensation. When ready to eat, reheat on the stove or microwave.
Freezer Friendly
Divide the chili into freezer‑safe bags or containers. Label with the date and freeze for up to three months. Thaw overnight in the refrigerator before reheating. The texture remains good, and the spices stay vibrant.
Best Reheating Method
Reheat the chili on the stove over medium heat, adding a splash of water or broth to keep it moist. Stir frequently to prevent sticking. If using a microwave, add a tablespoon of water and cover loosely to steam. The key trick is to keep it from drying out.