Why you'll love this recipe
- One‑pot, no‑mess dinner in 45 minutes
- Crowd‑pleaser with gooey cheese and smoky chilies
- Make‑ahead friendly for busy weeknights
- Freezer‑friendly for leftovers
- Kid‑approved mild heat and melty texture
I remember the first time I rolled these enchiladas in my tiny apartment kitchen—sunlight filtered through the window, and the scent of chilies drifted onto the balcony where my neighbor was watering herbs. My roommate peeked in, eyes widening at the golden tops, and we both laughed when the first bite made the cheese stretch like a sunrise over the desert. That moment cemented the dish as a go‑to comfort food for me. A few months later, I served them at my sister’s birthday brunch; the kids devoured them before the candles were even lit. The combination of creamy sauce and smoky chilies turned an ordinary gathering into a memory I still replay when I need a quick mood boost.
The story
The kitchen fills with the smoky perfume of fire‑roasted chiles as the sauce bubbles, and the first bite delivers a burst of molten cheese that stretches like sunrise over the desert. A quick sizzle of tortillas hitting the hot pan promises a golden crust. You’ll hear the soft sigh of the sauce soaking into each roll, and you’ll be hooked.
I first stumbled on this dish at my aunt’s Sunday lunch, where a rotisserie chicken sat beside a pot of green chile sauce that seemed to glow. Watching her pull apart the tender meat with a fork, I realized the perfect marriage of smoky chilies and creamy cheese. That afternoon, the flavors lingered on my palate and in my memory, and I’ve been perfecting the recipe ever since.
What sets this version apart is the simple trick of brushing each tortilla with a light coat of olive oil before rolling—this keeps them supple and prevents cracking. I also fold the sauce into the shredded chicken, creating a luscious, evenly‑distributed filling that stays moist throughout baking. The result is an enchilada that holds its shape yet melts in your mouth.
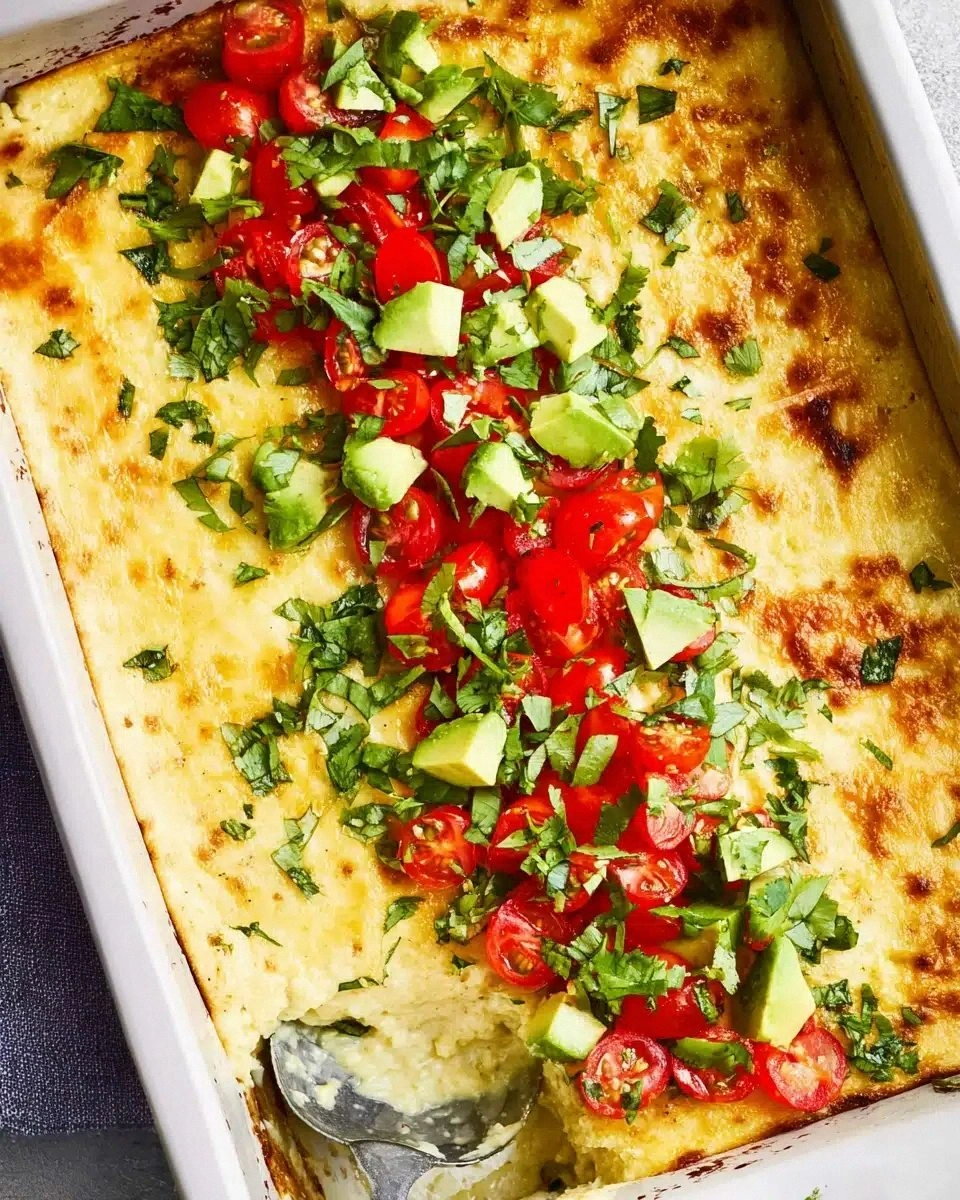
On the palate you get a layered experience: the earthy heat of green chilies, the subtle sweetness of onion, the buttery richness of sour cream, and the salty‑sharp snap of Monterey Jack. The corn tortilla offers a tender chew, while the baked cheese top adds a crisp, caramelized edge. Fresh cilantro finishes with a bright, herbal lift.
These enchiladas shine as a centerpiece for a relaxed weeknight dinner, a crowd‑pleasing dish at a potluck, or a make‑ahead option for busy mornings. Pair them with a crisp green salad and a squeeze of lime, or serve them alongside Mexican street‑corn for a festive spread. They’re also perfect for meal‑prep—just reheat and the flavors only deepen.
Don’t let the thought of rolling tortillas intimidate you; the oil brush makes them pliable, and the sauce‑infused filling stays forgiving. The bake is hands‑off, and the whole process fits comfortably within an hour. Even if you’ve never tackled enchiladas before, you’ll find this recipe straightforward and rewarding.
After testing four different cheese blends and watching my kids devour three plates each, I can say these enchiladas have earned a permanent spot on our family table. So grab your skillet, preheat the oven, and let’s bring a bit of Southwest sunshine to your home.
Why This Recipe Works
- Brushing tortillas with oil prevents cracking and improves sauce absorption.
- Mixing sour cream into the chicken keeps the filling moist during baking.
- Covering the dish early creates steam that softens tortillas before crisping the cheese.
Ingredient notes & substitutions
Chicken
Shredded rotisserie or poached chicken stays juicy and adds protein without drying out.
Green chiles
Fire‑roasted Hatch chilies give authentic smoky heat and vibrant color.
Corn tortillas
Corn tortillas absorb sauce while holding shape, delivering true Mexican texture.
Shredded cheese
Monterey Jack melts into a buttery, golden crust that browns beautifully.
Green enchilada sauce
The sauce ties the dish together with tangy, earthy depth.
Equipment you'll need
Ingredients
- Chicken: Rotisserie or poached chicken both work beautifully—just make sure it’s tender and easy to shred.
- Green chiles: Use canned fire-roasted Hatch or mild green chiles for that authentic Southwestern flavor.
- Corn tortillas: They soak up the sauce and hold their shape perfectly in the oven—always warm before rolling!
- Shredded cheese: Monterey Jack or a Mexican blend gives you that gooey, golden top everyone loves.
- Green enchilada sauce: Grab your favorite store brand or use homemade for even more depth of flavor.
- Onion: Just a touch of diced onion adds sweetness and a bit of crunch inside the enchiladas.
- Sour cream: Stirred into the filling, this makes the chicken mixture rich and extra luscious.
- Fresh cilantro: A sprinkle on top wakes up all the flavors with fragrant, herbal brightness.
- Salt and pepper: Essential for seasoning both the filling and the sauce to perfection.
- Olive oil: A quick brush keeps the tortillas soft and pliable for easy rolling.
Before You Start
- Preheat oven to 375°F
- Warm corn tortillas
- Shred chicken and cheese
- Mix filling ingredients
Instructions
Pro tips
Warm tortillas first
Heat each tortilla on a dry skillet for 10 seconds per side to soften and prevent cracks.
Brush oil lightly
A thin coat of olive oil keeps tortillas pliable and adds a subtle richness.
Don’t overfill
Two tablespoons of filling per tortilla rolls evenly and avoids bursting during bake.
Cover while baking
Cover the dish with foil for the first 20 minutes to keep the enchiladas moist.
Uncover for crisp
Remove foil for the final 10 minutes to achieve a golden, bubbly cheese top.
Let rest before serving
Allow the enchiladas to sit 5 minutes after baking; this lets the sauce thicken slightly.
Add cilantro last
Fresh cilantro sprinkled after baking preserves its bright flavor and color.
Variations to try
Spicy Cajun Twist
Stir in Cajun seasoning and diced bell peppers with the chicken for a bold, Southern‑style heat.
Dairy‑Free Version
Swap Monterey Jack for vegan cheese shreds and blend cashew cream into the chicken mixture.
Tex‑Mex Slider
Use mini corn tortillas, bake in a muffin tin, and serve as bite‑size party appetizers.
Holiday Verde
Add roasted poblano strips and finish with pomegranate seeds for a festive pop of color.
Serving Suggestions
Troubleshooting
Sauce breaks
Whisk in a splash of water or chicken broth over low heat until it smooths out.
Tortilla cracks
Warm tortillas longer and brush with oil; roll gently to avoid tearing.
Enchiladas dry
Cover tightly with foil for the first 20 minutes and add a drizzle of extra sauce before serving.
Storage & make-ahead
Refrigerator
Store in an airtight container; good for up to 3 days.
Freezer
Freeze unbaked rolled enchiladas in a single layer, then bag; up to 2 months. Thaw overnight in fridge before baking.
Best way to reheat
Reheat covered at 350°F for 20 minutes, then uncover 5 minutes to crisp; microwave with a splash of water if rushed.
Make-ahead
Assemble and refrigerate unbaked for up to 24 hours; keep sauce separate until ready to bake.
Ingredients
- Chicken: Rotisserie or poached chicken both work beautifully—just make sure it’s tender and easy to shred.
- Green chiles: Use canned fire-roasted Hatch or mild green chiles for that authentic Southwestern flavor.
- Corn tortillas: They soak up the sauce and hold their shape perfectly in the oven—always warm before rolling!
- Shredded cheese: Monterey Jack or a Mexican blend gives you that gooey, golden top everyone loves.
- Green enchilada sauce: Grab your favorite store brand or use homemade for even more depth of flavor.
- Onion: Just a touch of diced onion adds sweetness and a bit of crunch inside the enchiladas.
- Sour cream: Stirred into the filling, this makes the chicken mixture rich and extra luscious.
- Fresh cilantro: A sprinkle on top wakes up all the flavors with fragrant, herbal brightness.
- Salt and pepper: Essential for seasoning both the filling and the sauce to perfection.
- Olive oil: A quick brush keeps the tortillas soft and pliable for easy rolling.