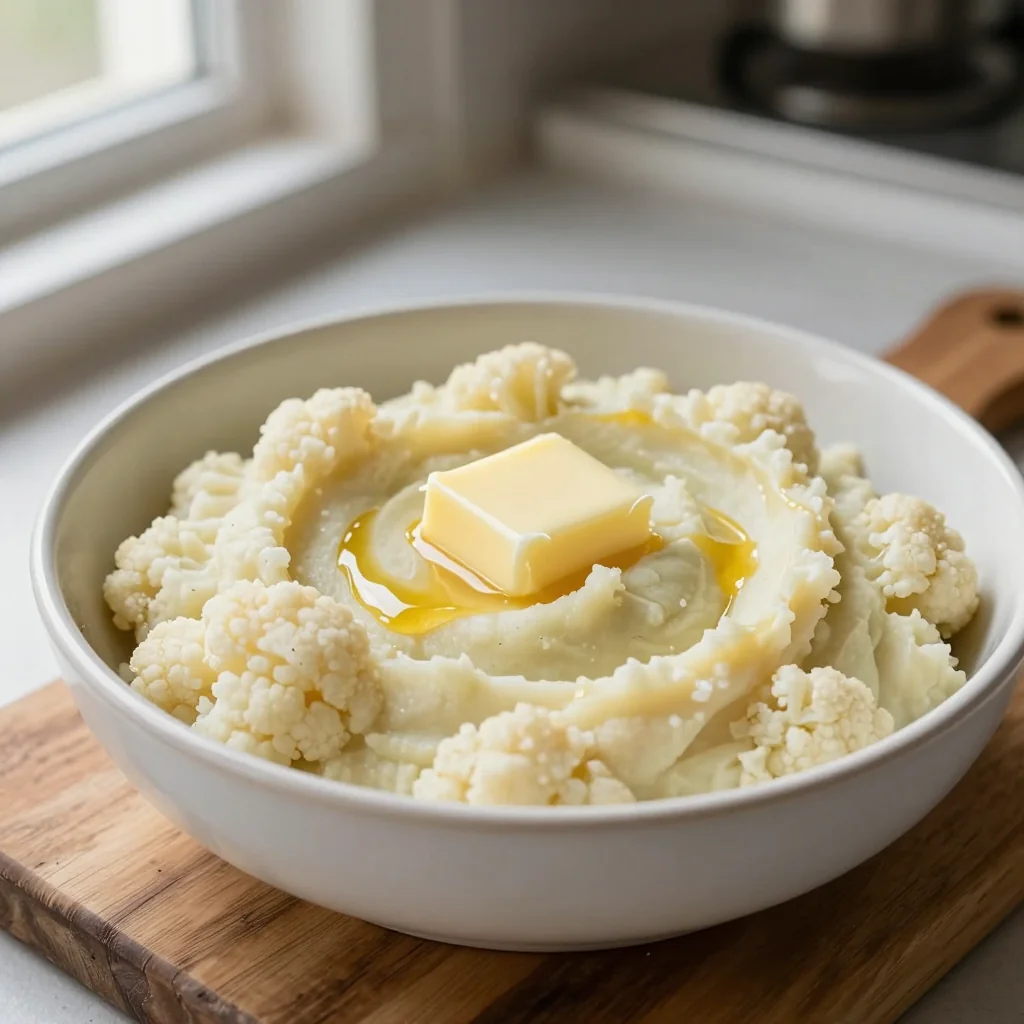
A silky, buttery cauliflower mash that delivers all the comfort of potatoes with a fraction of the carbs.

Why This Dish Holds a Special Place in My Kitchen
I still remember the first time I tasted a spoonful of this cauliflower mash at a cozy family gathering in the French countryside. The buttery aroma mingled with the gentle heat of roasted garlic, and the texture was so smooth it melted on the tongue, reminding me of the classic mashed potatoes my grandmother used to make. That night, I vowed to recreate that comforting sensation in a healthier, low‑carb form that could become a staple for anyone craving comfort without the heaviness.
Cauliflower, a humble cruciferous vegetable, has long been celebrated in French cuisine for its ability to absorb flavors while providing a silky base for sauces and purées. By pairing it with generous amounts of butter and a whisper of heavy cream, we achieve a luxurious mouthfeel that rivals any traditional potato mash. This recipe is a tribute to the timeless technique of turning simple vegetables into a star side dish.
In this guide, you’ll learn how to steam the cauliflower to perfection, infuse it with aromatic garlic, and finish it with a glossy butter glaze that adds depth and shine. I’ll also share tips on adjusting the richness, swapping ingredients for dietary needs, and presenting the mash in a way that looks as impressive as it tastes.
So grab your apron, preheat your steam basket, and let’s dive into a dish that will quickly become a beloved fixture on your dinner table.
🌟 Why This Recipe Will Win Your Heart
From its velvety texture to its adaptable nature, this garlic mashed cauliflower is more than a side—it’s a culinary experience.
- ✨ Velvety Texture: The combination of steam‑cooked cauliflower, butter, and a splash of cream creates a silky mouthfeel that feels indulgent without being heavy.
- ✨ Rich Garlic Flavor: Slow‑roasted garlic delivers a sweet, mellow depth that infuses every bite, eliminating the need for raw pungency.
- ✨ Low‑Carb Alternative: With only about 12 g of carbs per serving, it’s perfect for keto, paleo, or anyone watching their carbohydrate intake.
- ✨ Butter Infusion: Melted butter not only adds richness but also carries the garlic’s aroma, creating a harmonious flavor bridge.
- ✨ Quick and Easy: From prep to plate in under 40 minutes, it fits seamlessly into busy weeknight schedules.
- ✨ Versatile Side Dish: Pairs beautifully with roasted meats, grilled fish, or can even serve as a base for a vegetarian main.
🥗 Ingredients
📝 Complete Ingredient List
For the Mashed Cauliflower:
For the Garnish (optional):
🔍 Focus on the Key Ingredients
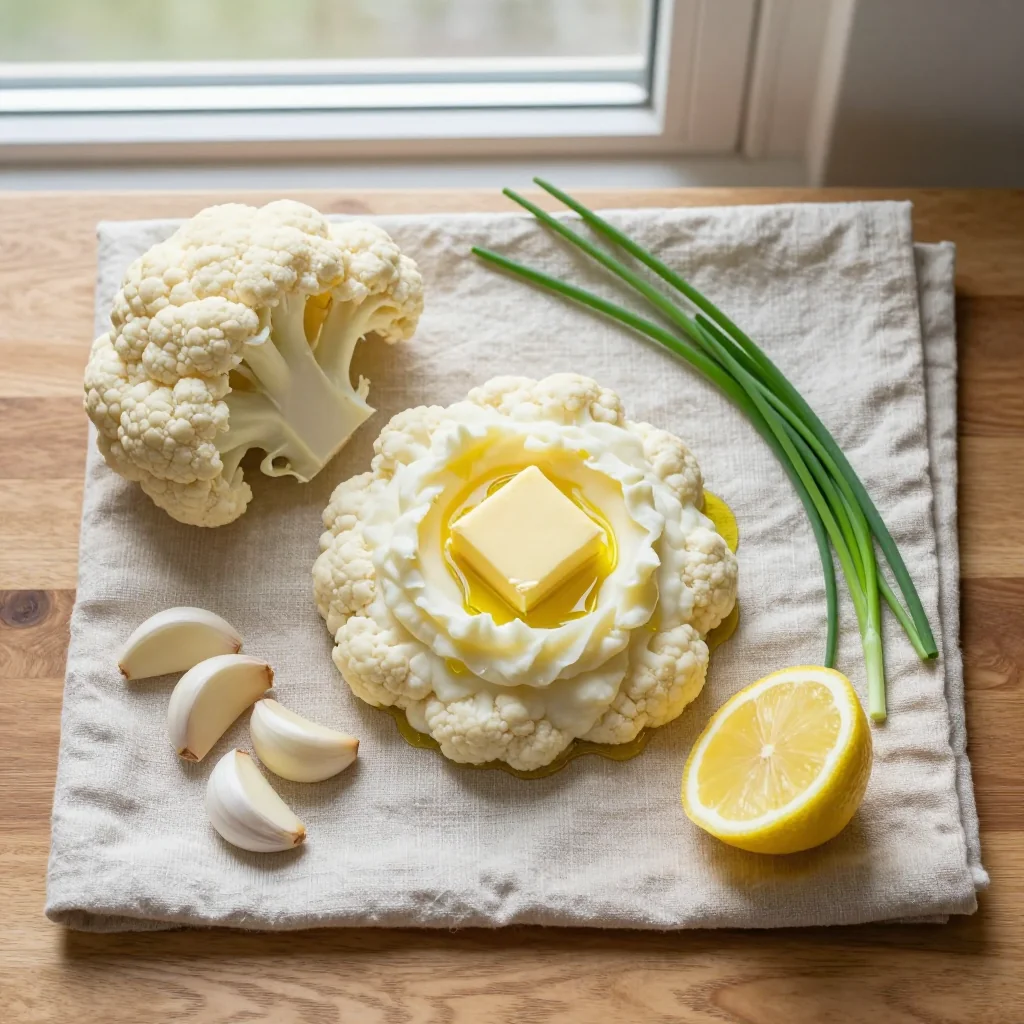
Cauliflower
Cauliflower is the star of this dish, offering a neutral canvas that absorbs the buttery garlic flavors beautifully. When selecting cauliflower, look for heads with tight, white florets and a faint, fresh aroma. The high water content ensures a light texture, while the fiber contributes to a feeling of fullness without excessive calories.
Garlic
Garlic provides the aromatic backbone. Roasting it gently before mixing releases natural sugars, turning its sharp bite into a sweet, caramelized nuance. This method also reduces the risk of a raw, harsh aftertaste, making the mash gentle enough for even the most sensitive palates.
Butter
Butter enriches the mash with a glossy sheen and a luxurious mouthfeel. Using unsalted butter gives you full control over the seasoning, while its fat content carries the garlic’s fragrance throughout the puree, ensuring each spoonful is evenly flavored.
🔄 Quick Substitutions
| If you don’t have... | Use instead... |
|---|---|
| Unsalted butter | Olive oil (use 3 tbsp) |
| Heavy cream | Coconut milk (full‑fat, 0.25 cup) |
| Parmesan cheese | Nutritional yeast (1 tbsp) |
👨🍳 Step‑by‑Step Instructions
Follow these detailed steps to achieve a perfectly smooth mash with a buttery garlic perfume that will impress family and friends alike.
📋 Phase 1: Preparation and Mise en Place
Gather and prep all components before you start cooking.
Trim and Wash the Cauliflower
Remove the outer leaves of the cauliflower head and cut it into uniform florets, each about 2‑3 cm thick. Rinse under cold water to remove any grit. Pat dry with a clean kitchen towel. Uniform pieces ensure even steaming, which is crucial for a consistent texture.
Mince the Garlic and Melt the Butter
Peel the garlic cloves and mince them finely. In a small saucepan, melt the butter over low heat, then add the minced garlic. Cook gently for 2‑3 minutes, stirring constantly, until the garlic becomes fragrant and just begins to turn golden. This gentle cooking prevents bitterness.
🔥 Phase 2: Cooking and Blending
Transform the raw ingredients into a silky mash.
Steam the Cauliflower
Place the cauliflower florets in a steamer basket over a pot of simmering water. Cover tightly and steam for 12‑15 minutes, or until the florets are fork‑tender and easily break apart. The steam preserves the vegetable’s natural sweetness while keeping it light.
Combine Cauliflower, Garlic‑Butter, and Cream
Transfer the steamed cauliflower to a large mixing bowl. Add the garlic‑butter mixture and the heavy cream. Using an immersion blender or potato masher, blend until smooth. Scrape the sides of the bowl to ensure every piece is incorporated.
Season and Adjust Consistency
Season with salt and freshly ground black pepper. If the mash feels too thick, stir in a tablespoon of additional cream or a splash of milk until you reach a creamy, spoon‑able consistency. Taste and adjust seasoning as needed.
✨ Phase 3: Finishing Touches and Plating
Give the dish its final shine and serve.
Check for Doneness
The mash should be completely smooth with no large cauliflower pieces. Run a spoon through the center; it should glide effortlessly. If you notice any lumps, give it a quick extra blend.
Garnish (Optional)
Sprinkle the chopped chives and grated Parmesan over the top. The bright green of the chives adds color contrast, while the Parmesan introduces a nutty umami note that complements the buttery base.
Serve Immediately
Transfer the mash to a warmed serving bowl. Serve alongside roasted chicken, grilled salmon, or a hearty stew. The mash holds its shape for a few minutes, making it perfect for plating.
💡 Expert Tips and Tricks
🛒 Choosing the Right Ingredients
Pick a cauliflower that feels heavy for its size; this indicates a denser, more flavorful head. Avoid heads with yellowing florets or a strong sulfuric smell. Fresh garlic should snap cleanly when pressed—signs of moisture indicate freshness. For butter, opt for European‑style butter with at least 82 % fat; it yields a richer mouthfeel and a more stable emulsion.
🔪 Preparation Techniques
Cutting cauliflower into uniform florets ensures even steaming, preventing some pieces from becoming mushy while others stay firm. When mincing garlic, keep the pieces as fine as possible; this allows the flavor to distribute uniformly without creating gritty pockets. A quick toast of the garlic in butter before adding it to the mash unlocks a subtle sweetness that balances the savory profile.
🌡️ Mastering the Cooking Process
Steam, not boil, the cauliflower to retain its natural sweetness and prevent waterlogging. Keep the lid on tightly to maintain a steady steam temperature around 100 °C. If you prefer a slightly richer mash, increase the cream by a tablespoon, but be mindful of the added calories. Always taste after seasoning; a pinch of salt can dramatically elevate the garlic’s depth.
🍽️ Presentation and Service
For a restaurant‑style presentation, pipe the mash using a large pastry bag fitted with a star tip onto a warmed plate. Finish with a drizzle of melted butter and a sprinkle of micro‑herbs. This not only looks elegant but also adds a final burst of aroma as the butter melts over the hot mash.
🏆 Pro Tips
Professional chefs rely on precision, technique, and a deep understanding of flavor balance to elevate a simple side into a show‑stopper.
- 🎯 Control the Steam Temperature: Use a thermometer to keep the water just below boiling. Consistent 95‑100 °C steam prevents the cauliflower from becoming water‑logged, preserving its natural sweetness.
- 🎯 Emulsify the Butter Properly: Add the melted butter gradually while whisking the mash. This creates a stable emulsion, giving the mash a glossy finish and preventing separation during reheating.
- 🎯 Use an Immersion Blender for Uniformity: An immersion blender creates a finer texture than a hand masher, especially when paired with a short pulse to avoid over‑processing, which can turn the mash gluey.
- 🎯 Finish with a Touch of Acid: A squeeze of fresh lemon juice (about ½ tsp) brightens the flavor, cutting through the richness of butter and cream without altering the low‑carb profile.
- 🎯 Salt at the End of Cooking: Adding salt after the mash is fully blended prevents the cauliflower from releasing excess water, maintaining a thick, creamy consistency.
- 🎯 Keep the Mash Warm, Not Hot: Store the finished mash in a low‑heat oven (around 60 °C) if you need to hold it for a short period. High heat can cause the butter to separate.
"A perfect mash is the canvas upon which the rest of the meal paints its flavors." — Chef Thomas Keller
🔄 Variations and Adaptations
This cauliflower mash is a flexible foundation that can be customized to suit dietary preferences, flavor cravings, and seasonal inspirations.
🥬 Vegetarian / Vegan Version
Replace the butter with a high‑quality plant‑based butter (such as Miyoko’s) and swap heavy cream for full‑fat coconut milk or oat cream. The result remains luxuriously creamy while staying 100 % vegan.
- Vegan butter (4 tbsp) – provides the same richness without dairy.
- Coconut milk (¼ cup) – adds a subtle tropical note that pairs well with ginger.
🌶️ Flavor Variations
The base mash is a perfect canvas for global twists. Below are three distinct flavor pathways.
Spicy Version
Add ½ tsp smoked paprika and a pinch of cayenne pepper during step 4. Finish with a drizzle of chili‑infused oil for an extra kick.
Mediterranean Version
Stir in 2 tbsp chopped sun‑dried tomatoes and 1 tbsp crumbled feta after blending. Garnish with fresh oregano for a bright, herbaceous finish.
Asian Version
Incorporate 1 tsp toasted sesame oil, 1 tbsp finely grated ginger, and a splash of low‑sodium soy sauce. Top with toasted sesame seeds and sliced scallions for an umami‑rich side.
⚠️ Dietary Adaptations
Gluten‑Free
This mash is naturally gluten‑free; just ensure any added garnishes (like soy sauce) are certified gluten‑free.
Lactose‑Free
Use lactose‑free butter and substitute heavy cream with lactose‑free cream or a blend of almond milk and a tablespoon of melted coconut oil.
Low‑Calorie
Reduce butter to 2 tbsp and replace half of the heavy cream with low‑fat milk or unsweetened almond milk. Add a teaspoon of Greek yogurt for tang without many calories.
👶 Kid‑Friendly Version
For younger palates, omit the garlic or reduce it to one clove, and blend in a small handful of shredded mild cheddar cheese. The cheese adds familiarity while keeping the dish nutritious.
📦 Storage and Reheating
🧊 Conservation
Refrigerator:
- Duration: 3 days
- Container: Airtight glass or BPA‑free plastic container
- Tip: Place a thin layer of butter on top before sealing to prevent drying.
Freezer:
- Duration: 2 months
- Method: Portion into freezer‑safe bags, flatten, and label with date.
- Defrosting: Transfer to fridge overnight, then reheat gently.
💡 For best texture, re‑steam the frozen mash briefly before adding fresh butter.
♨️ Reheating
🔥 Oven (Recommended):
- Preheat to 180 °C (350 °F).
- Cover the mash with aluminum foil.
- Heat for 10‑12 minutes.
- Remove foil, stir in an extra tablespoon of butter, and heat an additional 3‑4 minutes uncovered.
⚡ Microwave (Quick):
- Place mash in a microwave‑safe bowl, cover loosely.
- Heat on medium power for 1‑2 minutes, stirring halfway.
- Stir in a splash of milk or cream to restore creaminess.
🍳 Stovetop:
Add the mash to a non‑stick skillet over low heat, stir constantly, and drizzle a little butter to prevent sticking. This method revives the buttery sheen quickly.
🍷 Perfect Pairings
🥗 Side Dishes
- Arugula Salad with Lemon Vinaigrette: The peppery arugula cuts through the richness, while the citrus brightens the palate.
- Roasted Brussels Sprouts with Balsamic Glaze: Their caramelized edges complement the buttery cauliflower.
- Grilled Asparagus with Toasted Almonds: A crisp, nutty contrast that adds texture.
🍷 Wine & Beverage Pairings
- Chardonnay (oaked): Its buttery notes echo the mash while the acidity balances the richness.
- Pinot Noir: Light tannins and bright red fruit complement the garlic flavor without overpowering.
- Non‑Alcoholic Option: Sparkling apple cider with a splash of ginger.
🍰 To Complete the Meal
Begin with a light citrus‑herb soup, follow with the garlic mashed cauliflower alongside a herb‑roasted chicken, and finish with a delicate almond flour tart topped with fresh berries. This progression offers a balance of textures, flavors, and a satisfying conclusion.
❓ Frequently Asked Questions
Q: Can I use frozen cauliflower instead of fresh?
Yes, frozen cauliflower works well. Thaw it completely, pat dry to remove excess moisture, and steam as directed. The texture may be slightly softer, but the flavor remains excellent.
Q: How do I prevent the mash from becoming watery?
The key is to steam, not boil, and to avoid over‑cooking. After blending, if you notice excess liquid, return the mash to a low‑heat pan and stir gently to evaporate the water while adding a bit more butter to maintain creaminess.
Q: Is it possible to make this recipe dairy‑free?
Absolutely. Use plant‑based butter and replace heavy cream with coconut milk or oat cream. The mash will retain its silkiness, though the flavor will have a subtle tropical note from the coconut.
Q: What’s the best way to store leftovers?
Transfer the mash to an airtight container and refrigerate within two hours. For longer storage, portion into freezer‑safe bags, flatten, and freeze. Reheat using the oven method for best texture.
Q: Can I add cheese directly into the mash?
Yes, stir in ½ cup of shredded sharp cheddar or Gruyère during step 4 for a richer, cheesier version. Adjust the amount of butter slightly to keep the consistency smooth.
Q: How far in advance can I prepare the mash for a dinner party?
You can prepare the mash up to 24 hours ahead. Keep it refrigerated, then gently reheat in the oven with an extra tablespoon of butter to restore its glossy finish before serving.
🎉 Let’s Get Cooking!
This Garlic Mashed Cauliflower with Butter brings together simplicity, nutrition, and indulgence in a single bowl. Whether you’re feeding a family, impressing guests, or seeking a low‑carb comfort side, the recipe’s balance of buttery richness and aromatic garlic will keep you coming back for more. Remember, the secret lies in gentle steaming, careful emulsification, and the final flourish of fresh herbs.
I can’t wait to hear how you make it your own—whether you spice it up, keep it classic, or adapt it for dietary needs. Share your photos, leave a comment, and let the community celebrate your culinary success!
Have you tried this recipe?
Leave a comment and a rating below! Share your photos on Instagram with #CauliflowerCreamy for a chance to be featured.
Garlic Mashed Cauliflower with Butter
A creamy, low‑carb cauliflower mash infused with buttery garlic goodness.
📝 Ingredients
Mashed Cauliflower
Garnish (optional)
👨🍳 Instructions
- 1
Trim the cauliflower, cut into uniform florets, and rinse thoroughly.
- 2
Mince garlic and gently melt butter with the garlic over low heat until fragrant.
- 3
Steam the cauliflower florets for 12‑15 minutes until fork‑tender.
- 4
Combine the steamed cauliflower, garlic‑butter mixture, and heavy cream in a large bowl; blend until smooth.
- 5
Season with salt and pepper; adjust cream or butter for desired consistency.
- 6
Optional: stir in chopped chives and grated Parmesan for extra flavor and color.
- 7
Transfer to a warmed serving dish and serve immediately.
- 8
If preparing ahead, keep warm in a low oven (60 °C) and reheat using the oven method before serving.
- 9
Pair with roasted chicken, grilled fish, or a fresh green salad for a complete meal.
- 10
Enjoy and share your creation on social media using #CauliflowerCreamy!
🥗 Nutrition Facts (per serving)
*Nutrition values are estimates based on standard ingredient sizes.
📚 You Might Also Like
Roasted Brussels Sprouts with Balsamic Glaze
Lemon Herb Roasted Chicken
Almond Flour Berry Tart
Grilled Cauliflower Steak with Chimichurri
💬 Comments and Reviews
Comments will appear here once readers start sharing.


Leave a Comment