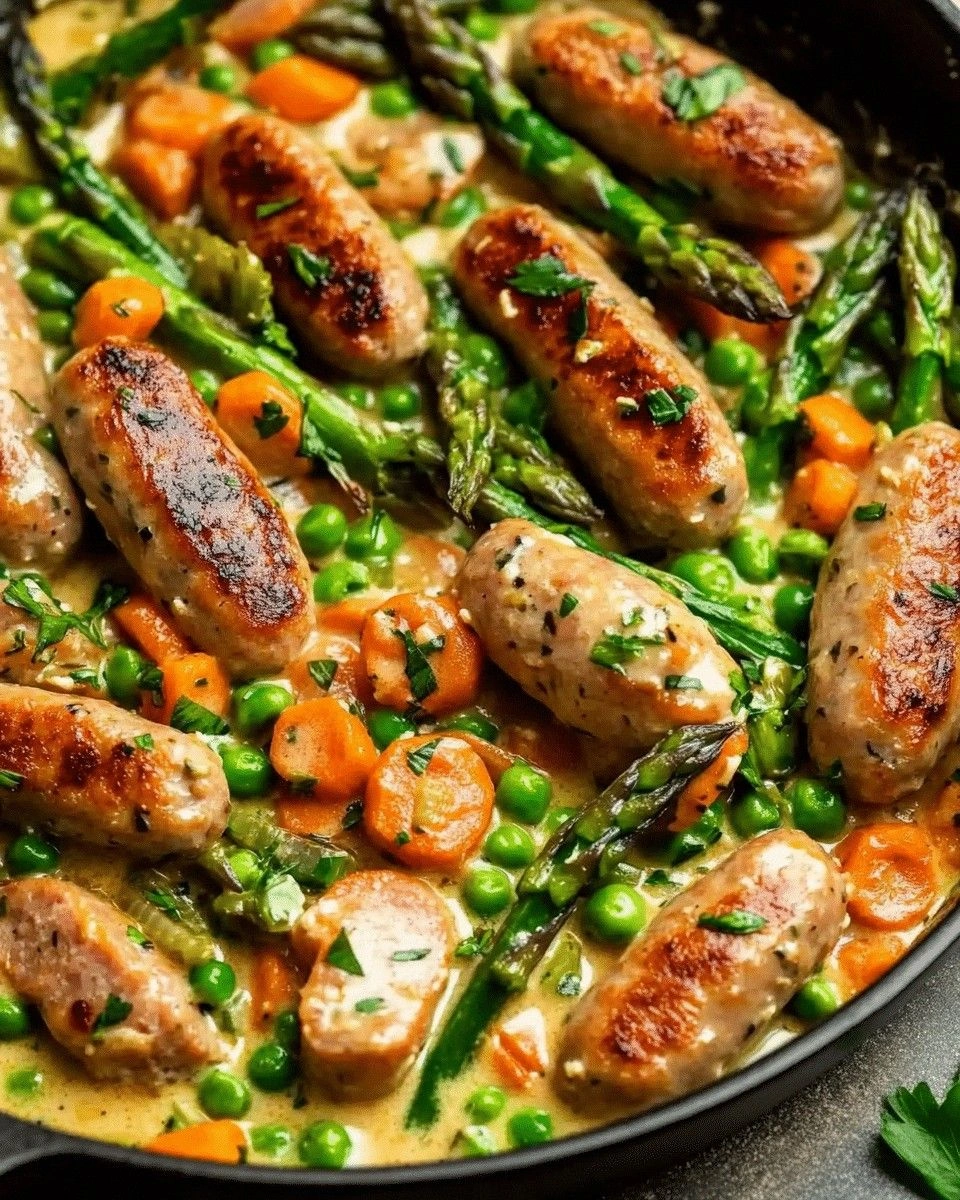
I was standing over a smoking stovetop, the smell of burnt garlic wafting up like an angry cloud, when a friend dared me to turn the disaster into dinner. I laughed, grabbed the nearest pan, and whispered, “Okay, now watch this part closely.” The result? A garlic‑infused chicken and vegetable pot that could make even the most skeptical palate sing. I dare you to taste this and not go back for seconds because the flavor hits you like a warm hug from a long‑lost relative.
Picture this: the kitchen humming with the sizzle of butter hitting a hot pan, the aroma of caramelized onions mingling with fresh herbs, and a faint, nutty perfume from a golden crust baking in the oven. Your ears pick up the gentle pop of vegetables as they hit the skillet, while your eyes feast on the vibrant colors—bright orange carrots, emerald peas, and ivory chicken pieces glistening in a silky sauce. The whole room feels alive, the countertop warm under your hands, the anticipation palpable.
Most recipes for chicken pot pie get the crust wrong, ending up soggy or bland. This version stands out because I use a double‑butter, cold‑water dough that fluffs up like a cloud, and I fold in a secret splash of milk into the filling for that luxurious, velvety mouthfeel. The garlic isn’t just a background note; it’s the star, roasted just enough to mellow into sweet, caramel‑like undertones while retaining a punch that makes every bite unforgettable.
I’ll be honest — I ate half the batch before anyone else got to try it, and that’s because the sauce coats the chicken and veggies like velvet, while the crust shatters with a crisp that’s almost audible. The technique I’m about to reveal involves a quick flour‑butter roux that prevents the dreaded watery filling, and a dash of thyme that adds a whisper of earthiness you won’t find in any boxed version. Let me walk you through every single step — by the end, you’ll wonder how you ever made it any other way.
What Makes This Version Stand Out
- Flavor Explosion: The roasted garlic and fresh herbs create a depth that turns a simple dinner into a celebration, making each forkful a burst of aromatic delight.
- Texture Harmony: Creamy, thickened sauce meets a flaky, buttery crust, delivering a contrast that’s as satisfying as a good plot twist in a movie.
- Simplicity Meets Sophistication: Only pantry staples and a few fresh veggies are needed, yet the final dish feels restaurant‑grade without the pretension.
- Ingredient Quality: Using bone‑in chicken thighs (or their boneless counterpart) ensures juicy meat, while the cold butter in the dough guarantees lift and flakiness.
- Crowd‑Pleaser Factor: This pot pie has become the go‑to comfort food at my gatherings; even the pickiest eaters can’t resist the golden top.
- Make‑Ahead Magic: Assemble the pie a day ahead, refrigerate, then bake when you’re ready—perfect for busy weeknights or lazy Sundays.
Inside the Ingredient List
The Flavor Base
Garlic, the undeniable hero, is minced finely and sautéed just until fragrant, releasing its natural sugars without turning bitter. If you skip this step, you lose the sweet undertone that balances the savory broth. For a milder profile, use roasted garlic cloves instead—they’ll add a subtle caramel note.
Onion and celery join the garlic, forming a classic mirepoix that builds a foundation of flavor. Choose yellow onions for their natural sweetness; white onions can become sharp when overcooked. If you’re out of celery, substitute with a pinch of fennel fronds for an anise‑like twist.
The Texture Crew
Carrots and potatoes bring heartiness and a pleasant bite. Dice them uniformly—about ½‑inch cubes—so they cook evenly and keep the sauce from turning mushy. Skipping the potatoes? You’ll miss that comforting, starchy body that makes the filling feel substantial.
Frozen peas are added at the very end, preserving their pop and bright green color. If you prefer fresh peas, blanch them quickly; just beware they’ll release more water, so you may need an extra tablespoon of flour for thickening.
The Unexpected Star
Whole milk, added after the roux, transforms the sauce from merely thick to luxuriously creamy. Skim milk would work, but you’d lose that buttery richness that makes the filling feel indulgent. For a dairy‑free twist, substitute with oat milk and a splash of coconut cream.
A single beaten egg brushed on the crust before baking gives it that irresistible golden sheen. If you’re avoiding eggs, a light glaze of milk mixed with a dash of sugar will also produce a beautiful glaze.
The Final Flourish
Fresh herbs—thyme and rosemary—are the aromatic finish, adding a piney, earthy whisper that lifts the whole dish. Fresh herbs are best, but dried versions work in a pinch; just use half the amount to avoid overpowering the palate.
Seasoning with salt and pepper at the end lets you control the flavor precisely. Taste as you go; the broth may already carry enough salt, especially if you use a low‑sodium stock.
Everything's prepped? Good. Let's get into the real action...

The Method — Step by Step
-
Start by making the crust. In a large bowl, combine 2 cups flour with a pinch of salt, then cut in 1/2 cup cold butter using a pastry cutter until the mixture resembles coarse crumbs. Add 1/4 cup ice water a tablespoon at a time, stirring gently until the dough just comes together. Form a disc, wrap in plastic, and chill for at least 30 minutes. This cold‑work method creates steam pockets that puff the crust into a flaky wonder.
Kitchen Hack: If the dough feels too dry, add a splash more ice water; if it’s sticky, sprinkle a bit more flour—keep it just right. -
While the dough rests, heat 1 tbsp olive oil in a large skillet over medium‑high heat. Add the chicken pieces, season with salt and pepper, and sear until golden brown on all sides, about 4‑5 minutes. The chicken should develop a deep caramel color—this is the first layer of flavor building. Remove the chicken and set aside.
Watch Out: Overcrowding the pan will steam the chicken instead of searing it; work in batches if necessary. -
In the same skillet, add a little more oil if needed, then toss in the diced onion, carrot, and celery. Sauté for 5‑6 minutes until the vegetables start to soften and the onions turn translucent. This is the moment when the kitchen smells like a cozy autumn market—sweet, earthy, and inviting.
-
Add the minced garlic and cook for another 30 seconds, just until fragrant. Then sprinkle 2 tbsp flour over the veggies, stirring constantly to form a roux. Cook the flour for 2 minutes; you’ll notice a faint nutty scent—that’s the flavor base locking in.
Kitchen Hack: Whisk continuously to avoid lumps; a smooth roux guarantees a velvety sauce. -
Gradually pour in 2 cups chicken broth while whisking, followed by 1 cup whole milk. Increase the heat to a gentle boil, then reduce to a simmer. The mixture should thicken within 5 minutes, coating the back of a spoon. Taste and adjust seasoning with thyme, rosemary, salt, and pepper. The sauce should smell toasty and have a creamy sheen.
-
Return the seared chicken to the skillet, add the cubed potatoes, and let everything simmer together for 8‑10 minutes, until the potatoes are just tender. Finally, stir in the frozen peas; they’ll turn a vivid green and retain a pleasant snap. If the sauce looks too thick, splash in a bit more broth or milk.
-
Preheat your oven to 400°F (200°C). Roll out the chilled dough on a lightly floured surface to a 12‑inch circle, then gently lay it over the filling in a deep baking dish. Trim excess dough, crimp the edges, and cut a few steam vents on top. Brush the surface with the beaten egg for that glossy finish.
-
Bake for 25‑30 minutes, or until the crust is golden brown and the filling bubbles vigorously at the edges. The aroma that fills your kitchen at this stage is pure magic—think buttery, garlicky, and comforting all at once. Let the pie rest for 10 minutes before slicing; this allows the sauce to set and prevents a soggy bottom.
That's it — you did it. But hold on, I've got a few more tricks that'll take this to another level...
Insider Tricks for Flawless Results
The Temperature Rule Nobody Follows
Never bake a pot pie from a cold pan; always let the filling come to room temperature before covering with the crust. This prevents the crust from absorbing excess moisture, which can make it soggy. I once tried skipping this step and ended up with a doughy bottom—lesson learned.
Why Your Nose Knows Best
When the sauce reaches the perfect thickness, it will emit a faint, buttery perfume that lingers even after you turn off the heat. Trust that scent more than a timer; it’s a reliable indicator that the roux has fully cooked and the flavors have melded.
The 5‑Minute Rest That Changes Everything
Allow the pie to rest for exactly five minutes after coming out of the oven. This short pause lets the steam redistribute, giving the crust a crispier bottom and the filling a more cohesive texture. Skipping this rest makes the first bite a bit watery—no one wants that.
Butter‑Boosted Crust
Fold a tablespoon of melted butter into the dough just before rolling it out. The extra fat creates layers that puff up like mini pastries, adding a buttery crunch that contrasts beautifully with the creamy interior.
Seasoning Layers
Season at three points: the chicken before searing, the vegetables while sautéing, and the final sauce before baking. This layered approach builds depth, so every bite delivers a balanced burst of flavor. A friend once seasoned only at the end and ended up with a bland pie—don’t make that mistake.
Creative Twists and Variations
This recipe is a playground. Here are some of my favorite ways to switch things up:
Mushroom Medley
Swap half the chicken for sliced cremini mushrooms. The earthy mushrooms absorb the garlic‑herb broth, giving the pie an umami boost that vegetarians will adore.
Spicy Southwest
Add a teaspoon of smoked paprika and a dash of chipotle powder to the sauce, then toss in corn kernels and black beans. The result is a bold, smoky twist that pairs perfectly with a dollop of sour cream.
Cheesy Crust
Mix ¼ cup grated Parmesan into the crust dough before rolling. The cheese melts into the crust, creating a savory, golden rind that adds an extra layer of indulgence.
Herb‑Infused Crust
Finely chop fresh sage and rosemary into the dough for an aromatic crust that mirrors the filling’s herb profile. It’s a subtle but sophisticated upgrade.
Curry‑Infused
Stir a tablespoon of curry powder into the roux and replace thyme with cilantro. This gives the pie a warm, exotic flavor that’s perfect for chilly evenings.
Storing and Bringing It Back to Life
Fridge Storage
Allow the pie to cool completely, then cover tightly with foil or a reusable lid. It will keep fresh in the refrigerator for up to three days. Reheat slices in a preheated 350°F oven for 15 minutes, or until the crust regains its crispness.
Freezer Friendly
Wrap the unbaked pie tightly in plastic wrap, then foil, and freeze for up to two months. When ready, bake straight from frozen, adding an extra 10‑15 minutes to the baking time. The crust may need a quick brush of melted butter halfway through for an even golden finish.
Best Reheating Method
For leftovers, place a slice on a baking sheet, drizzle a tiny splash of water around the edges, and cover loosely with foil. Heat in a 375°F oven for 12‑15 minutes. The added steam revives the sauce, while the foil prevents the crust from over‑browning.