Look, I was supposed to be cleaning out the freezer when I found the saddest pint of strawberries lurking behind a bag of peas. They'd been there since last summer, frost-bitten and begging for mercy. Instead of tossing them, I did what any self-respecting dessert addict would do: I turned them into the most addictive frozen bites that vanished faster than my willpower at a bakery. One taste and I was hooked — these little ruby gems are like eating strawberry cheesecake in stealth mode, except they're secretly good for you and take roughly the same effort as opening a bag of chips.
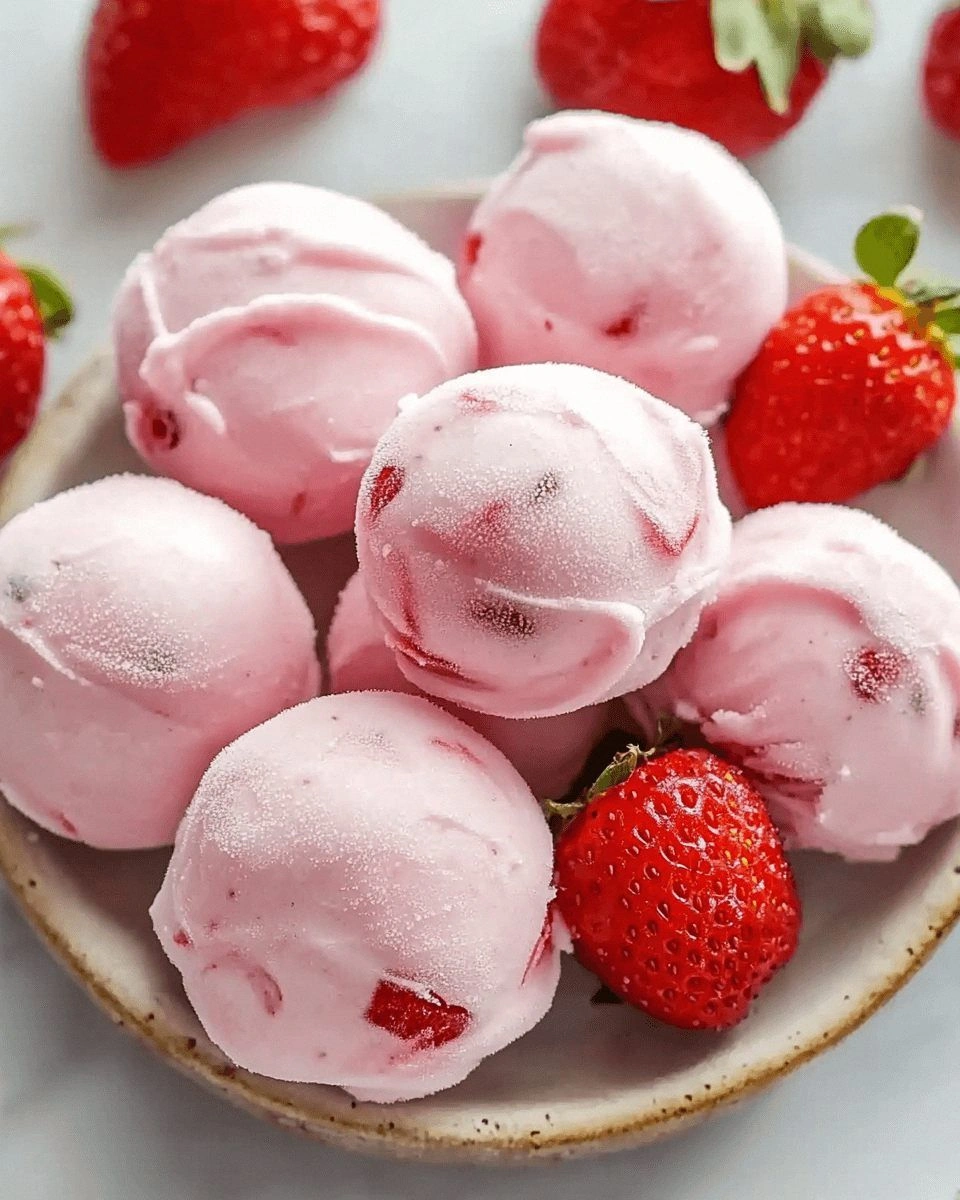
Picture this: it's 3 p.m., the sun is blazing, and the air-conditioner is pretending it has a day off. You want something cold and sweet, but the ice-cream tub is suspiciously empty (again). You pull out a tray of these Frozen Strawberry Yogurt Bites, pop one into your mouth, and boom — instant brain freeze followed by creamy, tangy, berry bliss that melts into a puddle of pure summer. The outside shell shatters like thin ice, revealing a soft, almost mousse-like center that tastes like someone blended cheesecake with a smoothie and froze it into bite-sized rebellion against hot weather.
I've made these for backyard barbecues, midnight snack attacks, and even smuggled them into the office in a mini cooler. Each time, the same thing happens: people grab one "just to be polite," then hover around the tray like seagulls until it's empty. I've witnessed grown adults arguing over the last piece and kids trading Pokémon cards for an extra bite. If you've ever struggled with healthy desserts that taste like, well, healthy desserts, you're not alone — and I've got the fix that'll make you forget "healthy" was ever part of the equation.
Let me walk you through every single step — by the end, you'll wonder how you ever made it any other way.
What Makes This Version Stand Out
Creamy Dreamy: The combo of Greek yogurt and a whisper of honey whips into a texture so lush it could moonlight as ice cream, minus the sugar crash. Each bite is silk on your tongue, but still light enough that you can justify having three more.
Lightning Fast: Five ingredients, five minutes of active work, and the freezer does the heavy lifting while you binge Netflix. If you can push buttons on a blender, you can nail this recipe on the first try, even if you're half-asleep.
Snack-Size Magic: Everything is portion-controlled into adorable two-bite squares, so you can grab, munch, and walk away without the self-loathing that comes from "accidentally" polishing off a whole pint of anything.
Flexible Flavor: Swap strawberries for mango, raspberries, or even roasted peaches; change the sweetener; stir in mini chocolate chips or a ribbon of nut butter — the base formula bends to your cravings without breaking.
Protein Sneak Attack: Thanks to Greek yogurt, each little square carries a solid protein punch that keeps hangry meltdowns at bay. My gym buddies call them "muscle marshmallows," and who am I to correct them?
Kid-Approved, Parent-Adored: They look like candy, taste like dessert, and contain zero mystery ingredients. I've watched picky toddlers devour them faster than candy-coated anything, and parents keep asking for the "secret" (spoiler: there isn't one).
Alright, let's break down exactly what goes into this masterpiece...
Inside the Ingredient List
The Flavor Base
Fresh strawberries are the star, and they deserve the spotlight. When they're in season, their perfume fills your kitchen before you even start blending. If you can only find the sad supermarket kind, no worries — a quick roast at 350°F for ten minutes concentrates the sugars and turns wallflower berries into flavor bombs. Frozen berries work too; just thaw them halfway so they don't water down the mix. Skip the berries entirely and you'll basically have tangy yogurt pebbles, which is fine if you're into that, but don't blame me when people ask where the strawberries went.
The Texture Crew
Plain Greek yogurt is the backbone, and full-fat is non-negotiable for that cloud-like richness. Non-fat will freeze into icy pebbles that taste like regret, while 2% is acceptable in a pinch but won't deliver the same velvet mouthfeel. If you're dairy-free, coconut yogurt swaps in beautifully and adds a tropical vibe that plays nicely with lime zest. The honey or maple syrup isn't just sweetener — it's the anti-ice-crystal insurance, keeping every bite scoopable straight from the freezer. Skip it and you'll need a chisel instead of a spoon.
The Unexpected Star
Vanilla extract is the quiet overachiever that makes strawberries taste more like strawberries, the culinary equivalent of turning up the saturation on a photo. Go for the real stuff; imitation vanilla has a tinny edge that shows up when food is cold. A pinch of salt sounds weird here, but it's the difference between a flat fruit pop and a flavor that blooms across your palate like a time-lapse flower. If you're feeling fancy, scrape in the seeds of half a vanilla bean and watch people's eyes widen when they taste the speckled magic.
The Final Flourish
Everything's prepped? Good. Let's get into the real action...
The Method — Step by Step
- Dump the strawberries, yogurt, honey, vanilla, and salt into a blender or food processor. Blend on high until the mixture turns a shocking Barbie-pink and looks like the smoothest milkshake on earth. Pause to scrape down the sides once, but don't overthink it — a few tiny berry flecks add character. Taste it now (I dare you not to go back for seconds) and adjust sweetness; remember that freezing dulls sugar perception, so lean slightly sweeter than you think you need.
- Grab a silicone mini-muffin tray or candy molds in cute shapes if you're feeling festive. Silicone is your best friend here; rigid plastic or metal will have you hacking away like an archaeologist. If all you have is a regular ice-cube tray, line it with plastic wrap for easy removal later. This next part? Pure magic.
- Pour the mixture into each cavity, leaving a whisper of space at the top for expansion. Tap the tray gently on the counter to knock out sneaky air bubbles that mar the surface. If you want photo-ready tops, smooth them with the back of a small spoon dipped in water — the water prevents sticking and creates a glassy finish. Okay, ready for the game-changer?
- Slide the tray onto a flat shelf in the coldest part of your freezer, usually the back. They need a solid two hours to freeze through, but I've been known to sneak one at ninety minutes when desperation strikes. Set a timer so you don't forget them like that half-drunk coffee you reheated three times. While you wait, the hardest part is not eating the remaining mixture with a spoon — consider yourself warned.
- Once rock-solid, pop the bites out by pushing up from the bottom of each cavity. They should release with a satisfying plop that sounds like summer vacation. If they resist, let the tray sit at room temperature for thirty seconds — any longer and they start to sweat. Transfer to an airtight container or zip-top bag; squeeze out as much air as possible to prevent freezer burn and flavor muting.
- For the optional chocolate coat, melt good-quality dark chocolate with coconut oil until glossy and thin enough to ribbon off a spoon. Dip each frozen bite halfway, then park them on parchment. The chocolate sets in under a minute against the cold yogurt, creating a snappy shell that shatters like thin ice. You'll think you've died and gone to a gelato shop in Rome.
- Return the chocolate-dipped beauties to the freezer for ten minutes to firm up, then store them in a single layer. If you need to stack, slip parchment between layers to prevent sticking. They'll keep for up to two months, but realistically they'll be gone in two days — and that's if you hide them behind the frozen broccoli.
- Serve straight from the freezer on hot days, or let them sit for three minutes if you prefer a softer cheesecake texture. Either way, prepare for the sound of happy silence as everyone chews. That's it — you did it. But hold on, I've got a few more tricks that'll take this to another level...
Insider Tricks for Flawless Results
The Temperature Rule Nobody Follows
Most recipes forget to tell you that yogurt loves to be room temp before blending — cold yogurt makes the honey seize up into sticky globs that refuse to mix. Let the yogurt sit out for ten minutes while you wash the berries. Your future self will thank you when the mixture whips into a satin-smooth dream instead of a lumpy mess that looks like curdled paint.
Why Your Nose Knows Best
Smell your strawberries before committing; if they don't smell like anything, they won't taste like anything either. A ripe strawberry should perfume your fingers for hours after you handle it. When in doubt, buy a pint, taste one, and if it's bland, roast or macerate with an extra teaspoon of honey to fake the sweetness nature forgot.
The 5-Minute Rest That Changes Everything
After blending, let the mixture sit for five minutes so the air bubbles rise and pop. This prevents those weird holes that make your bites look like miniature moon craters. Cover the blender pitcher with a plate so your cat doesn't stage a taste test — trust me, yogurt paw prints on the counter are not the vibe.
Freeze Flat, Live Happy
Place the tray on a flat shelf, not the slanted door shelf where gravity becomes your enemy. A tilted mold causes the yogurt to pool to one side, giving you lopsided bites that topple over like drunk penguins. If your freezer is a chaotic Tetris of leftovers, clear a space first — you'll thank me when every bite is Instagram-worthy.
Chocolate Math
If you're going for the chocolate shell, figure one ounce of chocolate per dozen bites — any more and you'll have half a bowl left over, which sounds great until you "accidentally" eat it with a spoon while the bites freeze. Add coconut oil at 1 teaspoon per 2 ounces chocolate; it thins the melt and creates that professional crack when you bite in.
Creative Twists and Variations
This recipe is a playground. Here are some of my favorite ways to switch things up:
Mango Coconut Dream
Swap strawberries for equal parts frozen mango and fold in two tablespoons of toasted coconut flakes before freezing. The tropical perfume will transport you to a beach where calories don't count and flip-flops are mandatory. Drizzle with melted white chocolate spiked with lime zest for the full vacation effect.
Raspberry Cheesecake Fake-Out
Use raspberries for a tangier punch and swirl in softened cream cheese so each bite has a marbled cheesecake vibe. The cream cheese freezes into delicate ribbons that taste like you slaved over an actual cheesecake. A crushed graham cracker sprinkle on top sells the illusion and adds crunch without any baking.
Peanut Butter & Jelly Time
Keep the strawberries but blend in two tablespoons of natural peanut butter; the result tastes like your favorite sandwich got a glow-up. Dip in milk chocolate instead of dark for full lunchbox nostalgia. Kids lose their minds, adults get glossy-eyed, and suddenly everyone's eight years old again.
Peach Cobbler Frozen Clouds
Roast peach slices with brown sugar and cinnamon until jammy, then blend into the yogurt. Add a pinch of nutmeg and call it autumn in July. If you want to get fancy, crumble freeze-dried peach on top for extra peachy punch that crackles like Pop Rocks.
Blueberry Pancake Bites
Blueberries bring antioxidants and that gorgeous purple swirl. Add a drop of maple extract and a handful of mini pancake pieces (yes, actual pancakes) for texture. It's like someone froze Sunday brunch into portable form, and yes, you can eat them in your pajamas without judgment.
Key Lime Pie Minis
Sub strawberries for lime juice and zest, bump honey to three tablespoons to balance the tartness, and crush a few graham crackers on top. The result is a frozen key lime pie that doesn't require turning on the oven during a heatwave. Serve with a tiny paper umbrella and pretend you're in Key West.
Storing and Bringing It Back to Life
Fridge Storage
These bites are meant to live in the freezer, but if you want a softer cheesecake texture, you can park them in the fridge for up to four hours. Beyond that they start to weep and lose their perky shape. Keep them in a lidded container with a sheet of paper towel underneath to soak up condensation.
Freezer Friendly
They freeze solid for two months without quality loss, assuming you wrapped them properly. Use a vacuum sealer if you're a meal-prep ninja, or press plastic wrap directly onto the surface before snapping on the lid. Label the bag with the date, because frozen yogurt bites look suspiciously like frozen cookie dough at 2 a.m. and you don't want to bite into the wrong thing.
Best Reheating Method
There's no reheating here — just a three-minute counter rest if you want them soft-serve style. If they've been in deep freeze for weeks, give them five minutes so your teeth don't stage a protest. Add a tiny splash of water to the container before re-closing; the slight humidity prevents surface ice crystals from forming and keeps everything silky.