I was staring at a ruined batch of banana bread that had turned into a chewy, soggy mess, and I thought, “This is why I need a better recipe.” The kitchen was a symphony of burnt sugar, the faint scent of overcooked almond, and the sound of my own sighs echoing off the walls. I knew there had to be a way to turn that disappointment into a triumph that would make my friends question their own baking skills. That’s when I stumbled upon this Easy Gluten-Free Orange Almond cake, and the moment I tasted the first bite, I knew I’d found a new holy grail.
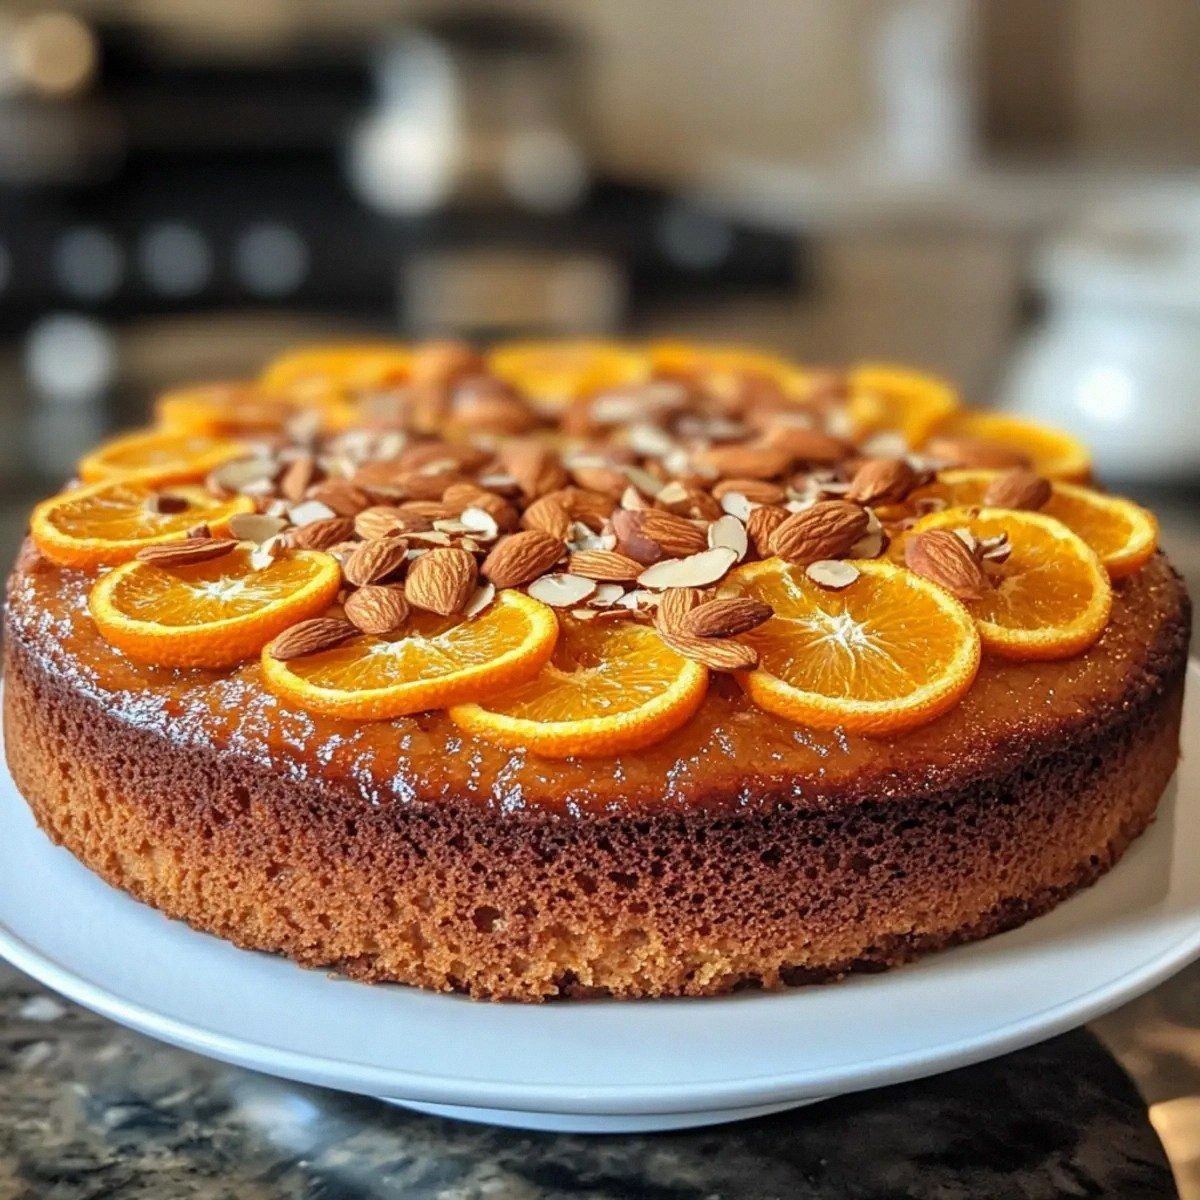
Picture the moment the first slice slides from the pan: a golden, airy crumb that gives way to a moist center, the citrus aroma rising like a sunrise over a quiet kitchen. The texture is a perfect marriage of fluffy cake and crunchy almond shards that crackle with each bite, sending a burst of bright orange zest into your mouth. The sound of the first bite is that satisfying crack that signals you’re about to embark on a flavor adventure. The taste is a sweet, buttery base with a citrus kick that lingers, followed by a subtle nutty finish that feels like a warm hug. The feel is that comforting, slightly greasy hand of olive oil that keeps the cake moist without drowning it.
This isn’t just another gluten-free cake; it’s a carefully engineered balance between flavor, texture, and visual appeal. The almond flour adds depth and a natural crunch that most gluten-free recipes lack, while the olive oil brings a silky mouthfeel that keeps the crumb tender. The fresh orange zest isn’t just an afterthought—it’s the star that gives this cake its signature brightness, making every bite feel like a citrus-infused summer day. The baking powder and salt work in harmony to create a light lift, ensuring the cake rises evenly without a heavy, dense center. The powdered sugar glaze adds a sweet finish that coats the cake like a fine dusting of sugar snow.
What sets this version apart is the simplicity of the ingredients and the precision of the method. The recipe calls for only ten ingredients, none of which require a trip to a specialty store, yet the result is a cake that would make any baker swoon. The use of olive oil instead of butter or other fats gives the cake a unique, slightly fruity flavor that complements the orange zest beautifully. The almond flour and gluten-free all-purpose flour blend creates a crumb that’s both airy and firm, a rare combination in gluten-free baking. The glaze, made from powdered sugar and a splash of orange juice, dries to a glossy finish that’s both elegant and edible.
I dare you to taste this and not go back for seconds. The first bite will have you questioning why you ever settled for ordinary gluten-free cakes. The second bite will have you planning a whole batch for the next gathering. The third bite will have you wondering how you ever lived without this recipe. The fourth bite will have you realizing that this is hands down the best version you’ll ever make at home.
If you've ever struggled with gluten-free baking, you're not alone—my kitchen has seen its fair share of crumbly disasters. I’ve tried countless recipes that promised “easy” but delivered “horrible.” I’ve stared at mixing bowls, whisked for hours, and still ended up with a cake that looked like a sad, dry lump. That’s why I’m so excited to share this recipe, because I’ve perfected each step to guarantee a flawless result every time. And trust me, you’ll wonder how you ever made it any other way.
Picture yourself pulling this out of the oven, the whole kitchen smelling incredible, the steam curling up like a fragrant cloud. The moment the timer dings, you can feel the anticipation building like a drumroll before the big reveal. You slice a piece, and the cake releases a burst of citrusy perfume that makes your mouth water. The first bite is a revelation, the texture so light it almost melts, yet the almond crunch keeps it grounded. The glaze glistens under the kitchen light, inviting you to dive in.
Okay, ready for the game-changer? This recipe is more than a cake—it’s a celebration of flavor, a lesson in gluten-free mastery, and a testament to the fact that you can have it all. Stay with me here—this is worth it. I’ll walk you through every single step, from ingredient prep to the final glaze, and by the end, you’ll wonder how you ever made it any other way. Let me walk you through every single step — by the end, you'll wonder how you ever made it any other way.
What Makes This Version Stand Out
- Flavor: The fresh orange zest delivers a bright, citrusy punch that cuts through the richness of the almond and olive oil, creating a harmonious balance that excites the palate.
- Texture: The combination of almond flour and gluten-free all-purpose flour results in a cake that is airy yet firm, with a subtle crunch from slivered almonds that adds depth.
- Ease: With only ten ingredients and no complicated techniques, this recipe is a breeze for beginners and a confidence booster for seasoned bakers.
- Uniqueness: The olive oil gives the cake a silky mouthfeel that is rarely found in gluten-free cakes, while the powdered sugar glaze provides a glossy, elegant finish.
- Crowd Appeal: The cake’s bright color and aromatic citrus make it a showstopper at gatherings, and the almond crunch keeps guests coming back for more.
- Ingredient Quality: Using high-quality almond flour and fresh oranges elevates the overall taste, ensuring each bite is packed with natural flavor.
- Method: A straightforward, step-by-step approach that eliminates common pitfalls, making the baking experience smooth and rewarding.
- Make‑Ahead: The cake can be baked a day ahead, glazed, and stored, making it perfect for last‑minute events or to share with friends.
Alright, let's break down exactly what goes into this masterpiece...
Inside the Ingredient List
The Flavor Base
Almond flour: This is the backbone of the cake, providing a nutty flavor and a tender crumb. Almond flour is naturally gluten-free, making it a staple for those avoiding wheat. If you skip it, the cake loses its signature almond taste and becomes too dry. For a richer flavor, choose a high-quality almond flour with a slightly darker hue, which indicates a higher roast level.
Gluten-free all-purpose flour: This flour blends the texture of wheat flour with the benefits of a gluten-free diet. It ensures the cake rises evenly and holds its shape. Skipping it will result in a cake that feels more like a dense brownie. Look for a blend that includes xanthan gum for better structure.
Granulated sugar: The sweetener that caramelizes on the surface, giving the cake a slight crust. It balances the acidity of the orange zest. If you prefer a lower sugar content, you can replace it with a natural sweetener like maple syrup, but the texture may change.
The Texture Crew
Large eggs: Eggs act as the binder, providing structure and a moist crumb. They also help emulsify the olive oil, creating a smooth batter. If you’re vegan, you can substitute with flax eggs (1 tbsp ground flaxseed + 3 tbsp water per egg). However, the texture will be slightly denser.
Olive oil: Olive oil gives the cake a subtle fruity flavor and keeps it moist without the heaviness of butter. It also helps the glaze set properly. If you’re sensitive to olive oil, you can use avocado oil for a milder taste. Just remember that the oil’s flavor will transfer to the cake.
Fresh orange zest: The zest is the star that brightens the entire cake. It adds a citrusy aroma that lingers long after you finish. If you can’t find fresh oranges, you can use a high-quality orange zest powder, but fresh zest provides the best flavor. The zest should be finely grated to avoid bitterness.
The Unexpected Star
Baking powder: This leavening agent ensures the cake rises and stays fluffy. It also helps to balance the acidity from the orange zest. If you’re allergic to baking powder, you can use a mixture of baking soda and an acid (like lemon juice) in equal parts. However, the rise may be slightly less dramatic.
Salt: Salt enhances all the flavors in the cake, making the sweetness and citrus more pronounced. It’s a small amount, but it’s essential for flavor depth. Skipping salt will result in a flat, bland cake. A pinch of sea salt works just as well.
The Final Flourish
Powdered sugar: The glaze is made from powdered sugar, which gives a smooth, glossy finish. It also adds a sweet crunch when combined with the slivered almonds. If you prefer a darker glaze, you can mix in a little cocoa powder. Just be careful not to overdo it; you don’t want the glaze to overpower the orange.
Slivered almonds: These add a delightful crunch and a nutty aroma that complements the almond flour. They also help to keep the cake moist by adding a bit of fat. If you’re allergic to nuts, you can replace them with sunflower seeds, but the flavor will change significantly.
Everything's prepped? Good. Let's get into the real action...
The Method — Step by Step
- Preheat your oven to 350°F (175°C) and line a 9-inch cake pan with parchment paper. The parchment will prevent sticking and make removal painless. Make sure the paper is centered to avoid uneven edges. Let the oven heat fully before placing the pan inside; this ensures a consistent bake. The aroma of preheated olive oil will start to mingle with the citrus scent even before you add the batter.
- In a large mixing bowl, whisk together the almond flour, gluten-free all-purpose flour, baking powder, and salt. The dry ingredients should be sifted together to avoid lumps. This step is crucial for a smooth batter and even rise. The mixture should feel like fine sand, not gritty. Keep the bowl covered until the wet ingredients are ready.
- In a separate bowl, beat the eggs until they’re light and foamy. Add the granulated sugar and continue beating until the mixture is pale and thick. The eggs and sugar together create a fluffy base that traps air, giving the cake its airy texture. This step is the foundation of the cake’s structure. A well-beaten egg mixture will result in a lighter crumb.
- Add the olive oil and fresh orange zest to the beaten eggs. Whisk until the oil is fully incorporated and the mixture looks glossy. The oil will coat the flour particles, ensuring the cake stays moist. The zest will release its oils, adding a bright citrus aroma. This is the moment when the cake’s personality starts to shine.
- Gradually fold the dry ingredients into the wet mixture using a silicone spatula. Fold gently to keep the batter airy; overmixing will lead to a dense cake. The batter should be smooth and pourable. As you fold, you’ll notice the batter lighten in color. This gentle technique preserves the cake’s lightness.
- Pour the batter into the prepared pan, smoothing the top with a spatula. Tap the pan lightly on the counter to release any air bubbles. The batter should level off evenly. The edges should be slightly higher than the center; this helps the cake rise uniformly. The smell of citrus will intensify as the batter sets.
- Bake for 30 minutes, or until a toothpick inserted into the center comes out clean. The cake should have a golden top that’s slightly firm to the touch. If you’re unsure, press the top gently; it should spring back. The aroma at this point will be intoxicating, a mix of citrus and toasted almond. This is the moment of truth—don’t walk away from the stove here.
- Remove the cake from the oven and let it cool in the pan for 10 minutes. Then transfer it to a wire rack to cool completely. This prevents the cake from becoming soggy at the bottom. While cooling, you can start preparing the glaze. The cake will release a subtle citrus perfume that will make you crave a second slice.
- Mix the powdered sugar with a tablespoon of orange juice until smooth. Stir until the glaze is thick yet pourable. If the glaze is too thick, add a few drops of water; if too thin, add more powdered sugar. This glaze will set to a glossy sheen that enhances the cake’s appearance. Drizzle it over the cooled cake, allowing it to pool at the edges.
- While the glaze sets, sprinkle the toasted slivered almonds over the top. The almonds will settle into the glaze, creating a crunchy, flavorful crown. This step adds both texture and visual appeal. The almonds will also help the glaze adhere better, preventing slippage. The cake is now ready for the final flourish.
- Let the cake rest for 5 minutes before slicing. This allows the glaze to firm up, preventing it from sliding off the cake when you cut. Slice with a warm knife for clean cuts. Serve immediately, or cover loosely with foil if you need to keep it warm. The first bite will confirm that every step was worth it.
That's it — you did it. But hold on, I've got a few more tricks that'll take this to another level...
Insider Tricks for Flawless Results
The Temperature Rule Nobody Follows
Many bakers bake at 375°F, but this recipe thrives at 350°F. The lower temperature allows the cake to rise slowly, preventing a cracked top and ensuring a moist interior. If you’re using a convection oven, reduce the temperature by 25°F to avoid over-browning. This subtle adjustment can mean the difference between a perfect cake and a dry one.
Why Your Nose Knows Best
Trust the aroma of the batter before you open the oven door. A sweet, citrusy scent signals that the cake is ready to go. If the smell is faint, let it bake a few more minutes. Your nose is a reliable judge of doneness, often more accurate than a toothpick.
The 5-Minute Rest That Changes Everything
After removing the cake from the oven, let it rest in the pan for exactly 10 minutes before transferring. This short rest allows the cake to set, preventing it from breaking apart when you remove it. Skipping this step often leads to a fragile cake that crumbles on the plate.
The Secret of a Silky Glaze
For a glossy finish, whisk the powdered sugar glaze at a medium speed for 30 seconds before drizzling. The brief whisking aerates the glaze, giving it a smooth sheen. If the glaze is too thick, add a splash of orange juice; if too thin, add more powdered sugar. This technique ensures a glaze that looks as good as it tastes.
The Almond Toast Trick
Toast the slivered almonds in a dry skillet until golden. This brings out their natural oils, giving the cake a richer nutty flavor. If you prefer a lighter crunch, skip the toasting step, but the cake will taste more like plain almond. Toasting also helps the almonds stick better to the glaze.
Creative Twists and Variations
This recipe is a playground. Here are some of my favorite ways to switch things up:
Lemon‑Zest Surprise
Swap the orange zest for lemon zest and use a splash of lemon juice in the glaze. The result is a bright, tart cake that pairs wonderfully with a dollop of whipped cream. This version is perfect for brunch or a light dessert. The lemon adds a refreshing tang that cuts through the richness of the olive oil.
Chocolate‑Almond Fusion
Add 1/4 cup of cocoa powder to the dry mix and replace half the powdered sugar with cocoa powder for the glaze. The chocolate will deepen the flavor while the almonds keep the crunch. This variant is a chocolate lover’s dream and works great for holiday gatherings.
Vanilla‑Infused Delight
Incorporate a teaspoon of vanilla extract into the wet mix and use vanilla‑flavored powdered sugar for the glaze. The vanilla lifts the citrus notes, creating a subtle, aromatic finish. This version is ideal for a sophisticated dessert that still feels comforting.
Nut‑Free Version
Replace almond flour with sunflower seed flour and use sunflower seeds instead of slivered almonds. The flavor will shift slightly, but the texture remains delightful. This is a great option for those with nut allergies without sacrificing taste.
Spiced Citrus Twist
Add a pinch of ground ginger or cardamom to the dry ingredients and a dash of orange zest to the glaze. The spices add warmth and complexity, turning the cake into a seasonal treat. This variation works wonderfully during fall or winter when you crave something cozy.
Cheesecake‑Inspired Variation
Add a layer of cream cheese frosting between the cake layers if you bake a two-tier version. The creamy richness contrasts beautifully with the citrusy cake. This hybrid dessert is a showstopper for celebrations and impresses even the most discerning palates.
Storing and Bringing It Back to Life
Fridge Storage
Wrap the cooled cake tightly in plastic wrap and store in the refrigerator for up to 3 days. The cake will stay moist and the glaze will remain glossy. When you’re ready to serve, let it sit at room temperature for 20 minutes to restore its natural softness. This method keeps the cake fresh without drying it out.
Freezer Friendly
Slice the cake into individual portions and wrap each slice in parchment paper, then place them in a freezer bag. Freeze for up to 2 months. When you want a slice, let it thaw in the fridge overnight. The texture remains tender, and the glaze stays intact.
Best Reheating Method
To revive a frozen slice, place it on a baking sheet and bake at 325°F (160°C) for 10 minutes. For a fresher feel, add a tiny splash of water to the pan before reheating; it steams back to perfection. Let the slice cool for a few minutes before slicing again. The cake will taste as if it were freshly baked.