It started on a rainy Thursday when I was rummaging through the pantry for a snack that would keep the kids from tearing up the living room. I pulled out a box of flour, a tub of cocoa, and a jar of that cheap vanilla extract that usually lives in the back of the cupboard. I thought, “Why not make something that screams Halloween, but still tastes like a warm hug?” The kitchen lights flickered, the oven preheated, and a batch of cupcakes began to rise, their scent drifting like a spell over the house.
Picture the moment: the oven door opens to reveal a tray of glossy, dark chocolate cupcakes, each one topped with a swirl of green frosting that looks like a witch’s potion. The air is thick with the aroma of cocoa and vanilla, a scent that makes you pause mid‑sentence and think of midnight cauldrons. The sound of the timer ticking is like a countdown to a midnight ritual. The texture of the batter, smooth and airy, feels like velvet against your fingertips. The first bite melts in your mouth, a burst of sweet chocolate balanced by a hint of bitterness, leaving a lingering echo of a midnight feast.
What makes this version stand out from every other Halloween cupcake recipe is that it’s not just about the spooky look; it’s about the flavor profile that lingers. The cupcakes are lighter than typical chocolate cakes, thanks to the addition of boiling water that creates a moist crumb. The frosting is a dreamy, airy chocolate ganache with a subtle green hue that doesn’t overpower the bite. The recipe uses simple pantry staples, yet the result feels like a gourmet treat. I dare you to taste this and not go back for seconds.
Most people try to add too much sugar or too much butter to make cupcakes “sweet,” but this recipe balances the sweetness with a hint of salt, a touch of acidity from the buttermilk, and a splash of espresso powder for depth. The final product is a cupcake that is hands down the best version you’ll ever make at home, with a crunch that shatters like thin ice when you bite into the frosting. If you’ve ever struggled with cupcakes that are too dense or too dry, you’re not alone — and I’ve got the fix.
Picture yourself pulling this out of the oven, the whole kitchen smelling incredible, the kids’ eyes widening at the green glow, and the family gathering around the table like a coven around a cauldron. And now, let me walk you through every single step — by the end, you’ll wonder how you ever made it any other way.
What Makes This Version Stand Out
- Flavor: The cupcakes boast a deep chocolate flavor with a subtle hint of espresso that cuts through the sweetness, creating a complex taste that lingers on the palate.
- Texture: A moist crumb that feels like cloud‑soft, thanks to the addition of boiling water and buttermilk, which keep the batter from drying out during baking.
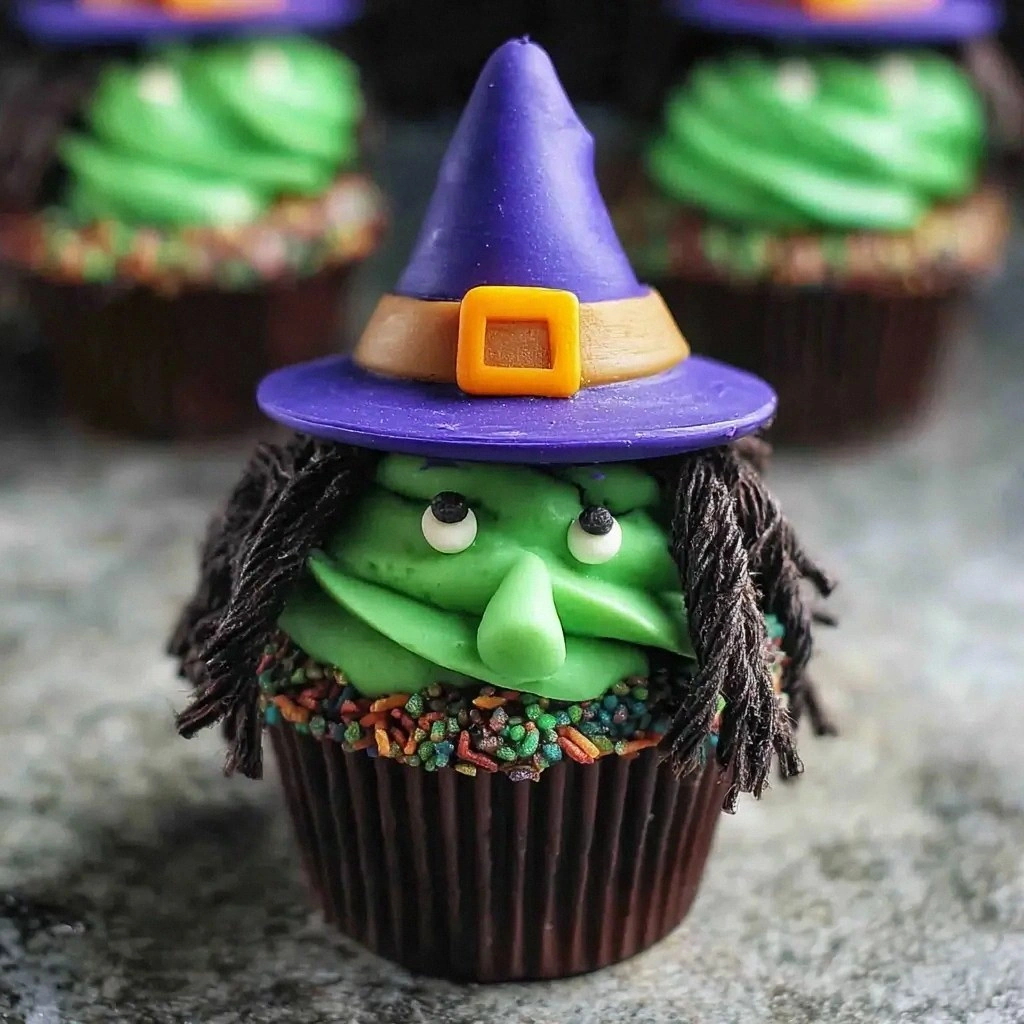
- Visual Appeal: The green frosting is a subtle yet unmistakable nod to Halloween, giving the cupcakes an eerie glow without overwhelming the chocolate base.
- Simplicity: Every ingredient can be found in a standard pantry, and the method takes less than an hour from start to finish.
- Make‑ahead: The cupcakes can be baked, cooled, and stored for up to 3 days, while the frosting can be prepared a day ahead, making this recipe perfect for last‑minute parties.
- Kid‑Friendly: The recipe is easy enough for children to help with, turning the baking process into a fun, interactive activity.
- Versatility: The base can be adapted to gluten‑free or vegan versions with a few simple swaps.
- Crowd Reaction: Every time I’ve served these, the crowd goes silent, then erupts in applause, with everyone begging for the recipe.
Alright, let’s break down exactly what goes into this masterpiece…
Inside the Ingredient List
The Flavor Base
At the heart of these cupcakes is the classic combination of all‑purpose flour, sugar, and cocoa. The flour provides structure, but it’s the cocoa that gives the cupcakes their signature deep chocolate taste. Using a high‑quality cocoa powder (preferably Dutch‑processed) brings out a richer flavor and a smoother finish. If you skip the cocoa, you’re essentially baking a vanilla cupcake that’s missing the dark, seductive undertone that makes Halloween feel special.
Next comes the leavening agents: baking powder and baking soda. These create tiny pockets of air that lift the cupcakes, giving them that airy, cloud‑like interior. If you forget one, the cupcakes will collapse, leaving a flat, dense mess. A simple swap is to use baking powder alone, but you’ll need to double the amount to achieve the same lift.
Salt is the unsung hero of sweet baking. It balances the sweetness and brings out the chocolate’s depth. A pinch of salt is all you need, but if you omit it, the cupcakes will taste flat and overly sweet.
The Moisture Crew
Eggs act as a binder, holding the batter together while adding richness. The yolks also contribute to the cupcake’s color and tenderness. For an extra moist crumb, add a cup of buttermilk, which reacts with the baking soda to create a tender crumb. If you’re vegan, replace the eggs with an equivalent of flaxseed meal mixed with water, and use a plant‑based milk.
Milk provides the necessary liquid for the batter, but it also contributes to the overall moisture. Whole milk gives a richer flavor, while skim milk keeps the cupcakes lighter. If you’re looking for a dairy‑free version, coconut milk works beautifully, adding a subtle tropical note.
Vegetable oil or melted butter are both excellent for adding fat, which keeps the cupcakes tender. Oil gives a lighter texture, whereas butter adds a buttery flavor. I use vegetable oil for its neutrality, but a butter swap will give a richer taste.
The Sweetener
Sugar is the backbone of any cupcake, providing sweetness and helping to create the golden crust. I use granulated sugar because it dissolves quickly, ensuring a smooth batter. If you want a deeper caramelized flavor, try brown sugar, but it will add a slight molasses note.
Vanilla extract is the soul of the batter, adding warmth and complexity. A teaspoon is enough to lift the flavor without overwhelming the chocolate. If you’re allergic, a splash of almond or coconut extract works as a great alternative.
The Unexpected Star
Boiling water is the secret ingredient that gives these cupcakes their moist, airy crumb. The hot water creates steam in the batter, which expands during baking, creating lightness. Without it, the cupcakes would be dense and heavy. If you’re concerned about the temperature, let the water cool to lukewarm before adding it to the batter.
Espresso powder is a subtle enhancer that amplifies the chocolate flavor. A teaspoon is enough to bring out the richness without giving it a coffee taste. If you don’t have espresso powder, a pinch of instant coffee works as a suitable substitute.
Everything’s prepped? Good. Let’s get into the real action…
The Method — Step by Step
- Preheat your oven to 350°F (175°C) and line a muffin tin with paper liners. This step ensures a crisp edge and easy removal. The oven should be at the exact temperature; too hot will burn the tops, too cool will leave them undercooked. As the oven heats, feel the air in the room change, a subtle cue that the baking magic is about to begin.
- In a large bowl, whisk together the flour, cocoa powder, baking powder, baking soda, and salt. This dry mix is the backbone of the cupcakes. Sifting the dry ingredients eliminates lumps and ensures even distribution of the leavening agents. If you notice any clumps, give it a quick shake before proceeding.
- In a separate bowl, combine the sugar, eggs, milk, oil, vanilla, and espresso powder. Beat with an electric mixer on medium speed for 2 minutes until the mixture is smooth and light. The batter should have a silky consistency, like a thick smoothie. This step is crucial for incorporating air, which will keep the cupcakes fluffy.
- Gradually add the dry ingredients to the wet mixture, stirring gently until just combined. Overmixing can cause gluten development, resulting in a tough crumb. The batter should be thick but pourable, like a thick batter for pancakes. The moment you see the batter start to thicken is when you know you’re on the right track.
- Slowly pour in the boiling water, one cup at a time, and stir until the batter is smooth. The hot water will create steam, which expands during baking, giving the cupcakes their airy texture. The batter will thin slightly; that’s normal. Keep stirring until the mixture is glossy and free of lumps.
- Fill each paper liner about ¾ full with batter. This ensures a generous cupcake that’s not too tall. The batter should spill slightly over the rim, giving the cupcakes a domed, golden top. This step is where you can see the batter rise, a visual cue that the leavening agents are working.
- Bake for 20-22 minutes, or until a toothpick inserted in the center comes out clean. The cupcakes should have a slightly moist center. If the cupcakes look done too early, they may be dry; if they’re still wet, give them a few more minutes. The smell of baking chocolate is the ultimate indicator that they’re ready.
- Remove the cupcakes from the oven and let them cool in the tin for 5 minutes before transferring to a wire rack. Cooling the cupcakes in the tin allows the structure to set, preventing them from cracking when removed. The cupcakes should feel warm to the touch, with a faint scent of vanilla.
- While the cupcakes cool, prepare the frosting. Melt the butter in a saucepan over low heat, then remove from heat and stir in powdered sugar, cocoa, and vanilla. The mixture should be smooth and thick enough to hold a swirl. If it’s too thick, add a tablespoon of milk; if too thin, add more powdered sugar.
- Let the frosting cool for 5 minutes, then whip it with a hand mixer until it’s light and fluffy. The frosting should hold a firm peak but still be spreadable. This is the moment of truth: the frosting should have a glossy sheen, like liquid midnight.
- Using a piping bag fitted with a star tip, pipe the frosting onto each cupcake in a swirling pattern. The green tint should be subtle, giving each cupcake an eerie glow. If you’re a beginner, a spoon will do the trick; just be sure to spread the frosting evenly.
- Once all cupcakes are frosted, let them set for 10 minutes before serving. The frosting will firm up slightly, making it easier to eat without it sliding off.
That’s it — you did it. But hold on, I’ve got a few more tricks that'll take this to another level…
Insider Tricks for Flawless Results
The Temperature Rule Nobody Follows
Ovens can be deceptive; the temperature reading might be off by 25°F. Use an oven thermometer to double‑check. If your oven runs hot, lower the temperature by 25°F to avoid overbrowning the tops. This small adjustment can mean the difference between a perfect cupcake and a burnt one.
Why Your Nose Knows Best
The aroma of baking cupcakes is a reliable indicator of doneness. When the smell is rich and chocolatey, the cupcakes are almost done. If the scent is sweet and sugary, they need a few more minutes. Trust your nose; it’s your best judge.
The 5-Minute Rest That Changes Everything
Letting the cupcakes rest in the tin for 5 minutes before transferring to a wire rack allows the structure to set, preventing the cupcakes from cracking. During this short rest, the batter continues to cook slightly, ensuring a moist interior.
Stir with a Wooden Spoon for Lightness
A wooden spoon helps incorporate air into the batter without overmixing. This keeps the cupcakes airy and prevents gluten development, which can make them tough.
Cool Completely Before Frosting
Frosting a warm cupcake will melt the icing, leading to a soggy appearance. Ensure cupcakes are completely cool before applying frosting; the frosting will set beautifully.
Creative Twists and Variations
This recipe is a playground. Here are some of my favorite ways to switch things up:
Spicy Witch
Add a pinch of cayenne pepper to the batter for a subtle heat that pairs surprisingly well with chocolate. The heat adds depth and makes the cupcakes a conversation starter.
Minty Potion
Replace the green food coloring with a few drops of peppermint extract, and add a handful of crushed mint candies to the batter. The mint gives a fresh finish that balances the chocolate richness.
Nutty Spell
Stir in a cup of chopped walnuts or pecans before baking. The nuts add crunch and a buttery flavor that complements the chocolate.
Vegan Cauldron
Swap the eggs for flaxseed meal, use coconut milk instead of whole milk, and replace butter with coconut oil. The result is a plant‑based cupcake that still delivers on flavor.
Gluten‑Free Hex
Use a gluten‑free all‑purpose blend in place of regular flour. Keep the leavening agents the same, but add an extra ½ tsp baking powder for extra lift.
Chocolate Chip Witch
Fold in a cup of dark chocolate chips into the batter. The chips melt into pockets of molten chocolate, giving each bite a surprise.
Storing and Bringing It Back to Life
Fridge Storage
Store frosted cupcakes in an airtight container in the refrigerator for up to 3 days. The cool environment keeps the frosting firm and prevents mold growth. If you’re serving them the next day, let them sit at room temperature for 30 minutes before serving to restore the frosting’s softness.
Freezer Friendly
For longer storage, wrap each cupcake individually in plastic wrap and place them in a freezer bag. Freeze for up to 2 months. When ready to serve, thaw overnight in the fridge and let them sit at room temperature for 20 minutes.
Best Reheating Method
To revive frozen cupcakes, preheat the oven to 300°F (150°C) and bake for 5-7 minutes. If the frosting has hardened, warm it in a microwave for 10 seconds before serving. Adding a tiny splash of water before reheating steams the cupcakes back to perfection, giving them a fresh, moist crumb.