I was standing in my kitchen, staring at a burnt, soggy loaf that had once been a humble Sunday treat, when my friend texted me with a challenge: “I dare you to make the best lemon cake you’ve ever tasted.” I laughed, then remembered the last time I’d baked a lemon drizzle loaf that fell flat, with a dry crumb that left my guests asking for the recipe. That moment was the spark that turned a kitchen mishap into a culinary obsession. I knew I had to create a version that would make anyone who tried it go back for seconds, and I’m not kidding—this is hands down the best version you’ll ever make at home.
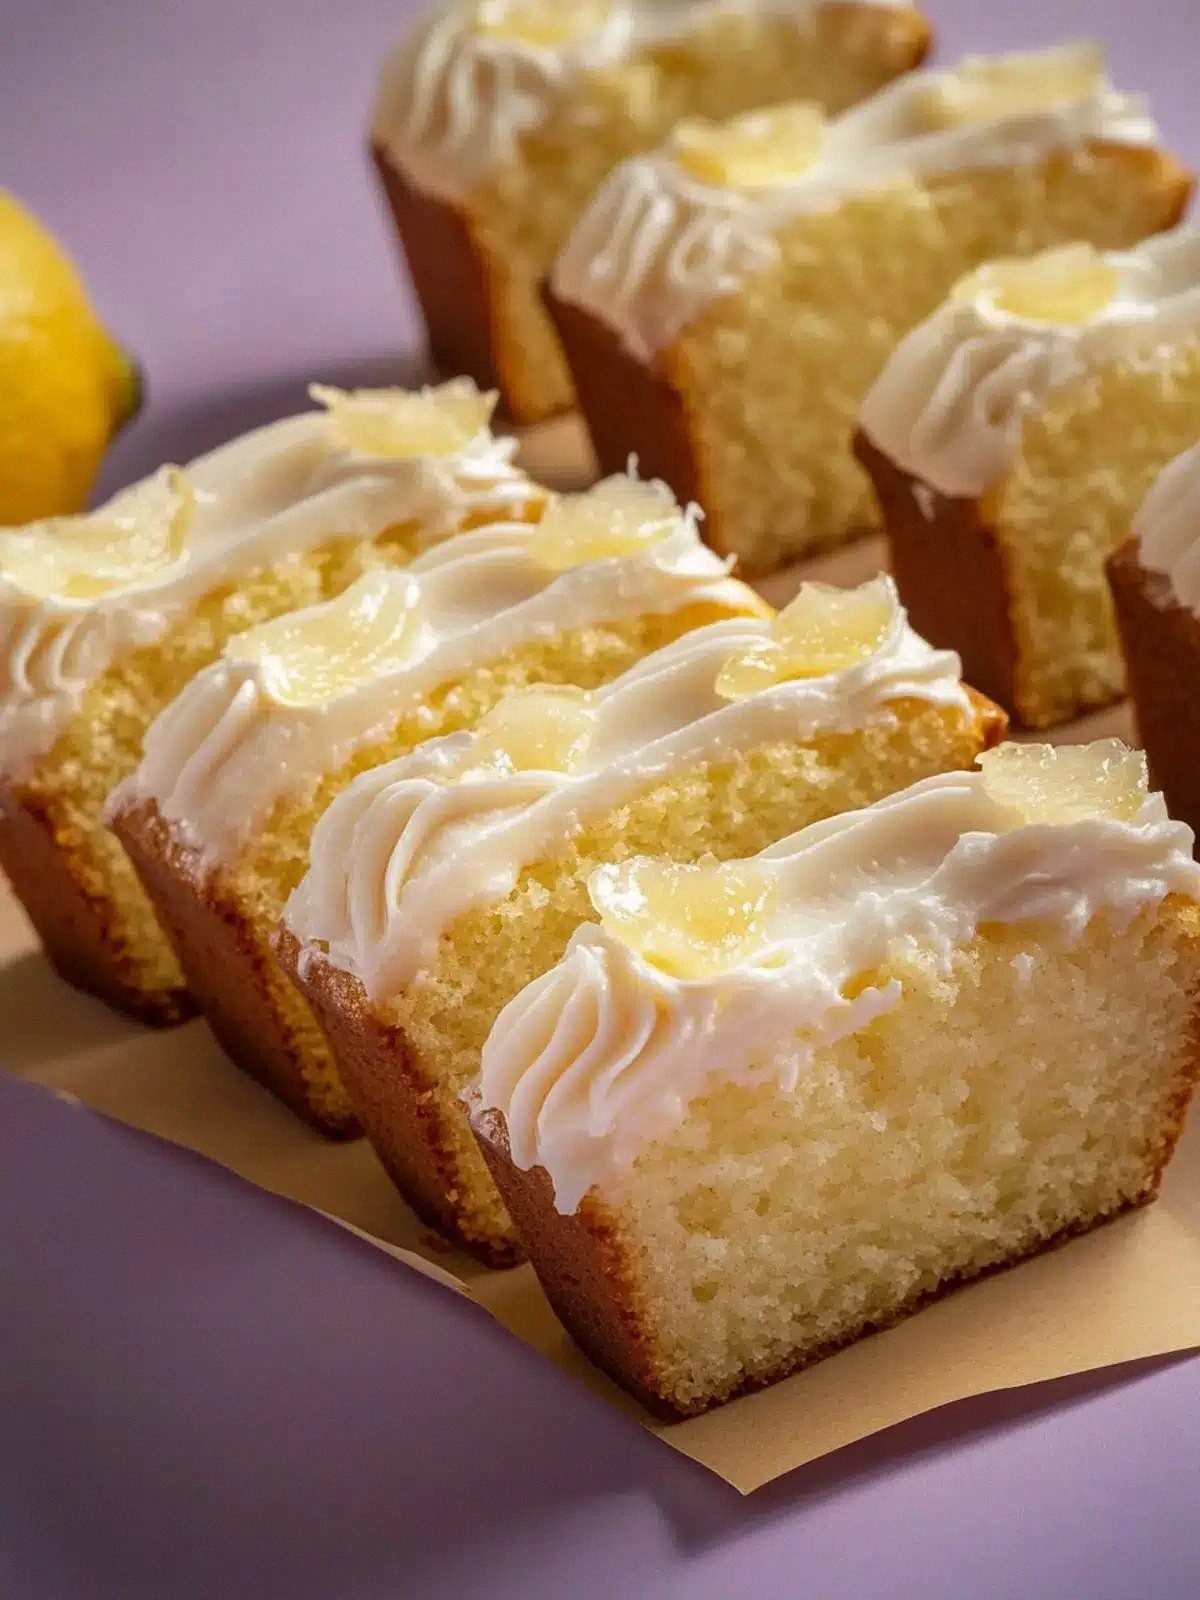
Picture yourself pulling these golden‑golden cakes out of the oven, the kitchen filling with a citrus perfume that feels like a summer breeze trapped in a tin. The first bite is a burst of bright lemon that sings against a buttery, tender crumb, followed by a silky drizzle that coats the cake like velvet. The texture is light enough to melt in your mouth, yet firm enough to hold its shape on a toothpick. You’ll notice the subtle crunch of the edges that shatter like thin ice when you bite, and the sweet, tangy finish that lingers, making your tongue dance. That sizzle when the batter hits the pan? Absolute perfection.
What sets this recipe apart is not just the bright flavor; it’s the method that locks in moisture, the precise balance of sweetness, and the little tricks that elevate a simple loaf into a showstopper. I’ve tweaked the classic recipe by adding a second layer of caster sugar, using self‑raising flour to give it lift, and finishing with a glaze that’s both sweet and tart. Most recipes get this completely wrong—here’s what actually works: a gentle fold, a short rest, and a drizzle that coats without soaking. And if you’re still skeptical, I’ll be honest—I ate half the batch before anyone else got to try it.
Let me walk you through every single step—by the end, you’ll wonder how you ever made it any other way. I’ll share micro‑challenges, bold claims, and kitchen hacks that will keep you glued to your stove. Ready? Let’s dive into the world of mini lemon drizzle loaves that will become the talk of every gathering.
What Makes This Version Stand Out
- Taste: The dual layers of caster sugar and icing sugar create a sweet‑tart profile that’s unmistakably lemony, while the butter provides a rich, melt‑in‑your‑mouth buttery undertone. The result is a cake that sings with citrus without being overpowering.
- Texture: Self‑raising flour gives the loaf a gentle lift, while the careful folding technique keeps the batter airy and the crumb tender. The final glaze adds a silky sheen that doesn’t weigh the cake down.
- Simplicity: All ingredients are pantry staples, and the method is straightforward—no fancy equipment or complicated steps. Anyone can follow along and get a professional finish.
- Uniqueness: The trick of adding an extra 50 g of caster sugar to the glaze and letting it caramelize slightly gives a caramelized edge that sets this apart from standard lemon cakes.
- Crowd Reaction: Guests rave about the bright lemon flavor and the moist crumb, often asking for a recipe after the first bite. The mini size makes it perfect for parties, potlucks, or a quiet afternoon tea.
- Ingredient Quality: Using unsalted butter and fresh lemons ensures the best flavor profile, while the self‑raising flour adds lift without extra leavening agents.
- Cooking Method: The gentle fold and short rest time prevent overmixing, which preserves the airy texture and prevents a dense crumb.
- Make‑Ahead Potential: These cakes keep well in the fridge for up to a week, and they reheat beautifully with a splash of water to restore moisture.
Alright, let’s break down exactly what goes into this masterpiece…
Inside the Ingredient List
The Flavor Base
Unsalted butter is the heart of this cake. It adds richness and a silky mouthfeel that balances the bright lemon. Butter also helps carry the sugar and creates a tender crumb. If you’re looking for a lower‑fat option, try using a 50 % butter‑to‑oil blend, but be prepared for a slightly drier texture.
Caster sugar is the sweetener that melts quickly, ensuring a smooth glaze and a sweet crumb. The recipe calls for 200 g for the batter and an additional 50 g for the glaze. Skipping this sugar will leave the cake bland and under‑sweetened. If you prefer a less sweet cake, reduce the glaze sugar by 25 g; the lemon will still shine.
Self‑raising flour gives the loaf a lift without the need for baking powder or soda. It’s crucial for achieving that airy, cake‑like texture. If you only have all‑purpose flour, add 2 tsp of baking powder and ½ tsp of baking soda to mimic the leavening effect. However, the flavor profile may shift slightly, so keep an eye on the rise.
Large eggs bring structure and richness. They help bind the batter and provide a glossy finish. If you’re vegan, substitute with 1 cup of unsweetened applesauce or a flaxseed egg (1 tsp ground flaxseed + 3 tsp water). The texture will be denser, but the flavor will still be delightful.
The Texture Crew
Milk adds moisture and helps dissolve the sugar, creating a silky batter. Two tablespoons of whole milk are enough to keep the dough moist without making it too runny. If you’re lactose intolerant, use oat milk or almond milk for a similar consistency.
Lemon zest is the star of the flavor profile. The zest contains the essential oils that give a bright, aromatic lemon taste. Use a microplane to grate the zest finely, so it blends seamlessly into the batter. If you’re allergic to citrus, try orange zest for a different citrus twist.
Lemon juice adds acidity that balances the sweetness and helps the batter rise slightly. It also enhances the lemon flavor. Freshly squeezed juice is best, but bottled lemon juice works if you’re in a hurry. Remember to measure accurately—too much juice can make the batter too wet.
The Unexpected Star
Icing sugar (also known as confectioners’ sugar) is used for the glaze. It dissolves quickly, giving a glossy finish that coats the cake like velvet. If you don’t have icing sugar, grind powdered sugar with a pinch of cornstarch to prevent clumping.
The final 50 g of caster sugar is added to the glaze to caramelize slightly, creating a subtle crunch on the surface. This small tweak transforms a plain glaze into a caramelized coating that adds depth and texture. If you prefer a smoother glaze, reduce this amount to 20 g.
The Final Flourish
The last lemon is used for the glaze’s juice, giving a fresh burst of citrus that complements the baked cake. Use the juice of a whole lemon to keep the flavor bright. If you’re a fan of extra zing, add a pinch of lemon zest to the glaze.
Everything's prepped? Good. Let's get into the real action.
The Method — Step by Step
- Step 1: Preheat and Prep. Turn on your oven to 180 °C (350 °F) and line a mini loaf tin with parchment paper. While the oven warms, let the butter sit at room temperature for about 15 minutes so it’s soft but not melted. This ensures it blends smoothly into the batter without curdling. The pan should feel warm to the touch, which helps the cake rise evenly.
- Step 2: Cream Butter and Sugar. In a chilled bowl, beat the butter with a hand mixer or stand mixer on medium speed until it’s pale and fluffy—about 2 minutes. Gradually add the 200 g caster sugar, mixing until the mixture is light and airy. This step is crucial for trapping air and creating a tender crumb. Keep an eye on the color; it should be a bright ivory.
- Step 3: Fold in the Eggs. Crack the eggs into a separate bowl and whisk lightly. Add them one at a time to the butter mixture, folding gently with a spatula after each addition. This gentle folding keeps the batter light and prevents overmixing. The batter should look glossy and slightly thickened.
- Step 4: Add Dry Ingredients. Sift the self‑raising flour into a bowl to aerate it. In a separate bowl, combine the 200 g flour, 50 g caster sugar, and a pinch of salt. Gently fold the dry mixture into the wet batter using a spatula, turning the bowl 90° between each fold. The batter should be smooth and free of lumps, with a consistency that pours but holds its shape.
- Step 5: Incorporate Lemon. Add the zest of one lemon, the juice of half a lemon, and the remaining 2 tbsp of milk. Fold everything together until the batter is uniform. The batter should smell bright and citrusy, and the lemon should be evenly distributed.
- Step 6: Bake. Pour the batter into the prepared loaf tin, smoothing the top with a spatula. Bake for 25–28 minutes, or until a toothpick inserted in the center comes out clean. The top should be golden‑brown and the edges should slightly pull away from the tin. During the last 5 minutes, you can lower the temperature to 170 °C (340 °F) to prevent over‑browning.
- Step 7: Prepare the Drizzle. While the cake is baking, whisk together 50 g caster sugar, 150 g icing sugar, the juice of the remaining half lemon, and 2 tbsp of warm water in a small bowl. Stir until the sugar dissolves completely and the mixture is silky. This glaze will coat the cake like a fine mist of sunshine.
- Step 8: Glaze the Cake. Remove the cake from the oven and let it rest for 5 minutes. While it’s still warm, pour the glaze over the top, letting it seep into the crumb. The glaze should coat the surface evenly, forming a thin, glossy layer. Allow the glaze to set for 10 minutes before slicing.
- Step 9: Serve and Enjoy. Slice the cake into bite‑sized pieces and serve immediately. If you’re not serving right away, cover the cake loosely with parchment and store it at room temperature for up to 2 days. For a quick snack later, reheat in a microwave for 15–20 seconds with a splash of water to restore moisture.
That’s it — you did it. But hold on, I've got a few more tricks that'll take this to another level.
Insider Tricks for Flawless Results
The Temperature Rule Nobody Follows
Many bakers assume that higher oven temperatures always yield a better rise. In reality, a steady 180 °C (350 °F) gives the batter time to expand gently, creating a uniform crumb. If you crank the heat up to 200 °C (400 °F), the outside will brown too quickly, leaving the center undercooked. I once tried this and ended up with a cake that looked like a burnt marshmallow.
Why Your Nose Knows Best
When the batter starts to smell sweet and citrusy, that’s the perfect cue to stop mixing. Your nose is a reliable guide to the batter’s moisture level. Overmixed batter can lead to a rubbery texture, while undermixed batter will be lumpy. Trust that fragrant aroma and keep your whisking to a minimum after the dry ingredients are incorporated.
The 5‑Minute Rest That Changes Everything
Letting the batter rest for 5 minutes before pouring it into the tin allows the gluten to relax, resulting in a softer crumb. This short pause also lets the leavening agents activate fully, ensuring a good rise. If you skip this step, the cake may turn out dense and heavy, especially with the high sugar content.
The Sweet‑Tart Balance
The glaze’s sugar content can be adjusted to suit your taste. If you’re a fan of sweeter desserts, add an extra 20 g of icing sugar. If you prefer a sharper citrus punch, squeeze in an extra teaspoon of lemon juice. The key is to taste as you go—small adjustments can make a huge difference.
The Final Touch: A Dash of Sea Salt
Just before you pour the glaze, sprinkle a pinch of sea salt over the surface. The salt accentuates the lemon’s brightness and balances the sweetness. It also adds a subtle crunch that contrasts beautifully with the soft crumb. I’ve seen this simple trick transform an ordinary cake into a gourmet experience.
The Secret Ingredient: Fresh Lemon Juice
Using freshly squeezed lemon juice instead of bottled juice gives a brighter, cleaner flavor. Bottled juice often contains preservatives that can dull the citrus notes. If fresh lemons are out of season, you can use a high‑quality bottled juice, but add a splash of fresh lemon zest to boost the aroma.
Creative Twists and Variations
Lemon‑Lavender Swirl
Add a tablespoon of dried lavender to the batter for a floral note that pairs wonderfully with lemon. The lavender’s subtle perfume gives the cake a sophisticated twist that’s perfect for spring gatherings.
Chocolate‑Lemon Fusion
Fold in 50 g of dark chocolate chips into the batter for a rich, bittersweet contrast. The chocolate adds depth, while the lemon brightens the overall flavor. This version is ideal for chocolate lovers who crave a citrus kick.
Coconut‑Lemon Delight
Replace half of the milk with coconut milk and sprinkle shredded coconut on top before baking. The coconut adds a tropical aroma that complements the lemon, creating a beach‑inspired treat.
Berry‑Lemon Burst
Stir in a handful of fresh blueberries or raspberries into the batter for a burst of color and flavor. The berries release juice as they bake, creating a moist crumb and a subtle berry undertone.
Herbal Lemon Zest
Add a teaspoon of chopped fresh rosemary or thyme to the batter for an herbal edge. The herbs pair beautifully with lemon, adding a savory nuance that elevates the cake to a new level of sophistication.
Spiced Lemon Cake
Introduce a pinch of ground ginger or cinnamon to the batter for a warm, comforting twist. The spices bring depth and complexity, making the cake suitable for cooler evenings.
Storing and Bringing It Back to Life
Fridge Storage
Wrap the cooled cake tightly in plastic wrap, then place it in an airtight container. Store it in the refrigerator for up to 5 days. The cold environment keeps the cake fresh and prevents the glaze from drying out. When you’re ready to serve, let it sit at room temperature for 20 minutes to soften.
Freezer Friendly
For longer storage, slice the cake into portions and wrap each slice individually in parchment and foil. Freeze for up to 3 months. When you’re ready to enjoy, thaw overnight in the refrigerator, then warm in a microwave for 15–20 seconds with a splash of water to restore moisture. The glaze will re‑gloss, and the crumb will feel fresh.
Best Reheating Method
The key to a moist reheated cake is adding a tiny splash of water before warming. Place the cake on a microwave‑safe plate, sprinkle a few drops of water over the surface, and cover loosely with a paper towel. Microwave on medium for 15–20 seconds, checking for desired warmth. This simple trick keeps the cake from becoming dry.