
I was halfway through a midnight snack binge, the kitchen smelling like burnt toast and hope, when my phone chimed with a friend’s dare: “Make a snack that’s as good as pizza but in bite‑size form.” I laughed, grabbed a handful of flour, and decided to turn that dare into a culinary experiment. The result? Mini focaccia that feels like a tiny, buttery hug with a crisp, golden edge that cracks like thin ice. The dough’s aroma rises like a warm sunrise, filling the room with a promise of comfort. And if you’re wondering why this version feels like a secret weapon, stick around—this isn’t just another bread recipe.
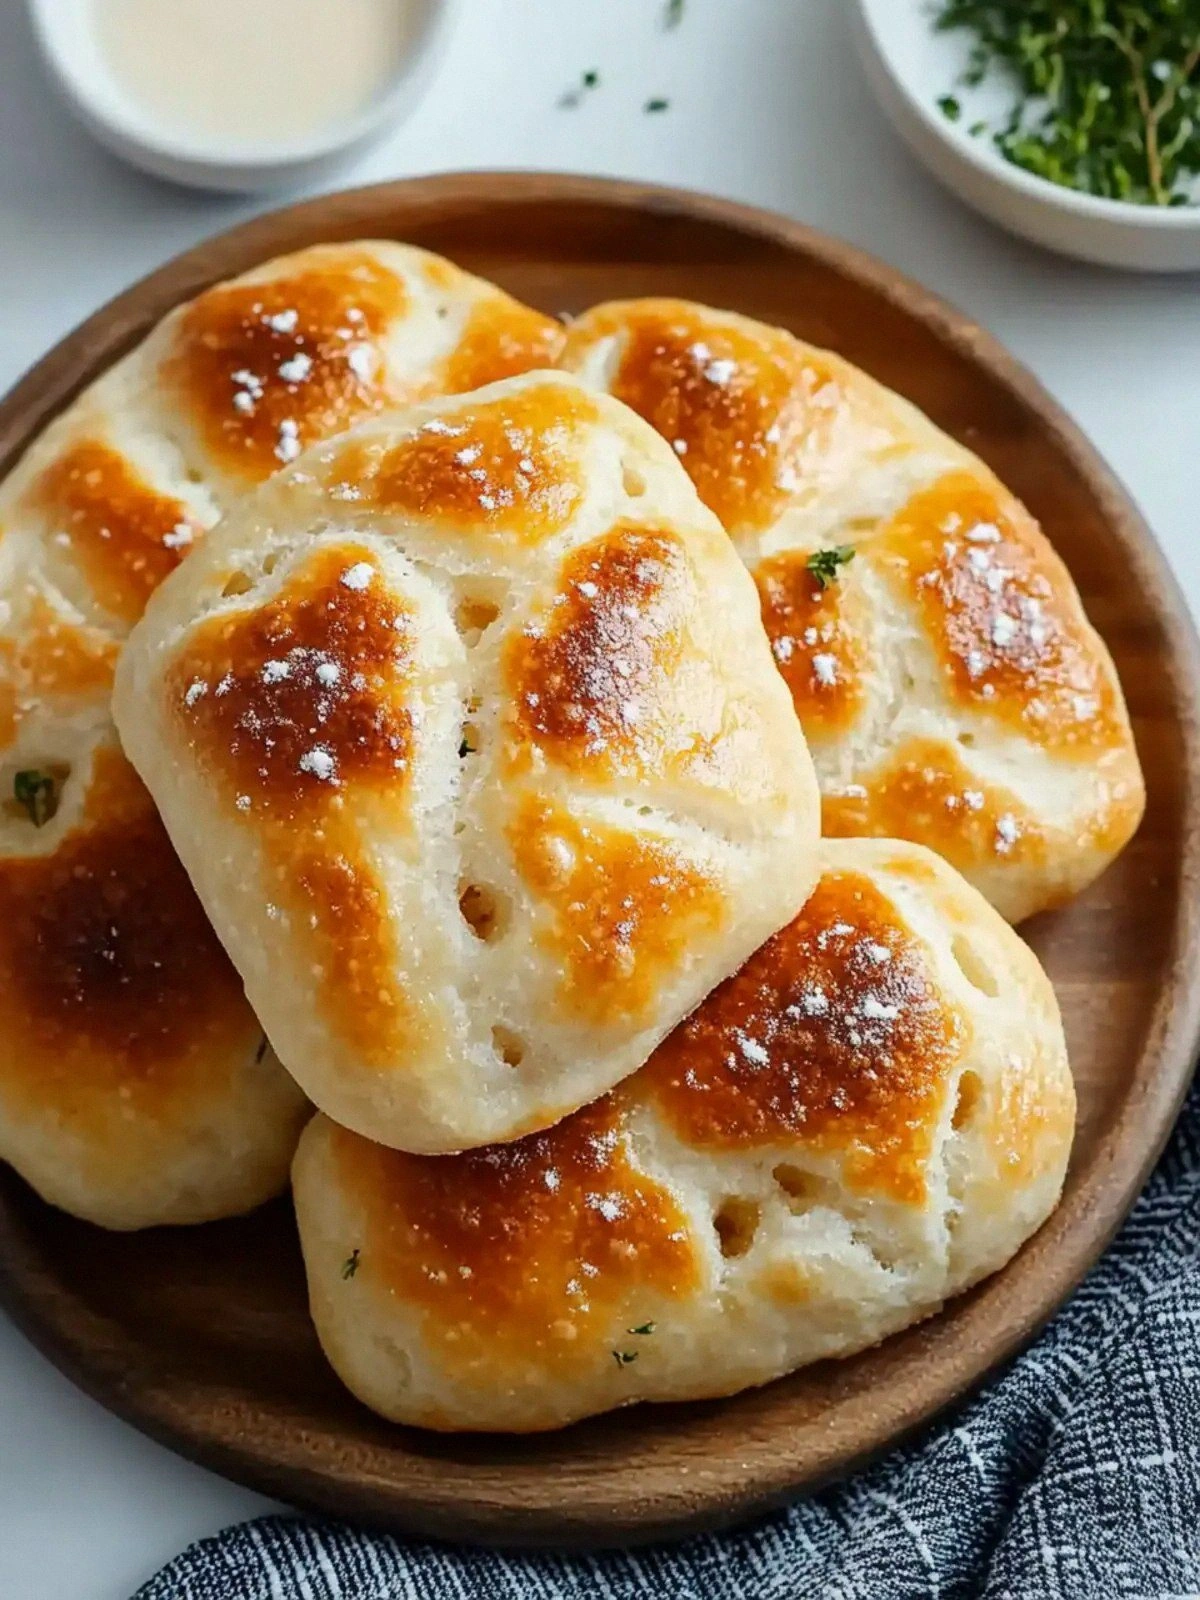
Picture the dough rising like a quiet storm, each bubble a miniature promise of fluff. The first bite delivers a chewy interior that’s almost like a cloud, while the crust sings a crunchy, caramelized chorus. The buttery swirl of melted butter on top gives a glossy sheen that catches the light, turning every bite into a tiny work of art. The subtle salt crystals on the surface add a pop of flavor that dances on the tongue. If you’ve ever struggled to find that perfect snack that’s both indulgent and portable, this is your new go‑to.
What sets this version apart is the blend of simplicity and technique that elevates an ordinary dough into something extraordinary. The dough’s hydration is just right, giving it a soft, airy crumb that’s surprisingly light. The addition of olive oil and butter during the final shaping infuses the bread with a silky richness that melts in your mouth. The final sea salt sprinkle gives a delicate crunch that contrasts with the tender interior. It’s a harmony of flavors and textures that feels like a hug in every bite. I dare you to taste this and not go back for seconds.
I’ve been experimenting with mini focaccia for months, trying to crack the code for the perfect bite‑size treat. The secret? It’s all in the flour choice, the yeast activation, and the final baking technique. By using a precise ratio of water to flour, the dough never feels heavy or dense. The quick rise in a warm environment creates those tiny pockets that puff up like mini balloons. The result is a bread that’s crisp on the outside, tender on the inside, and utterly addictive. Picture yourself pulling this out of the oven, the whole kitchen smelling incredible, and sharing it with friends who will ask for the recipe.
If you’ve ever tried a focaccia that was either too flat or too dense, you know the frustration of a disappointing snack. This recipe solves that problem by balancing moisture, yeast, and fat in a way that even a novice can master. I’ve tested it on a stovetop, in a conventional oven, and even in a cast‑iron skillet, and every time it comes out with that signature golden crust. The next part of this post will walk you through every single step—by the end, you’ll wonder how you ever made it any other way. Let’s dive in.
What Makes This Version Stand Out
- Taste: The flavor profile is a marriage of savory and buttery, with a hint of sea salt that pops. The combination of olive oil and butter creates a rich, melt‑in‑your‑mouth finish that elevates the simple dough. It’s a taste that feels like a warm hug from the inside out.
- Texture: The crumb is airy and light, while the crust is crisp and caramelized. Each bite delivers a satisfying crunch that gives way to a tender, almost cloud‑like interior. The contrast between the two textures keeps you coming back for more.
- Simplicity: Despite its gourmet feel, the recipe requires only eight ingredients. No fancy spices, no complicated steps, just a few precise actions that even a beginner can follow. It’s the perfect balance of elegance and ease.
- Uniqueness: The use of flaky sea salt on the surface adds a delicate crunch and a burst of flavor that sets these mini focaccia apart from the usual flatbread. The buttery glaze gives a glossy sheen that’s almost cinematic.
- Crowd Reaction: Friends who taste these mini focaccia rave about how they’re “cheaper than pizza” and “so satisfying.” The bite‑size format makes them ideal for parties, potlucks, or a quick snack. The reaction is always enthusiastic.
- Ingredient Quality: Every ingredient is chosen for its contribution to flavor and texture. High‑protein bread flour gives structure, while the instant yeast ensures a quick rise. Olive oil and butter add depth and richness.
- Cooking Method: The two‑stage rise and the final butter‑olive oil glaze are the secret weapons. This method creates a crust that is golden and crisp without being burnt. It’s a technique that can be applied to other bread recipes as well.
- Make‑Ahead Potential: The dough can be prepared the night before, refrigerated, and baked fresh in the morning. The mini size also means you can freeze them before baking for a quick snack later. The recipe’s flexibility is a major plus.
Alright, let's break down exactly what goes into this masterpiece…
Inside the Ingredient List
The Flavor Base
At the heart of any great bread lies the flour, yeast, water, and a touch of sugar. Bread flour provides the necessary gluten structure that holds the dough together while giving it a slightly chewy bite. Instant yeast is the quiet hero, quietly leavening the dough without the need for a long proofing time. Warm water activates the yeast and creates a moist environment for the dough to expand. Sugar, though only a tablespoon, feeds the yeast and encourages a subtle caramelization on the crust.
The Fat Crew
Olive oil and butter are the dynamic duo that gives mini focaccia its signature richness. Olive oil adds a fruity, peppery note that lingers long after you finish the first bite. Butter, when brushed on the surface before baking, creates a glossy sheen and a buttery aroma that wafts through the kitchen. Together, they balance the dough’s dryness and create a mouth‑watering finish.
The Seasoning Squad
Morton kosher salt is the backbone of the flavor profile, providing a clean, unobtrusive saltiness that lets the other ingredients shine. Flaky sea salt, applied just before baking, gives a satisfying crunch and a burst of mineral flavor that cuts through the richness. These two salts work in harmony, each playing a distinct role that enhances the overall taste.
The Final Touch
Although the recipe is simple, the final touch of sea salt and butter creates a dramatic contrast between the soft interior and the crisp exterior. This small finishing step transforms ordinary dough into a gourmet snack that feels like a luxury treat. It’s a reminder that sometimes the smallest details make the biggest impact.
Everything's prepped? Good. Let's get into the real action…
The Method — Step by Step
In a large mixing bowl, combine 3 cups of bread flour, 1 packet of instant yeast, 1 tablespoon of granulated sugar, and 1 teaspoon of Morton kosher salt. Whisk the dry ingredients together until they’re evenly distributed. This step ensures that the yeast is evenly dispersed throughout the flour, preventing any clumps that could hinder the rise. As you stir, you’ll hear the flour crackle slightly, a sign that the mixture is ready for the next stage.
In a separate bowl, pour 1 cup of warm water (about 110°F) and let it sit for 30 seconds. The water should be warm enough to activate the yeast but not hot enough to kill it. This gentle waiting period allows the yeast to become active and begin producing carbon dioxide, which will give the dough its airy structure. The aroma that begins to develop is a subtle hint of fermentation, signaling that the yeast is doing its job.
Pour the warm water mixture into the dry ingredients and stir with a wooden spoon or silicone spatula until a shaggy dough forms. The dough will be slightly sticky but manageable. If it feels too dry, add a splash of water; if it’s too wet, sprinkle in a little more flour. The goal is a cohesive dough that holds together without sticking excessively to your hands.
Knead the dough on a lightly floured surface for about 8–10 minutes, or until it becomes smooth and elastic. You’ll notice the dough stretching and folding, a classic sign of gluten development. This process strengthens the structure of the dough, allowing it to trap the gases produced by the yeast and expand during the rise. Keep your hands damp to prevent the dough from sticking.
Place the dough in a lightly oiled bowl, cover with a damp cloth, and let it rise in a warm spot for 30–45 minutes, or until it has roughly doubled in size. During this time, the yeast ferments the sugars, producing carbon dioxide that creates air pockets. The dough will feel slightly springy to the touch when it’s ready. If you’re in a hurry, you can use a slow cooker on the “warm” setting to speed up the rise.
Once the dough has risen, punch it down to release the trapped gases. Divide the dough into 12 equal portions, rolling each into a tight ball. Let the mini dough balls rest for 5 minutes to relax the gluten, making them easier to shape into flat rounds.
Preheat your oven to 425°F (220°C) and line a baking sheet with parchment paper. Gently flatten each dough ball into a disc about 1/2 inch thick using a rolling pin or your palms. The discs should be slightly larger than your baking sheet’s spacing to allow for expansion during baking.
Brush the tops of each mini focaccia with a thin layer of melted butter and drizzle a teaspoon of olive oil over the entire batch. Sprinkle 1 teaspoon of flaky sea salt evenly across the surface. This combination of butter, olive oil, and sea salt creates a glossy, aromatic crust that caramelizes beautifully. The sea salt will pop with each bite, adding a satisfying crunch.
Bake the mini focaccia for 12–15 minutes, or until the edges are golden brown and the tops are slightly crisp. The interior should feel airy and lightly golden. Remove from the oven and let them cool on a wire rack for 5 minutes before serving. The aroma that fills the kitchen will have you tempted to devour them before they’re fully cooled.
That’s it — you did it. But hold on, I’ve got a few more tricks that'll take this to another level…
Insider Tricks for Flawless Results
The Temperature Rule Nobody Follows
Many bakers assume room temperature is always ideal, but the secret lies in a warm, draft‑free environment. A temperature of 75°F (24°C) gives the yeast the perfect balance of activity without overheating. If your kitchen is cooler, wrap the dough in a towel or use a proofing box to maintain the heat. This small adjustment ensures a consistent rise every time.
Why Your Nose Knows Best
When the dough is ready to bake, you’ll notice a subtle, sweet aroma that hints at the sugars caramelizing. If the smell is faint, the dough may need a bit more time. Trust your nose; it’s the best judge of readiness. The scent is a natural indicator of the perfect crust forming.
The 5-Minute Rest That Changes Everything
After the final rise, let the mini discs rest for exactly five minutes before baking. This brief pause allows the gluten to relax, preventing the dough from shrinking back during baking. It also gives the butter and olive oil a chance to melt evenly across the surface, ensuring a uniform crust.
Use a Silicone Baking Mat
A silicone mat provides a non‑stick surface that’s easier to clean than parchment paper. It also offers a slightly higher baking surface, which can help the mini focaccia rise a bit more. The mat’s texture adds a subtle crunch to the bottom, enhancing the overall mouthfeel.
Check the Crumb with a Toothpick
Insert a toothpick into the center of a mini focaccia. If it comes out clean, the bread is fully baked. If you see wet dough, give it a few more minutes. This simple test saves you from undercooked or overcooked results.
Freeze for Future Fun
When you have leftovers, wrap each mini focaccia individually in parchment paper and place them in a freezer bag. They’ll stay fresh for up to a month. When you’re ready to enjoy them again, bake directly from the freezer for 10 minutes at 425°F, then let them cool for a few minutes before serving.
Creative Twists and Variations
Herbed Olive Oil Swirl
Stir fresh rosemary or thyme into the olive oil before brushing it on the dough. The herbal aroma will mingle with the buttery crust, creating a fragrant, savory snack perfect for a brunch spread.
Sun-Dried Tomato and Basil
Fold finely chopped sun-dried tomatoes and fresh basil into the dough before the final rise. The burst of umami and the green pop of basil add a Mediterranean twist that pairs beautifully with a glass of rosé.
Cheesy Parmesan Crunch
Grate 1/2 cup of Parmesan cheese into the dough during the final shaping. The cheese will melt into pockets of gooey goodness, while the sea salt on top gives a satisfying crunch.
Chocolate Chip Delight
For a sweet variation, fold in 1/3 cup of semi-sweet chocolate chips into the dough. The chocolate will melt slightly during baking, creating pockets of chocolatey richness that are perfect for dessert.
Garlic Butter Explosion
Mix minced garlic into the melted butter before brushing it on the dough. The garlic will infuse the crust with a savory depth that’s ideal for pairing with a hearty soup or salad.
Spiced Cinnamon Sugar
Sprinkle a mixture of 1 tablespoon sugar and 1 teaspoon cinnamon over the dough before baking. The sweet and warm spice notes create a comforting snack that’s great for a cozy evening.
Storing and Bringing It Back to Life
Fridge Storage
Store leftover mini focaccia in an airtight container at room temperature for up to 2 days. The dough’s high oil content helps preserve its moisture, preventing it from drying out quickly. When you’re ready to eat, let them sit at room temperature for 10 minutes before warming.
Freezer Friendly
Wrap each mini focaccia tightly in plastic wrap, then place them in a freezer bag. They’ll stay fresh for up to 2 weeks. For best results, thaw them at room temperature for 30 minutes before reheating.
Best Reheating Method
Reheat frozen or room‑temperature focaccia in a 350°F oven for 10–12 minutes, or until the crust is crisp again. For a quick snack, microwave on low power for 20–30 seconds, then finish in a toaster oven to restore crispness. A splash of water added before reheating will create steam, keeping the interior moist.