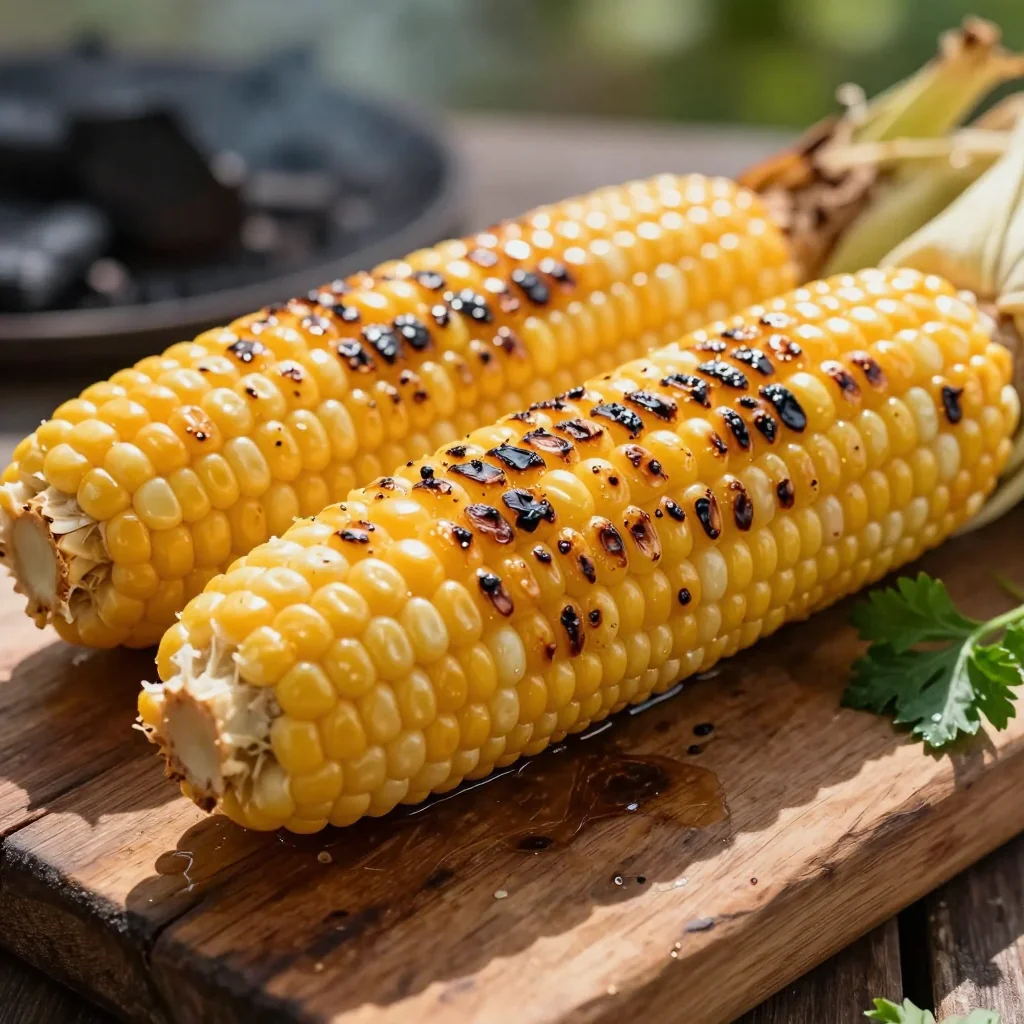
A smoky, buttery masterpiece that turns humble corn into a celebration of summer flavors.

I still remember the first time I tasted a perfectly grilled ear of corn at a family reunion in the Midwest. The sweet kernels, kissed by a whisper of smoke and brushed with a glossy butter‑herb glaze, sparked a memory that still makes my mouth water on a warm summer evening. That moment taught me that simplicity, when paired with the right technique, can become unforgettable.
Grilled corn on the cob has roots in many cultures—from the smoky barbecues of the American South to the open‑fire markets of Mexico. The char adds depth, while a quick brush of seasoned butter amplifies the natural sugars, turning each bite into a caramel‑kissed delight. It’s a dish that bridges generations, making it a staple at picnics, backyard parties, and even elegant dinner tables.
In this guide, I’ll walk you through every nuance: from selecting the freshest ears, to mastering a balanced spice rub, to achieving that perfect grill mark without overcooking. You’ll also discover how to adapt the recipe for vegans, spice lovers, and health‑conscious cooks without sacrificing flavor.
So roll up your sleeves, fire up the grill, and let’s turn those golden kernels into a celebration of summer on a plate.
🌟 Why This Recipe Will Captivate You
Grilled corn isn’t just a side; it’s an experience that engages sight, smell, and taste in a single, unforgettable bite.
- ✨ Irresistible Flavor Layers: The combination of smoky char, buttery richness, and a subtle hint of smoked paprika creates a multi‑dimensional taste that keeps you reaching for more.
- ✨ Quick and Easy Preparation: From prep to plate in under half an hour, this recipe fits perfectly into busy weeknight schedules or relaxed weekend gatherings.
- ✨ Nutrient‑Rich Snack: Corn provides fiber, antioxidants, and essential vitamins like B‑complex and folate, making it a wholesome choice for all ages.
- ✨ Versatile Pairings: Whether you serve it alongside a grilled steak, a fresh salad, or a crisp white wine, the corn adapts beautifully to any culinary context.
- ✨ Customizable Heat: Add a pinch of cayenne or a drizzle of hot honey for a spicy twist, or keep it classic with just herbs and butter.
- ✨ Crowd‑Pleaser: Its bright color and familiar aroma draw people in, making it an ideal centerpiece for potlucks, picnics, or holiday spreads.
🥗 Ingredients
📝 Complete Ingredient List
For the Grilled Corn:
For the Herb Butter Glaze:
Optional Garnish:

🔍 Focus on Key Ingredients
Fresh Corn on the Cob
The star of this recipe is the corn itself. When harvested at the milk stage, each kernel bursts with natural sugars that caramelize beautifully over a hot grill. Look for ears that feel heavy for their size, with husks that are still moist and silks that are bright and unblemished. If you can, choose corn that’s been shucked the same day you plan to cook; the flavor difference is remarkable.
Smoked Paprika
Smoked paprika adds a deep, earthy smokiness that complements the char from the grill without overwhelming the corn’s sweetness. It’s made from peppers that are dried over oak wood, which imparts a subtle wood‑infused aroma. A single teaspoon is enough to coat the ears evenly, but feel free to increase the amount if you love a richer smoky profile.
Herb Butter Glaze
Butter is the ultimate flavor carrier. When melted and mixed with fresh parsley, lime juice, and a pinch of salt, it creates a glossy, tangy glaze that seeps into the kernels as they rest on the grill. The acidity of lime cuts through the richness, balancing the dish and adding a bright finish that elevates every bite.
🔄 Quick Substitutions
| If you don’t have... | Use instead... |
|---|---|
| Olive oil | Canola oil or melted coconut oil |
| Smoked paprika | Regular paprika + a dash of liquid smoke |
| Fresh parsley | Dried parsley (½ tsp) or cilantro for a different note |
👨🍳 Step‑by‑Step Instructions
Follow these detailed steps to achieve perfectly charred, buttery corn every time. The process is broken into three phases—preparation, grilling, and finishing—so you can stay organized and confident at the grill.
📋 Phase 1: Preparation and Mise en Place
Start by getting all ingredients ready and prepping the corn for the grill.
Shuck and Clean the Corn
Pull back the husks of each ear without removing them completely. Snap them off at the base, then remove the silky threads by hand or with a soft brush. Rinse the kernels under cold water to wash away any remaining silk, then pat dry with a clean kitchen towel. Leaving the husks attached (but loosened) helps protect the kernels from direct flame while still allowing smoke to infuse.
Prepare the Spice Rub
In a small bowl, combine the olive oil, smoked paprika, garlic powder, sea salt, and black pepper. Stir until a smooth paste forms. This rub will coat the corn evenly, delivering flavor deep into every kernel.
Apply the Rub
Using a silicone brush, spread the spice rub over each ear, making sure to coat the kernels through the husk openings. Rotate the corn to ensure all sides receive a thin, even layer. The oil helps the spices adhere and prevents the kernels from drying out.
🔥 Phase 2: Grilling and Cooking
Time to bring the heat and let the corn develop its signature char.
Preheat the Grill
Light your charcoal grill or preheat a gas grill to medium‑high heat, aiming for a temperature of about 400°F (204°C). If using charcoal, arrange the coals in a two‑zone setup: one side hot for searing, the other cooler for indirect cooking.
Grill the Corn
Place the seasoned corn directly on the grill grates, husks up. Grill for 10–12 minutes, turning every 2–3 minutes. You’ll see the husks start to blacken and the kernels begin to pop. The goal is a light char on the kernels without burning the husks completely.
Brush with Herb Butter
While the corn is still hot, brush each ear generously with the melted butter mixture. The heat will melt the butter instantly, allowing it to seep into the kernels. Sprinkle a pinch of crushed red pepper flakes if you enjoy a subtle heat.
✨ Phase 3: Finishing Touches and Serving
The final steps bring everything together for a stunning presentation.
Check for Doneness
Gently peel back a small section of husk. The kernels should be tender when pierced with a fork, and you’ll see a golden‑brown caramelization. If they need a minute more, return them to the grill and monitor closely.
Dress and Garnish
Transfer the corn to a serving platter. Sprinkle grated Parmesan over the hot kernels for a salty, nutty finish, and add a final drizzle of lime juice for brightness. The parsley already mixed in the butter provides a fresh, herbaceous note.
Serve Immediately
Grilled corn is best enjoyed while still warm. Offer guests butter‑dipped corn knives or sturdy forks for easy eating. Pair with your favorite side dishes and a chilled beverage for a complete summer feast.
💡 Expert Tips and Tricks
🛒 Choosing the Right Corn
When selecting corn, prioritize ears with bright green husks that cling tightly to the kernels. The silks should be moist and golden, not brown or dried. If you have access to a farmer’s market, ask the vendor when the corn was harvested; the fresher, the sweeter. For a deeper flavor, you can also try “white” corn varieties, which have a slightly nutty taste.
🔪 Preparation Techniques
To keep the kernels from drying out, never remove the husks entirely. Instead, pull them back, clean the silk, and then fold the husks back over the kernels. This creates a natural “steamer” effect, trapping moisture while still allowing smoke to flavor the corn. For an extra smoky aroma, add a few wood chips (like hickory or apple) to the charcoal.
🌡️ Mastering the Grill
Maintain a consistent medium‑high heat. If your grill runs hot, move the corn to the cooler side after the initial sear to prevent burning. Use a grill thermometer to keep the temperature around 400°F. Rotating the ears every few minutes ensures even char and prevents hot spots.
🍽️ Presentation and Service
Serve the corn on a rustic wooden board for visual impact. Add a small bowl of extra herb butter on the side for guests who want a richer coating. If you’re serving a large group, pre‑cut the kernels off the cob using a sturdy knife, then toss them with the butter glaze and serve in a large bowl.
🏆 Pro Tips
Professional chefs know that the smallest details separate a good dish from an unforgettable one.
- 🎯 Control the Smoke Level: Use a blend of hardwood chips (like cherry and oak) to create a balanced smoke profile. Too much smoke can overpower the corn’s natural sweetness, while too little leaves the flavor flat.
- 🎯 Butter Emulsion: Whisk the melted butter with the lime juice and parsley over low heat for 30 seconds before brushing. This creates an emulsion that clings better to the kernels and adds a silky mouthfeel.
- 🎯 Temperature Check: Insert an instant‑read thermometer into the thickest part of a kernel; it should read around 190°F (88°C) for perfect tenderness without becoming mushy.
- 🎯 Char Timing: The first 3–4 minutes of grilling should be focused on achieving a light char. After that, move the corn to indirect heat to finish cooking without burning.
- 🎯 Flavor Layering: Add a final sprinkle of flaky sea salt just before serving. The coarse crystals provide a satisfying crunch that contrasts with the soft kernels.
- 🎯 Portion Scaling: When scaling the recipe, keep the butter‑to‑corn ratio consistent. For every additional ear, add ½ tbsp of butter and ½ tsp of olive oil to maintain balance.
"Grilling is about respect – respect for the fire, the ingredients, and the moment." — Thomas Keller
🔄 Variations and Adaptations
This grilled corn recipe is a versatile canvas. Below are several ways to tailor it to different dietary needs, flavor preferences, and occasions.
🥬 Vegetarian/Vegan Version
The base recipe is already vegetarian. To make it fully vegan, simply replace the butter with a plant‑based alternative such as melted coconut oil or vegan margarine. Add a splash of nutritional yeast for a cheesy umami note.
- Replace butter with 2 tbsp melted coconut oil.
- Swap Parmesan with 2 tbsp nutritional yeast.
🌶️ Flavor Variations
Experiment with global spice blends to give your corn a new personality.
Spicy Mexican Style:
Add 1 tsp chili powder and a drizzle of chipotle hot sauce after grilling. Finish with crumbled Cotija cheese and fresh cilantro.
Mediterranean Twist:
Use a mixture of dried oregano, lemon zest, and a splash of extra‑virgin olive oil instead of smoked paprika. Garnish with crumbled feta and a sprinkle of sumac.
Asian Inspired:
Brush the corn with a blend of soy sauce, sesame oil, and a pinch of five‑spice powder. Top with toasted sesame seeds and chopped scallions for a savory, umami‑rich finish.
⚠️ Dietary Adaptations
Gluten‑Free:
This recipe is naturally gluten‑free. Ensure any added sauces or seasonings are certified gluten‑free.
Lactose‑Free:
Substitute the butter with lactose‑free margarine or a dairy‑free butter blend. The flavor remains rich and satisfying.
Low‑Calorie:
Reduce the butter to 1 tbsp and replace half of the olive oil with a light cooking spray. Increase the lime juice to 2 tbsp for extra brightness without added calories.
👶 Kid‑Friendly Version
Kids often love corn but may be sensitive to strong spices. Omit the smoked paprika and red pepper flakes, and use a mild herb butter made with just parsley and a pinch of salt. Serve with a side of honey‑drizzled yogurt dip for a sweet‑savory combo that appeals to younger palates.
📦 Storage and Reheating
🧊 Conservation
Refrigerator:
- Duration: 3 days
- Container: Airtight glass container or zip‑lock bag
- Tip: Store the corn in its husk to retain moisture.
Freezer:
- Duration: 2 months
- Method: Blanch the corn for 3 minutes, cool in ice water, dry, then wrap each ear tightly in foil before placing in a freezer bag.
- Defrosting: Transfer to the refrigerator overnight or use the microwave’s defrost setting.
💡 For best texture, reheat only the portion you’ll eat rather than the whole batch.
♨️ Reheating
🔥 Oven (Recommended):
- Preheat to 180°C (350°F).
- Wrap each ear in aluminum foil with a drizzle of butter.
- Reheat for 10 minutes.
- Unwrap, brush with fresh herb butter, and grill for 2 minutes for a crisp finish.
⚡ Microwave (Quick):
- Place the corn on a microwave‑safe plate.
- Cover with a microwave‑safe lid or another plate.
- Heat on medium power for 2 minutes, then flip and heat another 1‑2 minutes.
- Stir in a little extra butter before serving.
🍳 Stovetop:
Heat a large skillet over medium heat, add a splash of oil, and sauté the corn for 3‑4 minutes, turning frequently, until heated through and lightly crisped.
🍷 Perfect Pairings
🥗 Side Dishes
- Grilled Avocado Salad: Creamy avocado, cherry tomatoes, and a lime‑cilantro vinaigrette complement the corn’s sweetness.
- Spicy Black Bean Slaw: Crunchy cabbage, black beans, and a jalapeño‑lime dressing add heat and texture.
- Herb‑Infused Quinoa Pilaf: Light, fluffy quinoa with fresh herbs balances the richness of the butter glaze.
🍷 Wine & Beverage Matches
- Albariño (Spain): Its bright acidity and citrus notes cut through the buttery richness.
- Riesling (Off‑dry): The subtle sweetness mirrors the corn’s natural sugars while refreshing the palate.
- Non‑Alcoholic: Sparkling cucumber‑mint water provides a crisp, hydrating contrast.
🍰 To Complete the Meal
Begin with a light citrus gazpacho or chilled cucumber soup to awaken the palate. Follow the corn with a grilled salmon or marinated chicken breast for protein. Finish with a simple vanilla bean panna cotta topped with fresh berries, allowing the sweet, creamy dessert to echo the corn’s natural sweetness without overwhelming the senses.
❓ Frequently Asked Questions
Q: Can I use frozen corn instead of fresh?
While fresh corn offers the best flavor and texture, frozen kernels can be used in a pinch. Thaw them completely, pat dry, and follow the same seasoning steps. Expect a slightly softer bite, as frozen corn loses some of its natural crispness during the freezing process.
Q: How do I prevent the husks from burning?
Soaking the shucked corn in cold water for at least 10 minutes creates steam inside the husk, reducing the chance of flare‑ups. Additionally, keep the grill’s lid closed and monitor the heat; move the corn to the cooler side of the grill if you see excessive charring.
Q: What if I don’t have a grill?
You can achieve a similar char using a broiler. Place the seasoned corn on a baking sheet, set the oven to broil, and cook for 4–5 minutes per side, watching closely to avoid burning. The flavor will be slightly less smoky but still delicious.
Q: Can I add other herbs to the butter glaze?
Absolutely! Fresh thyme, dill, or cilantro work beautifully. Add them in the same proportion as the parsley (2 tbsp) and adjust the lime juice if you want a more herbaceous profile.
Q: How do I make the corn extra sweet?
Lightly brush the kernels with a thin layer of honey or maple syrup before the final butter glaze. The sugars will caramelize during the last minutes of grilling, intensifying the natural sweetness.
Q: Is it possible to prep this recipe ahead of time?
Yes. You can shuck, clean, and season the corn up to 2 hours before grilling. Keep the seasoned ears covered in the refrigerator. Brush with the butter glaze just before placing them on the grill to maintain a fresh, glossy finish.
🎉 Let’s Get Cooking!
Grilled corn on the cob is more than a side dish; it’s a celebration of summer’s bounty, a canvas for creativity, and a crowd‑pleasing favorite that never disappoints. By following the precise steps, using the freshest ingredients, and embracing the pro tips, you’ll produce corn that’s smoky, buttery, and perfectly charred every single time.
Remember, the secret lies in the balance of heat, seasoning, and timing. Adjust the portion sizes with the handy control below, experiment with the suggested variations, and most importantly, enjoy the process of cooking outdoors. Your guests will taste the love and care you put into each ear.
Have you tried this recipe?
Leave a comment and rating below! Share your photos on Instagram with #GrilledCornJoy for a chance to be featured.
Corn on the Cob Grilled
Smoky, buttery corn on the cob that turns a simple vegetable into a star of any summer spread.
📝 Ingredients
Grilled Corn
Herb Butter Glaze
Optional Garnish
👨🍳 Instructions
- 1
Shuck the corn, remove all silk, and rinse under cold water. Pat dry.
- 2
Combine olive oil, smoked paprika, garlic powder, sea salt, and black pepper to create a rub.
- 3
Brush the rub onto each ear, ensuring even coverage through the husk openings.
- 4
Preheat grill to medium‑high (≈400°F). If using charcoal, set up a two‑zone fire.
- 5
Place corn on the grill, husks up. Grill 10‑12 minutes, turning every 2‑3 minutes.
- 6
While hot, brush each ear with melted butter, parsley, and lime juice. Sprinkle red pepper flakes if desired.
- 7
Check doneness by piercing a kernel; it should be tender and lightly charred.
- 8
Optional: Sprinkle grated Parmesan over the hot kernels for a salty finish.
- 9
Transfer to a serving platter, garnish with extra parsley, and serve immediately.
- 10
Enjoy with your favorite side dishes and beverages.
🥗 Nutritional Information (per serving)
*Values are estimates based on standard ingredient data.


💬 Comments and Reviews
Leave a Comment
[Comments will appear here once submitted by readers]