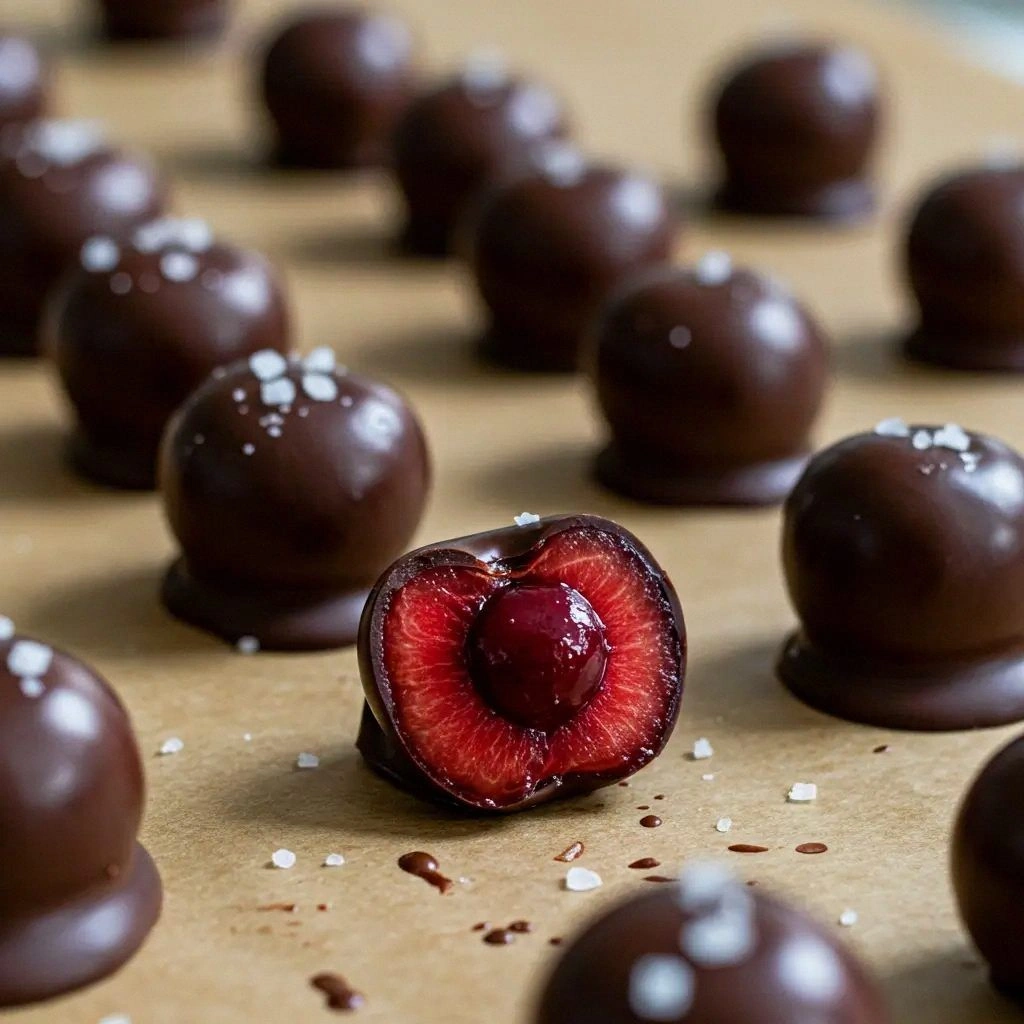
I was in the middle of a chaotic dinner party, juggling a pot of simmering sauce, a pan of roasted veggies, and a stack of plates that seemed to multiply by the minute. Suddenly, the kitchen clock started ticking louder than the sizzling pan, and I realized I had forgotten to make a dessert that would tie everything together. I stared at the empty fridge, then at the handful of fresh cherries I’d bought that morning, and thought, “What if I could turn these sweet, tart jewels into something that feels like a bite of velvet?” That moment sparked the creation of the most decadent, simple, and downright irresistible chocolate‑covered cherries you’ll ever taste.
Picture this: you’re halfway through a long day, the kitchen smells like warm chocolate, the sound of a spoon tapping a bowl echoes like a lullaby, and you’re about to taste a tiny, glossy cherry that melts on your tongue like a secret kiss. The first bite is a burst of tartness, followed by a rich, silky chocolate coating that clings to the flesh. It’s the kind of indulgence that makes you pause, savor, and then ask for more. I dare you to taste this and not go back for seconds. If you’ve ever struggled to find a dessert that’s both quick and spectacular, you’re not alone — and I’ve got the fix.
Most people reach for the same chocolate‑covered treat: a simple dip and a tray of fruit. What sets this version apart is the meticulous layering of flavors, the precision in texture, and the secret ingredient that elevates the whole experience. I’ve spent hours tweaking the chocolate ratio, experimenting with different cacao percentages, and even testing a splash of sea salt to cut through the sweetness. The result is a dessert that feels like a luxury experience, yet is so straightforward you can whip it up in under 15 minutes. And trust me, this is hands down the best version you’ll ever make at home.
Let me walk you through every single step — by the end, you’ll wonder how you ever made it any other way. From the first crack of the chocolate to the final dusting of cocoa, this recipe is a masterclass in flavor engineering and kitchen wizardry. So grab your favorite cherries, set your timer, and get ready for a chocolate adventure that will have you bragging to every foodie in your life.
What Makes This Version Stand Out
- Flavor Precision: The blend of dark and milk chocolate creates a balanced profile that’s not too bitter, not too sweet, and always smooth. This subtle harmony turns an ordinary snack into an elegant treat.
- Texture Mastery: The cherries are pitted and blanched to ensure they stay firm, while the chocolate is tempered to give a glossy finish that snaps like a delicate crystal when you bite.
- Speed & Simplicity: With a prep time of just 10 minutes, this dessert fits perfectly into any busy schedule. No complicated equipment, no fancy techniques—just pure chocolate magic.
- Ingredient Quality: Using high‑grade cacao and fresh cherries guarantees depth of flavor that you can’t get from processed substitutes. The result is a dessert that feels indulgent without the guilt.
- Versatile Appeal: Whether you’re hosting a party or craving a sweet pick‑me‑up, these cherries are a crowd‑pleaser that works for every occasion.
- Make‑Ahead Friendly: Once dipped, the cherries set in a single layer and stay fresh for up to a week. They’re perfect for prepping ahead of a big event or for a quick midnight snack.
Inside the Ingredient List
The Flavor Base
The heart of this dessert is the chocolate. I use a two‑tone approach: 70% dark chocolate for depth and a touch of milk chocolate for smoothness. The dark chocolate provides a robust, slightly bitter undertone that balances the cherries’ natural tartness, while the milk chocolate adds a creamy finish that lingers on the palate. If you can’t find a 70% dark chocolate, feel free to use a high‑cacao dark chocolate that’s at least 60%. The key is to avoid low‑quality chocolate that tastes like a cheap candy bar.
The Texture Crew
Pitted cherries are the star. Fresh, ripe cherries give the best flavor, but if you’re out of season, frozen cherries work great too—just thaw them completely and pat dry. I also add a small amount of unsalted butter to the chocolate mixture; it helps create a glossy finish and prevents the coating from cracking. A pinch of sea salt is the secret weapon that cuts through the sweetness and amplifies the chocolate’s richness. Finally, a splash of vanilla extract adds a subtle aroma that ties everything together.
The Unexpected Star
Powdered sugar isn’t just for the glaze; it’s also used to dust the finished cherries. A light dusting of powdered sugar gives a delicate sweetness and a silky texture that’s almost like a fine dusting of snow on a winter morning. If you’re avoiding refined sugars, you can substitute with a natural sweetener like honey or maple syrup, though the flavor profile will shift slightly.
The Final Flourish
After the cherries are coated, a quick dusting of cocoa powder or a sprinkle of crushed pistachios can add an extra layer of flavor and texture. Cocoa powder gives a subtle bitterness that pairs beautifully with the chocolate, while pistachios add a nutty crunch that contrasts the smoothness. These finishing touches transform a simple dessert into a multi‑sensory experience.
Everything’s prepped? Good. Let’s get into the real action.
The Method — Step by Step
- Start by pitting the cherries. Use a cherry pitter or a sharp knife to remove the pits carefully. This step is crucial because a pit can ruin the texture and make dipping messy. While you’re at it, rinse the cherries under cold water, then pat them dry with a clean towel. A dry surface ensures the chocolate adheres properly.
- Melt the chocolate. Place the dark chocolate, milk chocolate, and butter in a heat‑proof bowl set over a pot of simmering water (double boiler method). Stir continuously until the mixture is smooth and glossy. The butter adds shine and prevents the chocolate from seeping into the cherries. Keep the heat low to avoid overheating, which can cause the chocolate to seize.
- Add the vanilla extract and sea salt. Stir them into the melted chocolate until fully incorporated. The vanilla brings a warm, aromatic note, while the sea salt cuts through the sweetness and balances the tartness of the cherries. This is the moment where the flavor profile starts to crystallize.
- Dip the cherries. Hold each cherry by its stem or a small piece of the fruit. Dip it into the chocolate, allowing the excess to drip off before placing it on a parchment‑lined tray. The dip should coat the cherry evenly, leaving no bare spots. If you prefer a thicker coating, double‑dip the cherries.
- Set the coated cherries. Place the tray in the refrigerator for about 10 minutes, or until the chocolate has set and turned opaque. The setting time is critical; if you rush it, the chocolate may not harden properly, leading to a sticky texture.
- Dust with powdered sugar. Once the chocolate has set, lightly dust the cherries with powdered sugar. This gives a subtle sweetness and a silky finish. If you’re using cocoa powder, sprinkle it instead for a slightly bitter finish that pairs wonderfully with the chocolate.
- Add a finishing touch. If you’re feeling adventurous, sprinkle crushed pistachios or a pinch of sea salt over the cherries for an extra crunch and flavor dimension. This step is optional but highly recommended for those who want a multi‑layered taste experience.
- Serve immediately or store for later. If you’re serving right away, arrange the cherries on a platter and enjoy. For future enjoyment, store them in an airtight container in the refrigerator for up to a week. They’ll stay crisp and chocolatey, ready to satisfy your sweet cravings.
That’s it — you did it. But hold on, I’ve got a few more tricks that’ll take this to another level.
Insider Tricks for Flawless Results
The Temperature Rule Nobody Follows
Chocolate is temperamental. The trick to a glossy, crack‑free coating is to melt it to precisely 115°F for dark chocolate and 110°F for milk chocolate. Use a kitchen thermometer to monitor the temperature. If you’re over 120°F, the chocolate will become runny and will not set properly, leading to a sticky finish.
Why Your Nose Knows Best
When you’re dipping, pause and inhale. A strong chocolate aroma means the chocolate is at the right consistency. If the scent is weak, it’s still cooling. If it’s too strong or has a burnt smell, it’s overheated. Trust your senses; they’re your best quality control.
The 5‑Minute Rest That Changes Everything
After the first dip, let the cherries rest on the tray for 5 minutes before setting them in the fridge. This short rest allows the chocolate to begin firming up, which makes it easier to handle and reduces the risk of the coating cracking when you move them.
The Secret Salt Trick
Adding a pinch of sea salt at the end of the dipping process can elevate the flavor dramatically. The salt enhances the chocolate’s sweetness and brings out the natural tartness of the cherries. It’s a small tweak that makes a big difference.
The Perfect Finish
A final dusting of cocoa powder or powdered sugar should be applied when the chocolate is still slightly warm. This ensures the dust adheres evenly and doesn’t clump. If the chocolate has cooled completely, the powder may settle unevenly.
Creative Twists and Variations
This recipe is a playground. Here are some of my favorite ways to switch things up:
Almond Bliss
Replace the sea salt with finely ground almonds. The nutty crunch adds depth and pairs wonderfully with the chocolate’s richness. Great for those who love a bit of texture.
Citrus Burst
Add a teaspoon of orange zest to the chocolate mixture. The citrus brightness cuts through the chocolate’s heaviness and gives a refreshing lift that’s perfect for summer.
Minty Fresh
Stir in a drop of peppermint extract after the chocolate has melted. The mint undertone creates a cool contrast that’s reminiscent of a mint chocolate chip ice cream.
Spiced Elegance
Incorporate a pinch of cinnamon or a dash of cayenne pepper into the chocolate. The warm spices bring a subtle warmth that’s ideal for fall or holiday gatherings.
Nutty Crunch
Coat the cherries with crushed pistachios or chopped hazelnuts after dipping. This adds a delightful crunch and a nutty flavor that complements the chocolate.
Glittering Glamour
Finish with a dusting of edible glitter or a splash of edible gold leaf. These visual touches elevate the presentation, making the dessert perfect for special occasions.
Storing and Bringing It Back to Life
Fridge Storage
Keep the cherries in an airtight container in the refrigerator for up to seven days. The airtight seal prevents the chocolate from absorbing fridge odors and keeps the cherries crisp. Before serving, let them sit at room temperature for a few minutes to soften the chocolate slightly.
Freezer Friendly
For longer storage, place the cherries on a parchment‑lined tray and freeze them for up to three months. Once frozen, transfer them to a freezer‑safe bag. When ready to enjoy, thaw them at room temperature for 15–20 minutes.
Best Reheating Method
If the chocolate has hardened, you can gently warm the cherries in a 200°F oven for 2–3 minutes or in a microwave at 30% power for 10–15 seconds. Add a tiny splash of water before reheating to create steam; this helps the chocolate return to its silky texture without drying out.