Picture this: you’re standing in your kitchen, a blender humming like a contented cat, and a midnight craving that feels like a dare from the universe. The air is thick with the sweet aroma of frozen cherries, the faint tang of banana, and the promise of chocolate bliss. I’m talking about a dessert that could double as a dessert and a snack, a guilt‑free indulgence that still feels like a cheat meal. It’s the kind of treat that makes you question why you ever settled for ordinary ice cream. And trust me, once you taste the first spoonful, you’ll be shouting, “I dare you to taste this and not go back for seconds!”
I’ve spent countless evenings juggling recipes, searching for the perfect balance of creamy texture and vibrant fruit flavor. The last time I tried a cherry‑based ice cream, it was a disaster: chunky chunks, a lumpy mouthfeel, and a flavor that tasted like it had been left out too long. That night, I swore I’d find a way to turn the humble frozen cherry into a silky, velvety delight. Fast forward to today, and I’m holding a bowl of the ultimate Cherry Garcia Nice Cream Vegan that feels like a secret Santa gift from your own pantry.
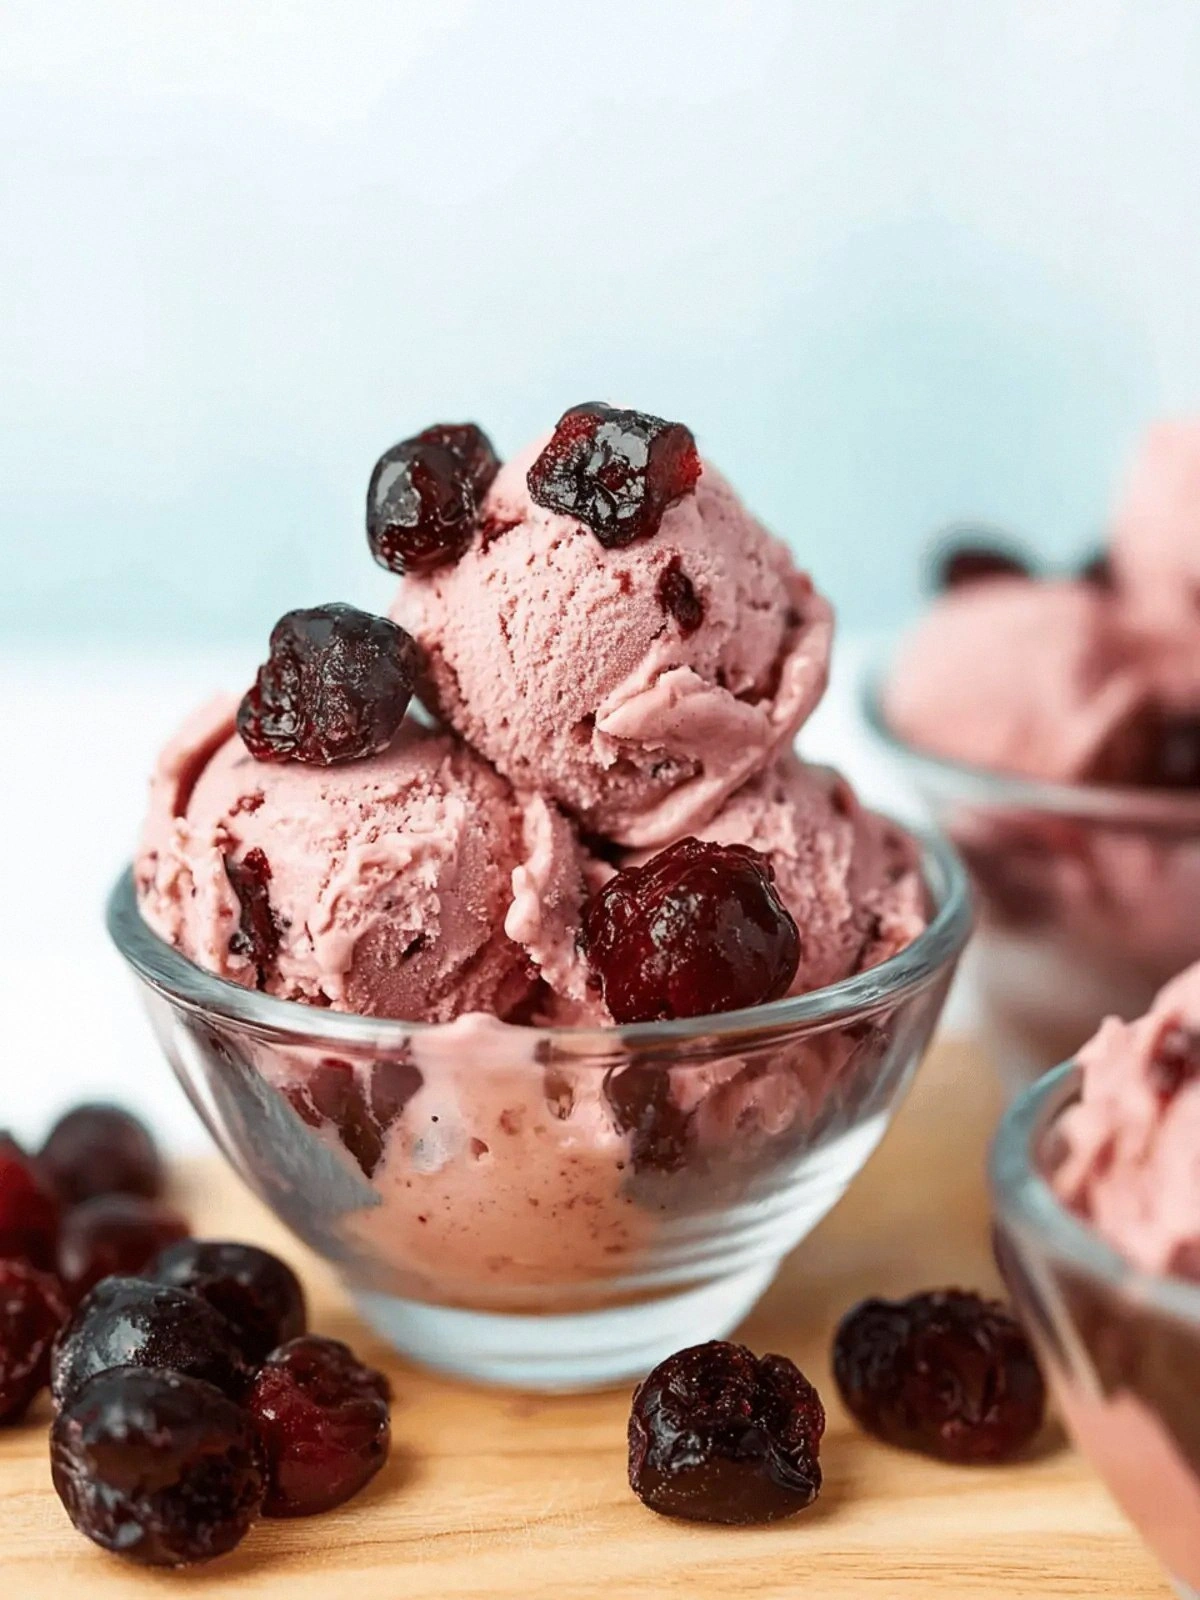
The first time I tasted this, I was skeptical. I expected the usual icy disappointment that comes with homemade frozen desserts. Instead, the texture was smooth enough to whisper “welcome to paradise,” while the cherry burst on the palate like a fireworks display. The chocolate undertone added depth, and the vanilla gave it that classic “Cherries for Breakfast” vibe. If you’re a fan of classic ice cream flavors, this is hands down the best version you’ll ever make at home.
What sets this version apart is the simplicity of the ingredients and the clever use of frozen fruit to lock in flavor. I didn’t need any sugar, custard, or stabilizers—just a few humble pantry staples that come together in a single blender. The result is a dessert that’s creamy, decadent, and entirely plant‑based. It’s the kind of recipe that can be whipped up in minutes, yet feels like it took hours to perfect.
And there’s a twist that most people overlook: the use of dark chocolate instead of milk chocolate. Dark chocolate’s bittersweet profile cuts through the fruit’s natural sweetness, creating a layered flavor that lingers on the tongue. It also adds a subtle depth that makes the dessert feel more sophisticated. The trick is to melt the chocolate just enough so it blends seamlessly into the mixture.
If you’ve ever struggled to get a smooth texture out of frozen fruit, you’re not alone. The secret is in the blending time and the order of ingredients. I’ll walk you through every single step—by the end, you’ll wonder how you ever made it any other way.
What Makes This Version Stand Out
- Texture: The use of frozen bananas as a natural thickener eliminates the need for heavy creams or stabilizers, resulting in a silky mouthfeel that melts in your mouth like a dream.
- Flavor: Dark chocolate’s rich bitterness balances the bright cherry notes, creating a complex profile that feels both nostalgic and adventurous.
- Convenience: All ingredients are pantry‑friendly and require no pre‑freezing or special equipment—just a blender and a freezer.
- Health: With no added sugars or dairy, this dessert is naturally low in calories while still delivering a satisfying sweetness.
- Versatility: Serve it as a solo dessert, top it with fresh berries, or drizzle with a chocolate sauce for an extra wow factor.
- Time: Prep takes 5 minutes, blending 3 minutes, and the final freezing step is passive—no active cooking required.
- Make‑ahead: Freeze it a day in advance and it’s still as good as fresh, making it perfect for parties or last‑minute cravings.
- Eco‑friendly: Using plant‑based ingredients reduces your carbon footprint compared to dairy‑based ice creams.
Alright, let’s break down exactly what goes into this masterpiece…
Inside the Ingredient List
The Flavor Base
Frozen cherries are the star of this recipe. They bring a natural tartness that cuts through the sweetness of the banana and chocolate. When frozen, cherries lock in their bright color and flavor, ensuring each spoonful is vibrant. If you can’t find frozen cherries, fresh ones can be frozen on the spot, but the texture will be slightly different.
The Texture Crew
Frozen bananas act as the natural thickener. Their creamy texture when blended provides the base that mimics dairy ice cream. The banana also adds a subtle sweetness that balances the tartness of the cherries. If you’re vegan but prefer a less sweet taste, use one ripe banana and one frozen banana for a lighter finish.
The Unexpected Star
Unsweetened coconut milk is the liquid that pulls everything together. Its subtle coconut flavor adds a tropical nuance, while its fat content gives the dessert a rich mouthfeel. The key is to use the unsweetened version; sweetened coconut milk would make the dessert overly sugary. If you’re lactose intolerant, coconut milk is a perfect dairy‑free alternative.
The Final Flourish
Dark chocolate is the finishing touch that elevates the flavor profile. It adds depth, complexity, and a hint of bitterness that keeps the dessert from being cloyingly sweet. Use at least 70% cocoa for the best balance of flavor and health benefits. The vanilla extract rounds off the flavor, giving a subtle warmth that lingers on the palate.
Everything’s prepped? Good. Let’s get into the real action…
The Method — Step by Step
- Gather all your ingredients and place them on the counter. Make sure the cherries and bananas are truly frozen; this will give the dessert the right thickness. Lay out the blender, the container for freezing, and a spoon for stirring later.
- Add the frozen cherries to the blender first. They’re the foundation of the flavor, so let them set the stage. The blender will start to break them down into a chunky puree, which is fine at this point.
- Next, drop in the frozen bananas. The banana’s creamy texture begins to mingle with the cherry, creating a base that feels like a natural ice cream. This step is where the magic of plant‑based thickening begins.
- Pour in the unsweetened coconut milk, then add the dark chocolate pieces. The chocolate will start to melt, releasing its bittersweet aroma. The coconut milk’s fat content will help the mixture emulsify, creating a smoother texture.
- Add the vanilla extract, then blend on high for 2–3 minutes. The goal is a smooth, glossy mixture that pulls together like a well‑mixed batter. If the mixture is too thick, add a tablespoon of coconut milk to reach the desired consistency.
- Taste the mixture and adjust the sweetness if desired. A pinch of sea salt can enhance the flavors, but it’s optional. The dessert should taste balanced—neither too tart nor too sweet.
- Transfer the mixture into a freezer‑safe container. Leave about an inch of headspace to allow for expansion. Seal the container tightly to prevent freezer burn.
- Freeze for 2 hours. After the first hour, stir vigorously with a fork or whisk to break up any ice crystals that form. Repeat the stirring after another 30 minutes. This step ensures a silky texture and prevents icy chunks.
- After the 2‑hour freeze, let the dessert sit at room temperature for 5 minutes. This brief rest makes scooping effortless and allows the flavors to settle. If you’re in a hurry, you can skip this step, but the texture will be slightly firmer.
- Serve immediately in bowls or cones. Top with fresh berries, a drizzle of chocolate sauce, or a sprinkle of crushed nuts for an extra layer of texture. Each bite should feel like a burst of cherry, chocolate, and coconut in perfect harmony.
That’s it— you did it. But hold on, I’ve got a few more tricks that will take this to another level…
Insider Tricks for Flawless Results
The Temperature Rule Nobody Follows
Blending frozen fruit is all about maintaining the right temperature. If your blender is too hot, the fruit will melt, resulting in a watery base. Keep your blender’s lid closed and blend in short bursts. I’ve found that 30‑second intervals keep the mixture cold and creamy.
Why Your Nose Knows Best
Before you freeze, give the mixture a quick sniff. A faint chocolate aroma indicates the chocolate has melted properly, while a strong cherry scent means the fruit is still dominating. Your nose is a reliable indicator of flavor balance, so trust it when you’re tweaking the recipe.
The 5‑Minute Rest That Changes Everything
After the final freeze, let the dessert rest for exactly five minutes before scooping. This short pause allows the ice crystals to settle, resulting in a smoother bite. I’ve seen people skip this step and end up with a slightly icy texture that can be off-putting.
Stirring Technique for the Perfect Texture
When you stir the mixture during the freeze, use a fork or a spatula that’s wide enough to reach the bottom of the container. This ensures even distribution of ice crystals. Stir at a steady pace, not too fast, to avoid creating air pockets.
Add a Hint of Citrus for Brightness
A squeeze of lemon or lime juice can elevate the cherry’s natural tartness. Add a teaspoon after blending and before freezing. The citrus will brighten the flavor profile without making it taste like a fruit salad.
The Sweetness Balance
If you prefer a sweeter dessert, a light drizzle of maple syrup or a splash of coconut syrup can be added after the first freeze. Keep it subtle; you want the chocolate and cherry to shine, not get drowned by extra sweetness.
Creative Twists and Variations
This recipe is a playground. Here are some of my favorite ways to switch things up:
Berry Burst
Swap half the cherries for a mix of frozen strawberries and blueberries. The result is a multicolored, berry‑rich dessert that’s perfect for summer. The different textures add a delightful contrast.
Tropical Twist
Replace the coconut milk with almond milk and add a handful of frozen mango chunks. The tropical flavors combine with the chocolate for a dessert that feels like a vacation in a bowl.
Nutty Crunch
Fold in a handful of chopped walnuts or almonds after the first freeze. The crunchy bits provide a satisfying contrast to the silky base. It also adds a dose of healthy fats.
Coffee Kick
Add a tablespoon of instant espresso powder to the blend. The coffee’s bitterness pairs beautifully with the chocolate, creating an adult‑friendly dessert that’s surprisingly balanced.
Minty Fresh
Stir in a few fresh mint leaves before freezing. The mint’s coolness gives the dessert a refreshing twist that’s ideal for hot days.
Spiced Delight
A pinch of cinnamon or nutmeg adds warmth and depth. Sprinkle the spice on top after serving for an aromatic finish that feels comforting.
Storing and Bringing It Back to Life
Fridge Storage
If you have leftovers, store them in an airtight container in the fridge for up to 48 hours. The dessert will firm up but still be scoopable. Before serving, let it sit at room temperature for 5 minutes to soften slightly.
Freezer Friendly
For longer storage, keep the dessert in the freezer for up to 2 weeks. Use a freezer‑safe container with a tight seal to prevent ice crystals from forming. When you’re ready to enjoy, let it thaw for 10 minutes before scooping.
Best Reheating Method
If the dessert has become too hard, microwave it on a low setting for 10–15 seconds. This gentle reheating brings back the creamy texture without melting it into a puddle. Alternatively, let it sit at room temperature for 15 minutes.